
Don't get me wrong, natural light and golden hour are gorgeous and a huge part of what we do. But, in addition to these types of photographs, we have built our name on imagery that differs from the typical wedding or couples photograph. Our studio (Lin and Jirsa Photography) has become known for unique and epic environmental portraits. While almost every client wants golden hour imagery, these stand-out epics help draw clients to our brand in the first place.
In this article, I want to show you a technique we call the "whip pan." It's a nighttime portrait technique that works very well in city-based locations where you have background lights that can be used for effect. This technique not only creates unique imagery but is also one of those "tricks" that can really wow a client when pulled off.
The following article contains excerpts from our video workshop, "Unscripted | Photo Shoot BTS, Season 1," on SLR Lounge. In this Premium Workshop, you will see us capture real engagements and weddings, get a glimpse of our camera settings, and hear our client communication and posing directions.
Here's how to execute the whip pan in seven simple steps.
1. Place The Camera On A Tripod
The whip pan technique requires a bit of precision, especially if you need to create a composite in post using multiple images (more on that later). First, set up your tripod, securely place your camera on it, and make sure the horizon is level in your viewfinder. Next, frame and compose your shot. The background should have enough points of light to create interesting light streaks when you pan the camera left and right, which brings us to one last item; be sure to loosen the lock on your ball head for horizontal panning movement.
2. Select Ambient Exposure With Shutter (Recommended: 1" to 2")
 (Canon 5D Mark III, Canon 35mm f/1.4 at f/5, 1-second shutter speed, ISO 100, 5500K; color temperature adjusted during post-production to 3000K - as seen on the right)
The "whip pan" technique uses slow shutter speeds (usually 1" to 2") and quick camera movements to capture motion blur in a scene; therefore, when adjusting your settings to dial in ambient exposure, slow the shutter speed to approximately 1" to 2" and then set the aperture and ISO accordingly. Unfortunately, there is no one-setting-fits-all for these types of shots, but you can see our settings in the image above.
For more information on shooting in low light situations, check out these behind-the-scenes videos from one of our nighttime engagement sessions.
3. Place Off-Camera Flash To Add A Backlight
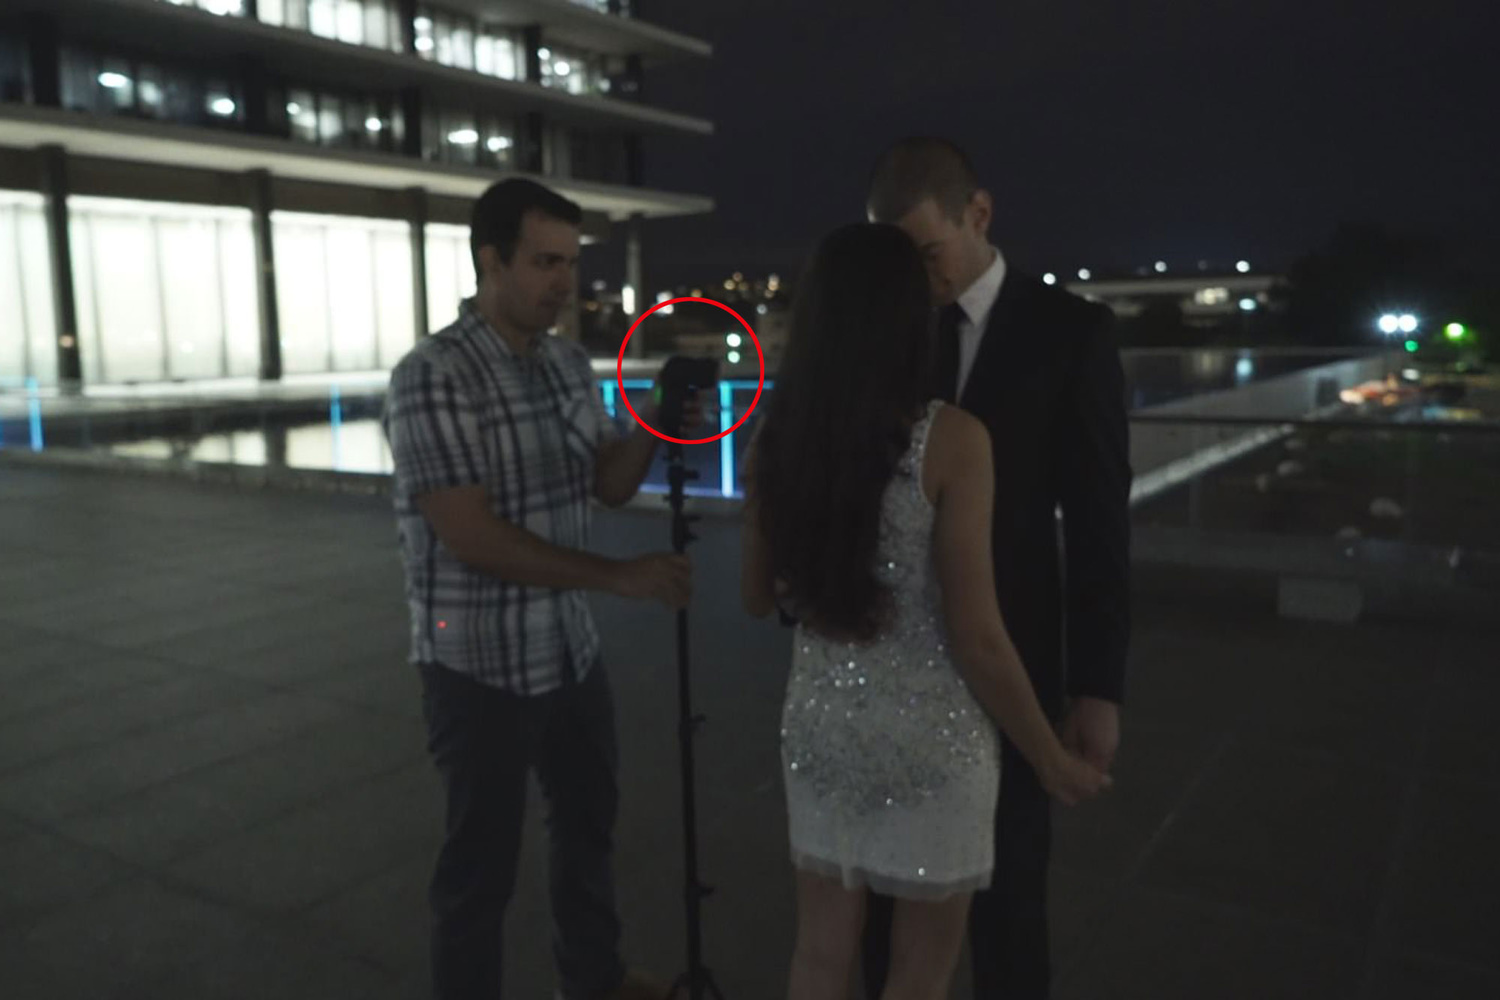
Next, add an off-camera flash to backlight the subjects and separate them from the background. In the image above, I placed the flash close to the subjects and angled the light toward the male subject's white shirt to bounce a little extra light back onto both subjects, which helped define their features in the final image.
Using a flash also helps counter the slow shutter speed as it freezes your subjects in place. You can make the artistic decision to add a full CTO gel to the flash or not, but we chose to add a gel to warm the couple's skin tone in-camera and then "cool" the overall image in post-production, resulting in a blue-ish background and a couple with normal skin tones (see the final image in step seven below).
4. Pose Subject(s)
There are a number of poses you can direct your subjects into (see the video above for a quick overview of our Foundation Posing Framework), but you should consider the mood and purpose of the image before deciding on any particular one. For our whip pan image, we chose a closed pose because this technique draws extra attention to the lights and to the environment in general. It would probably look awkward if the subjects were asked to look directly into the camera. This epic shot is more about the scene and less about the couple's expressions.
Once you have posed your subjects for the shot, let them know to stand still as the slow shutter speed will increase the chances of capturing movement within the image, which could leave the subjects looking out of focus.
5. Plate Shot
 (Canon 5D Mark III, Canon 35mm f/1.4 at f/7.1, 1-second shutter speed, ISO 100)
One of the shots you'll need to take is a plate shot, which is used as a "clean" shot of the scene, without motion blur or other distractions (see above). In a worst-case scenario, we can use plate shots and blend them with motion images in Photoshop to create a composite that matches our vision.
6. Capture Image With Whip Pan (Left/Right In Quick Motion With Slow Shutter)

Position your subjects within the frame and then press the shutter button. With the shutter still open, pan the camera to the left and right. The slow shutter speed combined with the panning motion should result in long lines of light that reach across the image. It's worth noting that the slower the shutter speed, the longer the light streaks will be.
7. Create A Composite Image In Photoshop (If Necessary)

If you can nail the shot in camera, great. If not, create a composite by combining the images (your plate shot as well as your whip pan shot) and masking the layers in Photoshop. You can find more information on how to create a composite image in post here. Be sure to create a soft transition between the photos in order to make the composite less obvious.
Tip: Place your couple in an area where the lights will not blend over them (black background). That way, the slow shutter speed and whip pan motion will blur the lights in the background while the flash freezes the couple.
Final image:
![]() (Final image - above: Canon 5D Mark III, Canon 35mm f/1.4 at f/7.1, 1-second shutter speed, ISO 100)
(Final image - above: Canon 5D Mark III, Canon 35mm f/1.4 at f/7.1, 1-second shutter speed, ISO 100)
To learn more useful tips and strengthen your foundation of photography education, consider becoming an SLR Lounge Premium Member and receive access to hundreds of gold standard lighting, postproduction, and posing tutorials. The images used in this article are from our workshop, “Unscripted | Photo Shoot BTS - Season 1.”


You could do this as a photograph if you "flag" the bottom half of the frame after the flash, but photoshop is photography always now. Not trying to be negative, just seems like there is never any "photography tips" anymore just photo illustrations. I do photo illustrations for work and marketing. I also like photography. It is fun to do both.
Wouldn't you want it before the flash? Flag it and then right before the flash goes off remove it, so the flash captures the still couple, or am I missing something.
I would consider doing this in post similar to the tut, though I feel your sentiment.
It could be done in camera, yeah, but trial and error are the 2 worst assistants if getting paid.
I get you though, it's a downer when it feels like people spend 1 hour making the shot, 3 minutes processing it, and then 4+ hours Photoshopping -that's not photography.
This feels like a good use though, and is fast (-er than in camera for a lot of people).
I definitely wouldn't say 4+ hours for this composite more like 4 min but meh I can see OP doesn't like people using photoshop which is what I picked up first before a camera.
Unless I'm misunderstanding your explanation, I don't think that would work. I can't see any way to do it in camera. Their description, panning left and then right, doesn't account for the final shot, either.
You just cover the lens at the top, flash, then pull the cover to the bottom, wiggle the camera Its not that tricky.
But the blur was at the bottom as well. Just not at the bottom center. I'm going to try it but I'll do it both ways just to cover my bases.
We do this in-camera, and sometimes in post with a plate. The main trick to getting it right in-camera is having a dark area in the frame to place the couple. But, it's a 30 - 60 second job in PS to simply layer and mask, so I don't know that I would consider this a full on photo illustration. But, to each their own.
Wouldn't you have more luck getting it 'in camera' with the flash set to Rear Curtain Sync? I'd still go to town on Photoshop to perfect the image but Rear Curtain Sync would freeze the couple at the end of the movement. I guess it would depend on where you finished the frame before the shutter closed though.
I was just about to suggest the same thing Jonathan! So funny that you said that. You could even kick it up a notch by adding a second light on the front of the couple. Even bring that one way down to give just a hint of a fill. It would also act as a stopping facto for the motion of those panning. I tried a different take on this idea sans the panning. Instead using 2nd curtain flash to capture the flashlight motion.
i thought of the rear curtain freeze trick too ...
but that trick works well mostly when the main subject is moving too (say riding on a bike) and the photographer is also moving alongside the subject (say on another tracking device moving perpendicularly to the subject on the bike) and we want to capture the main subject 'frozen in time' while the background is going to be blurry ...
it's not the case here though, where the couple are still ... and are supposed to remain fully / sharply still too, simply because in the main subject moving case mentioned above, the subject will still be a little blurry due to the existing light of the street being recorded as well, while the flash's high speed 'shutter' lets a frozen image of the moving subject be captured and superimposed on its blurry image just as well ... a nice effect, but not the same as this one ...
_ _ _
there is a blur motion effect in Photoshop that can make any similar background look like this btw ... if we are to use more than one shot to acheive this effect, we don't really need the long exposure trick although it's worked nicely here anyway ...
Nope. Using rear curtain sync makes the process more difficult since you would have to account for exactly where the couple is in the frame when your movement stops. Easier to flash at the beginning with them framed properly, then add the motion.
Didn't think of that! Good cal.
nice shot ... useful trick ...
what concerns me personally most in cases like this though, is the fact that how much time a photographer (myself included) can expect the subjects (in this case engagement or wedding couples) hang around and wait for 'live special effect setups' that usually take a long time to create?
after all, they are not professional paid actors under a contract, and we're not in a movie production studio, where certain actions and things are mandatory for everybody!
yes, if they want something fun and good and different, then you can always tell them their cooperation, as well as patience, is much needed and they'll usually accept it happily too ... but i believe doing things like this 'discreetly' and without tiring the subjects during the process is a much better idea ... time spent creating something like this on location can be spent at the desk in post processing too, without the subjects spending more than the required amount of time for the shoot ...
(remember: they are paying us to work for them, not the other way around!) ;-)
These shots take less than 5 minutes in-camera, about 2 minutes start to finish in post. Not sure your concern Shawk. I'd say don't practice on actual client shoots, get the technique down, then take it into your shoots.
IF a photographer CAN do things like this quickly (enough) without bothering a bride and groom (as well as their families and guests) in their most important day of their lives that happens ONLY ONCE, then it's surely ok, even necessary, when they're willing / ordering such shots too ...
as for me personally, though, i don't even 'push' my professional paid models to wait overly long, or even work harder than necessary, for each shot i take really ... i don't treat model shoots in a master / slave manner ... but well, that's me ... (some photogs such as Annie Liebowitz think exactly the opposite though! they actually believe 'torturing' the model is allowed if the photographer feels like it ... rather SDM i'd say ... not me! not in photography at least!) ;-)
https://www.masterclass.com/classes/annie-leibovitz-teaches-photography?...