There are a couple of things you can do to get sharper photos with your long lens. But what if we want to go even further? This lens hack might be a bit crazy, but it is the best I have ever seen because it really works, and it is feasible on location. Find out how to get sharper telephoto shots.
In my latest video on YouTube, I show how I have prepared my telephoto lens setup to get sharper photographs. The problem with long lens photography is that the longer you go with your focal length, the harder it is to prevent camera shake issues.

The angle of view gets less, and each wind gust and every vibration has a bigger impact on shaking. To compensate for that, we usually go shorter with our shutter speed by increasing the ISO or by opening the aperture. And this works, but there are limits. We want to choose an aperture that leads to the depth of field we need for our composition, and we want to get rid of ISO noise.
The Weak Point of Tele Lenses
With an extremely long focal length of 600mm, for instance, the angle of view is around four degrees, which is not much. A tiny shake of just a half degree only would lead to a total disaster. This is why I was always used to photographing with silent shutter when I was above 400mm. And if wind came into the game, I was always happy to have image stabilization on my 70-200mm lens. Image stabilization works fantastically. But there are situations where it simply doesn’t work, where you can do whatever you want, but you get a blurred photo due to shaking.
The Weak Point of Tripods
The connection between a long lens and a tripod sometimes involves a bracket. This is a good thing because it allows us to stay flexible with panning the lens around to fine-tune a composition. But from the mechanical side, we have to consider that the lens bracket operates like an anchor point, and ultimately, we get a kind of leverage effect. The longer the lens is, the more impact wind has. To get rid of that, we need a second anchor point.

Building a Second Anchor Point
We need a chain with a length of seven to ten feet, a carabiner, an Arca-Swiss mount, a screw with a lug, and a wire cutter. The heart of this camera hack is the chain, and the idea is basically to mount our camera on the chain. This might sound crazy, but again, it works. All we have to do is to fix the carabiner on the chain and fix the camera mount on the carabiner by using the lug screw. With that and our long lens, we go out in the field for photography.
Using the Chain Out in the Field
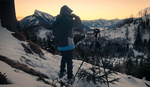
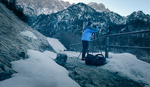
I don’t use this hack all the time, only when it is necessary to get sharp closeup shots with ISO 100 from a mountain that is miles away, even in windy situations. And as easy it was to put the parts together and as easy it is to use, I still mount my lens on the tripod as usual, then then I mount the chain on my camera.
If you thought it was already crazy to mount the chain on the camera, wait for the next step: it is all about stepping gently on the chain to get a tiny bit of tension, which leads to additional stabilization of the entire system. But please, be careful here: giving too much pressure could make your camera break and damage your lens mount or your camera body. In the above-mentioned video, you see how much tension I put on my Sony a7R IV with my Sony 200-600mm lens without risking anything. This worked fantastically, and I got stunningly sharp photographs with ISO 100, where I usually had needed ISO 640 or even above.

I also took the wire cutter to my photo spot, as it is a good idea to shorten the chain as you need to. Ultimately, it depends on the height of the tripod and the height of the photographer. I decided on a length of seven feet, but I would recommend trying yourself.
To see in detail how I put the chain together, how I used it out in the field, and what else you can do to get sharper photos, watch the video above. And feel free to leave a comment below this article if you also have experience with useful camera hacks.


I have a 25mm width carrying strap for my tripod that can serve the same purpose. The difference is that it connects to the tripod's hub, not the camera body, and eliminates the potential deflection caused by stepping on the chain. Just sayin'...
Excellent insight!
Very cool hack! I've often relied on software and post-processing to achieve a similar result. I choose a faster shutter speed (whatever the stabilization system can provide sharp shots at) and then use continous shutter to shoot a few dozen photos. Back at the computer I pick the sharp shots, align them in photoshop, and average them to reduce noise and improve detail. I've done this with a few hundred photos in the case of extreme telephoto landscapes (like 800mm moonrise shots) where the combination of wind + big telephoto makes long exposures impossible.
How long did it take to do that? It's always a balancing act to figure out which approach is more worth it: in-camera/in-PS. I guess I'm more comfortable trying to rig something like this on the day.
Interesting idea...
Might be just as easy to attach a monopod to the camera base and make it a "Quadpod". Just musing..
Interesting thought. The monopod addition might actually be less stressful on the lens mount than the chain tension method discussed here.
Brilliant idea to use a monopod. The monopod may not even have to touch the ground as the pendulum like effect will reduce the harmonic frequency of any camera shake. This will allow the camera compensation to work better. All this is theoretical, but I do leave my monopod on all the time as a brace for hand shooting even if off the ground.
Now all I need is a long lens with a lens mount.
All I have is a 70-300mm, so I might hold the lens with my hand while the camera is on a tripod. However, while on holiday, I don't carry a tripod, but a monopod only.
This is exactly what I was thinking. I tip from the video world.
It's rare that I'd shoot at 600 on a tripod and on the occasions that I use a tripod, I find the old trick of weighing it down works pretty well. The biggest issue is wind. Even a light breeze will be amplified by the structure of the tripod.
Mind you, I usually shoot the 200-600 handheld and it's rare that I have issues with shake showing up even at 100%. I also tend not to shoot anything very far away (>50 metres) because it's enough distance that atmospherics become an issue. Caveats for some days when the weather plays ball and doesn't have different temps/refractive indices between the camera and target!
I'd be worried about placing stress on the lens mount with your method to be honest. Also, thought of getting an aftermarket foot with AS mount? They're pretty cheap, have a more ergonomic design and removes the need for another mechanical interface that robs you of stability. Tripodhead.com have a really nice foot for the Sony 200-600 for only $79 US, though the one I have was from aliexpress for about $30NZ.
Just hook a length of elastic strap to your tripod hook. Vary the tension by stretching it... you're welcome!
This is cool. I've never tried it, but I see how my setup might benefit from putting it to use. I don't use a ball head with my Sony 200-600mm. I prefer to use either a gear head or a gimbal. With the gear head, you could set light tension on the chain and still move the screw gears to make fine adjustments.
Why not use a gimbal? Press your eye socket against the eye cup and steady the lens barrel with your spare hand. So that's three points steadying the rig.
Also try turning off OSS. Can get in the way with a SS of over 1/500s.
Here's my best camera hack for stabilization... with a couple of draw backs. This is my gimbal setup for when I was taking pictures of an eclipse a few years back. Now, I use it when I take pictures of birds in the rice paddies or monkeys raiding the pineapple fields, among other things.
The specifics. I have my 200-600mm and a 2x converter on my a7III. Then, because I could feel just a slight bit of movement in the bayonet connections, I got a long Arca-Swiss plate that mounts to both the lens foot and the camera body. This seems to stabilize all the movement that is caused by the on camera connections by adding an additional stressed frame member. I also remove the center post of the tripod, so that everything is sitting right on top of the legs.
The gimbal, I feel, is more stable than my gear head and both are more stable than any of my ball heads for my super-zoom lenses. Even at night, this is stable. Here's a pic I took of some guys drinking beer and smoking cigarettes outside the convenience store behind my house and another pic for reference. This is with the 2x converter at f/13. You can see the lit cherry on the end of the guy's cigarette. Don't judge these pictures for clarity, I was just goofing around to see what the camera and lens could do. I wasn't shooting for any awards.
The draw backs of this rig are: 1. No portrait mode. If you need a portrait, crop in post. 2. You're committed. With the long plate strapped to the lens foot and camera body, you're locked into using that lens. Changing lenses requires a few more minutes. 3. The plate can get in the way of extreme angles, up or down. I can't use this for moon or planet shots if they're straight overhead because the plate bangs into the gimbal. Besides, I prefer my gear head when taking moon and planet shots. It tracks better.
Interesting. Wouldn't replacing the chain with an elastic wire and attaching it to the tripod leg or the central column be easier?
I use the Django method
Monopod with up pressure.