
Have you ever noticed that your camera's autofocus is consistently back or front-focused? It may not be your fault. Check out this review and how-to on calibrating lenses using the Datacolor SpyderLensCal.
The Problem
While photographing at a job recently, I ran into a back-focus issue with a camera and a telephoto lens. The issue only appeared in that one combination, and the focus was practically useless, leaving me to focus manually. I wasn't sure if the lens needed a repair, but my gut said the lens and camera combination needed a calibration, as both components worked well apart from one another. It reminded me of my 1.4x teleconverter that I've never been impressed despite reviews stressing preservation of detail. The teleconverter had always been slightly out of focus, and with larger resolution image sensors, that issue was even more obvious. I decided to try calibrating my gear before sending anything out for repair, and I'm glad I did.
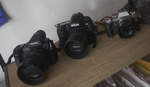
My (Nikon) cameras have an "Autofocus Fine-Tune" setting which I had never attempted to use. I have heard of camera repair shops offering a calibration service often for one camera body and two lenses around $100. With three DSLR cameras and six autofocus lenses, plus a 1.4x teleconverter, outsourcing the work would quickly add up even with a price break.
The Solution
To calibrate my autofocus lenses, I ended up ordering a Datacolor SpyderLensCal from B&H. It had positive reviews and included a built-in bubble level, which was a deal-maker. The camera's film plane, or, focal plane, will need to be totally parallel to the SpyderLensCal for it to work, so a level was a necessary inclusion. It also features a brass 1/4-20 mount to secure it to a tripod quick release plate.

Setup
For the best accuracy, both the SpyderLensCal and camera need to be level, parallel, and at the same height. I mounted the SpyderLensCal on a tripod and my camera on a tripod set at the same height. I found it simpler to use a tripod than a studio stand, as there are fewer moving parts to keep lined up, and I have three plates for my tripod head. The camera's LCD should show you enough detail to check focus as you calibrate each lens. That said, tethering to a computer shows finer detail and similar to using a remote or (two-second) timer, will ensure a sharper capture. You will need a tape measure to mark off designated distances from the camera to the SpyderLensCal. A depth-of-field calculator app verified that the included recommended distances split the depth of field for each lens/camera combination down the middle.
Camera Settings
Cameras should be set to aperture priority, with apertures as wide as possible for each lens. ISO should be at the normal low according to the manufacturer (i.e. ISO 200 for Nikon, ISO 100 for Canon, etc.), image stabilization/vibration reduction turned off, and disable any focus limiters on lenses. Zoom lenses should be extended to their maximum focal length, with single point autofocus mode, using the center point in the viewfinder on the center of the SpyderLensCal.
Results
Twenty-one total configurations later, every combination of lenses and camera body was customized. In looking at the numbers, adjustments were primarily influenced by the camera body, which required more consistent adjustments than looking at adjustments by each lens.

Helpful Hints
- Mirror lockup and ample light will keep shutter slap from affecting sharpness. Everything counts.
- Start by making changes in increments of five or ten to save time. Initial adjustments can be reviewed on the camera's display, and imported into a photo editing program for a finer check.
- If you have multiple plates available for a tripod head, this is the time to use them. One per camera or tripod collar ring.
- If you buy a used camera, check the autofocus settings. I almost always buy my cameras used and one of them was set up with a default, as well as specifics for telephoto lenses.
- If either the SpyderLensCal or camera is tilted in any direction, your results will vary. This can't be done with accuracy by hand, but it is worth quickly checking offhand when complete.
- It's important to note that a camera can have a default setting for lenses not calibrated. This is different than saving a setting for the attached lens. When possible, I found an average based on my results and set a default autofocus adjustment for two of my three cameras.
- I've seen handheld calibrations attempted online using newsprint and 2D surfaces, but there's no way to ensure consistent results or to maximize focus. Tilting the plane of the camera will affect how much of any calibration device is in the plane of focus.
- Record your adjustments for future reference. Similar to calibrating color a display, test again in 6-12 months depending on use.
What I Liked
- Increased confidence and accuracy in image sharpness.
- My cameras and lenses effectively got an upgrade in sharpness without changing any of the hardware.
- The SpyderLens Cal's brass 1/4-20 threading for longevity. It's constructed out of thick plastic with hefty hinges and collapses for easy storage. This should hold up well for long term use.
- No additional software is required for calibration. The process is entirely analog.
- I tested 21 total combinations of seven lenses and three cameras inside of a day. I didn't have to ship or drop my gear off anywhere so it was always available if needed.
- Calibrated lenses are producing consistently sharp photographs.
What Could Be Improved
- Initially, I was expecting the calibrator would be constructed out of metal, as it's a precision tool.
- A better way to store the SpyderLensCal. I held onto the packaging for this purpose.
- The quick start guide's instructions are inadequate and pale in comparison to the user guide PDF on Datacolor's website.
What Camera Software Could Be Improved
- Ability to review the autofocus adjustment applied to each lens in the camera without attaching the lens.
- Possibly include the date of the last calibration in the camera menu.
- A simple reset of all previous calibration settings (useful for used cameras).
With the SpyderLensCal, anytime you add a new camera or lens to your kit, you'll have everything you need to dial it in to make it your own. Calibration is a technical undertaking but a rewarding one that pays dividends in every image I make going forward. I highly recommend everyone who takes image quality seriously consider using one if your camera features autofocus calibration. For as much as photographers invest in cameras and lenses for fast apertures and tack-sharp images, calibration is a no-brainer. I only wish I had calibrated my lenses years ago.


i prefer using reikan focal software that does it all automatically
This is one way to do it but Reikan's Focal does it automatically (or semi-automatically w/ Nikon), provides a lot of useful information and does other useful tests.
Will this be needed with Mirrorless?
Wherever two surfaces meet, the lens and the lens mount, there could be variances.
With a mirrorless camera autofocus micro-adjustment is redundant. You don’t need it, and you will never have to measure or calibrate the camera’s autofocus system. It also doesn’t matter which autofocus point you use, as they all work equally well. That is why, for still subjects, autofocus in mirrorless cameras is superior to that of digital SLRs. Copied from: https://digital-photography-school.com/3-reasons-why-mirrorless-cameras-...
Not true.
With contrast detect, you’ll never need AF fine tune.
But... mirrorless don’t use contrast detect in many AF modes, but on-sensor phase detect. With on-sensor phase detect and no contrast detect confirmation, you have eliminated a lot of variables with mirrorless (2 mirrors and AF module) but not others (lens calibration, sensor to mount distance). So you might need fine tune in all modes that do not use contrast detect confirmation.
E.g. most modes on a Nikon Z don’t use contrast detect confirmation and might need af fine tune, though the biggest variables have been eliminated so it is less likely than on a DSLR.
I have used several times the LensCal, but the issue i found was that it is almost impossible to have a very precise alignment between the focus target and the sensor plane on all three axis, and the ruler can be too short with some lenses at long distances.
The bubble level is not a reliable solution: i’m uncertain the focus target is really always perpendicular to the bubble level plane, and the artificial horizon on the camera is not precise enough, and i’m not even talking about bubble level on the hot shoe, which are not always parallel to the sensor.
The LensAlign from Michael Tapes is a far superior design as it ensures that both are parallel enough.