
I’m a big believer that you don’t need expensive equipment and a complicated lighting set up to create beautiful images. Some of my favorite images were captured with a really simple lighting setup and with little or no lighting equipment at all. Sometimes too much emphasis is often put on equipment and we can easily get caught up in complicated lighting and expensive gear.
Recently I decided to go back to the basics and experiment with stripping back on equipment. Natural light has been a favorite of mine since I first started photography at 15, when I didn’t have access to any lighting equipment. I decided to put together an article to show you the processes that I used when all that I had in my camera bag was a basic SLR and a cheap external flash. The following are some of my favorite techniques I learned before I had a studio that I have incorporated into my current work.
Window Lighting: Setup One

Photography by Marissa Alden


Window light is one of my favorite ways to work with natural lighting. A window can produce lighting in a similar way that a softbox can, without the need to setup or buy any equipment. And just like a softbox you can create a lot of different lighting effects with a single window.
To create a dramatic image with a range of both shadows and highlights (like pictured), have the model stand with the window to one side. This will mean that the light will fall on one side of the subjects face more than the other, creating an image with contrast and shadow. If you are wanting a more subtle effect, try turning the model slightly more towards the window to lessen the shadows. You can also pull the model away from the window to dull the contrast of the lighting, or move him/her closer to the light source to increase contrast. If you are wanting a softer effect, experiment with lightening the shadows by using a white reflector.
Window Lighting: Setup Two


Another favorite setup of mine again uses only window lighting. By posing the model facing directly towards the window, the lighting becomes soft and even. Stand with your back towards the window and have your model pose in front of you, facing towards the window.
I love using this technique for fresh, natural portraits or for beauty work because the angle of the lighting tends to enhance and open the model's eyes. You can manipulate the lighting in a couple of ways. Positioning the model closer to the window will brighten the image and positioning the model further away from the window will increase shadows. I like to find a middle ground, where the model is far enough away from the window so that the lighting has an even mixture of light and shadow. Lighting can also be enhanced by adding a v-flat or reflector to bounce light.
Combining Natural Lighting and Flash: Setup Three


Lighting on location can be unpredictable. I often find that the location that I’m shooting at is too dark or the lighting quality isn’t good enough to shoot only with natural light. The strobes I use in my studio are often too bulky to bring along when shooting on location, so I usually opt for my external flash (I use a Nikon SB700) which is easy to travel with.
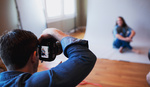
One of my favorite ways to light my model using the external flash is to combine the natural and artificial light and bounce the flash off the walls and ceiling. Because I like my lighting to be soft and not too harsh, I turn the flash away from the subject so that the light bounces behind me and off the walls (as shown in the diagram). This is an easy way to avoid any harsh shadows and tends to produce a more natural looking lighting effect. I regularly use this set up if I find that the lighting on location is lacking a bit of contrast, or if some shadows needed to be filled. You can power the external flash on a low setting and use this technique just to add a touch of light to your image. Using a flash as a fill light is an easy way to enhance natural lighting.
Shooting with natural light again really reminded me how little is actually needed to create a beautiful image. Don't let equipment ever hold you back, natural light is free and fairly basic to work with. You don't need fancy lights or a studio to create great photos.


Great article, photos and setup diagrams. In my case, I rarely have access to window lighting where I need it, so I have no choice but to emulate it with artificial light.
#3... why have I not been doing #3?!? Thank you!
It's so easy and has definitely saved me on a few shoots! No problem :)
As I hate cold, I'm looking forward to the Spring and Summer months to do more outdoor shooting with #3!
My thoughts exactly. I would have assumed that using flash that way would produce unflattering lighting, but it looks great in that example.
Thanks Dave! It can take a little bit of playing around, depending on where you are shooting. But I’ve had some great results from that technique :)
Lovely article!! (:
Thanks Shavonne :)
Thanks for taking the time to share this article, I don't have lots of lighting equipment and will be able to use this. The set-up diagrams are really helpful.
No problem :) I’m glad that you found it useful!
Love the article and love the photos.
Thanks so much Matthew :)
Back in my news photography days (with film) this is how we did it, or pray to the film god for mercy. Thank for showing how to get back to the basics.