
When taking portraits with natural light, often times, there is one key aspect that is overlooked. This facet of naturally lit photos is far more important than things like shooting at a specific time of day. Before diving into what makes a naturally lit photo a spectacular one, it is important to know and understand the difference between artificial lighting and using natural light.
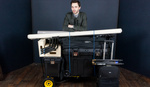
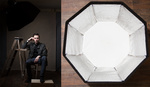
The biggest difference between using strobes and a natural light source (i.e. the sun), is the directional light. Directional light is when you have a powerful source of SOFT light coming from one specific angle. This is often called the key or main light. The reason this is important to have in a portrait is the depth it gives the skin and the way it highlights features. Without that directional light, your subject's skin and features will look flat and unflattering. While the sun is technically considered a directional light source, the lighting is often direct and harsh on the subject. When using artificial light, a photographer can use things like modifiers to perfectly illuminate the subject’s skin in the proper areas. The light should wrap around the skin smoothly and evenly. In most cases, when using natural light in the open, the subject’s skin can appear to look flat because there is light bouncing off surrounding areas from all directions. If you are in direct sunlight, well it's a given that the light will be far too harsh with unwanted harsh shadows.

Contrary to popular belief, although the sun may be harsh during midday hours, if you are conscious of directional light, chances are you can find it any time of the day. Obviously, it will not be in an open corn field or in a park midday, nonetheless, there are far more opportunities then you can imagine. Personally when I’m walking the streets looking for that perfect spot to shoot I’m concentrating mainly on that perfectly soft and directional light. One example is an alley, they are dark and deceiving but the light coming from either end is extremely soft. 
A quick note before I show you a few more examples of great locations: just as it's important to find softer, directional light, it is also just as important to find an enclosed space that will block the light from the sides. This enclosed space could be nearby buildings, narrow alleys or right inside a doorway entrance. The subject needs to be lit properly however, it is crucial to cast shadows on the sides of their faces in order to add depth in lighting. Shadows are important because it accentuates the directional light source.

Here are a few examples of my personal favorite locations. All these locations have one thing in common: the light is coming from one or 2 NARROW directions and the surrounding area around my subject is casting a shadow on their sides.


Right inside any doorway always works. The large opening serves as a 3ft x 8ft softbox

I used this exact location on Lincoln Rd in South Miami Beach for the image taken below.


Alleys, narrow streets with tall builds and underpasses double as more then just one directional light. There's a second light coming from the other end that will highlight the back of your subjects hair. An example of that is the cover image of this article and the one below.

This one tip cannot be stressed enough and I will not even turn on my camera until I find that light I’m looking for. Other examples of naturally lit images can be found on Dani Diamond Photogaphy.


This is a really great article. I appreciated how the author gave an in-depth discussion of HOW to properly position yourself to take advantage of natural light, as opposed to just saying "natural kight and artificial light looks different... Here are a few examples of some sweet shots."
My favorite articles on FStoppers are the ones that really feature meaty instruction. Rumors and opinion articles are fine fluff pieces, but true instructional articles are what keep me coming back to the site.
Was this an 85 1.2 ?
Dani usually shoots with the Nikkor 85 1.4
Really enjoy your work, Dani. Thanks for the article.
Great article Dani, Thanks.!!!!
Excellent article. Explains why certain shots I took outside looked better than others. Will be using this technique from now on.
Great article Dani!
Yes. Learn to see the light and you don't need any fancy equipment to take good photo. Similarly, the most professional equipment won't help you if you can't see the light.
Obviously on these was done lots of burning and dogging. Nothing wrong with that, but without PS these pictures would look quite differently ;)
I think it would be a good idea to include a link to Dani's dodging and burning article with this article; it would definitely tie together some of the missing elements to getting the best results with this lighting technique.
https://fstoppers.com/editorial/makeup-tip-i-wish-someone-had-told-me-wh...
Thank you dani for clear cut, straight to the bone approach to natural light. And thanks again for the adorama workshop.
A fan!
Love this mate great article :)
Thanks for taking your time to post this, great tips!!
Love your article Dani !
Wow, thank you so much Dani!
This is excellent information with useful examples! However, Fstoppers, and the author, would benefit from better editing to remove the spelling and grammatical errors.
I have to agree with Jaemie here - Dani, your articles are excellent in content and instruction, but I think they would appear even more professional if you took some time to check your articles for spelling and grammar mistakes before posting. It's the details that separate the good from the great, right?
Thanks for the incredibly useful information nonetheless!
This reminds me of the first assignments in my college second semester classes which was to go out and shoot a variety of natural light portraits. I shot a lot of ep work using natural light.
I always love your articles, especially when the focus is using natural light and not in a way that puts others down for using other light sources. Your articles always have content that has the potential of really bringing someone's work to a higher level of quality if they really focus on applying the information to their technique.
Good read , thanks Dani.
Nice article Dani!
Thank you :)
i would really like to see how you do this awesome picture style (post production) ... for people who can't come to your workshops :( :))
Might have to visit that spot at Lincoln Rd. Looks like I could get a car up there maybe. But natural lighting is my favorite. This was at an entrance to a parking garage. Luckily, it was a cloudy day & the sun was diffused.
Always such great stuff!
As you said, nitpicking. This article couldn't have been more straight forward. If you had a hard time understanding what the author wrote then your issue goes beyond his choice of wording. He brought examples any beginner would understand.
I was a little confused about how Dani was using the term "directional light" as well, but I think he is referring to a source that illuminates the subject from one direction ( the sun or an octa) rather than from all directions (cloudy day with snow on the ground).
I think it might be possible to reproduce such a lighting setup in the middle of a field on a cloudy day as well - use two large, black reflectors on either side of the subject.
Great article, useful info some may know but no one ever says. Wish I had seen this years ago.
Great little article mate. Really gives you an interesting perspective on how to use otherwise "uninspiring" locations. Thanks !
Hello Dani,
English isn't my first language so my apologizes if I have misunderstood the article and have any grammatical mistakes in this comment.
This is a great article, so thank you.
I just want to summarize the whole article in a few sentences just to make sure I've got it right.
Basically, you looking for a soft main light and possibly a hair light as well. The building(inclosed area) acts as the flags to block off fill light which makes the image flat.
However, when you have placed a subject in an ally way(shadow area), where is the directional light? I thought the light will be the bounce light from the wall.
If anyone can help then thanks in advance. :)
Awesome article, achieving soft directional lighting is my biggest challenge in street portraiture and this gives some great pointers.
Yep, i found out about this a few days ago when with some friends of mine. I didn't had the camera with me, but i noticed how the light fell on their faces. Time to put the EF 135mm f/2 lens on the eos 6D and get some results. Amazing article Dani, as usual. Oh and your selection of models is amazing, they look stunning!! :)
Ok, the article is great! Nice, concise and informative approach to seeing light. But, sorry, my issue here is your use of 'then' when you should have used 'than'. 'Then' is a marker of time, 'than' is an alternative. You used 'then' twice in this article, both out of its viable limits of usage context. Use of proper English adds to your credibility and reduces the perception that our education system failed yet another obviously talented individual.