
Lightroom is probably the most used photo database program available, with an integrated raw file editor, and many options for post processing. These thirteen tips can improve your Lightroom experience.
Adobe Lightroom is a program that is loved and hated. This article is not about that. It is for the people that are using it and would like to learn more about the many options that are possible.
Lightroom is the dark room of the digital age. It enables us to develop your digital footage similar to the way it was done in the analogue days, when photographers spend their time in yellow or orange light, bending over toxic developer, stop, and fixation chemicals. But the digital developing of photos is only a part of Lightroom. It is a database that enables us to maintain a large catalog with all the photos we took. It is a tool that makes it possible to find an certain image between all those others.
For this article I have looked at my method of working with Lightroom. It is impossible to show all the options that can be used, and I would be lying if I would say I know them all. I just want to show a couple of things that make my work in Lightroom easier and efficient. Maybe some of those things are already known and obvious, but perhaps there are a few that can help you when working with Lightroom.
1. Use the Letter I for Switching Information
There is some information about the photo in the left corner when you are in the develop module. You can choose what you want to show, and it is possible to switch between two sets of information. By tapping the letter i, you can switch between these two information sets, or to show no information at all. Just press i to toggle between the information.

By pressing the letter I it is possible to switch information about the image. This information can be customized also.
2. Solo Mode for Collapsing Panels
At the left and right of the window there are different panels. By clicking on it you can expand the panel, or collapse it. When you open different panels you will need to scroll down and search for the right one, especially in the develop module. By right clicking on one of the panels you find the option solo mode. By activating this option, a panel will collapse automatically when you chose another panel. This way you won’t have to scroll so much.

In the context menu it is possible to activate the solo mode. This way you prevent the different panels from being open at once. Only the one you are using will be open.
3. Select Toolbar Content
You will find a toolbar below the image. It is possible to choose a couple of options to show on this toolbar. Just click on the button at the right side of the toolbar, and choose the options you will use a lot. This way you have easy access for the most used options, or hide the ones you never need.

It is possible to choose which buttons are present in the toolbar below the image. These buttons can make it easier going through your photos
4. Show Filters in the Toolbar
If you like to filter the images in your collection, you can have easy access to most filters by a double click on the word Filter. It will expand most common filter options like flags, colors, and stars.
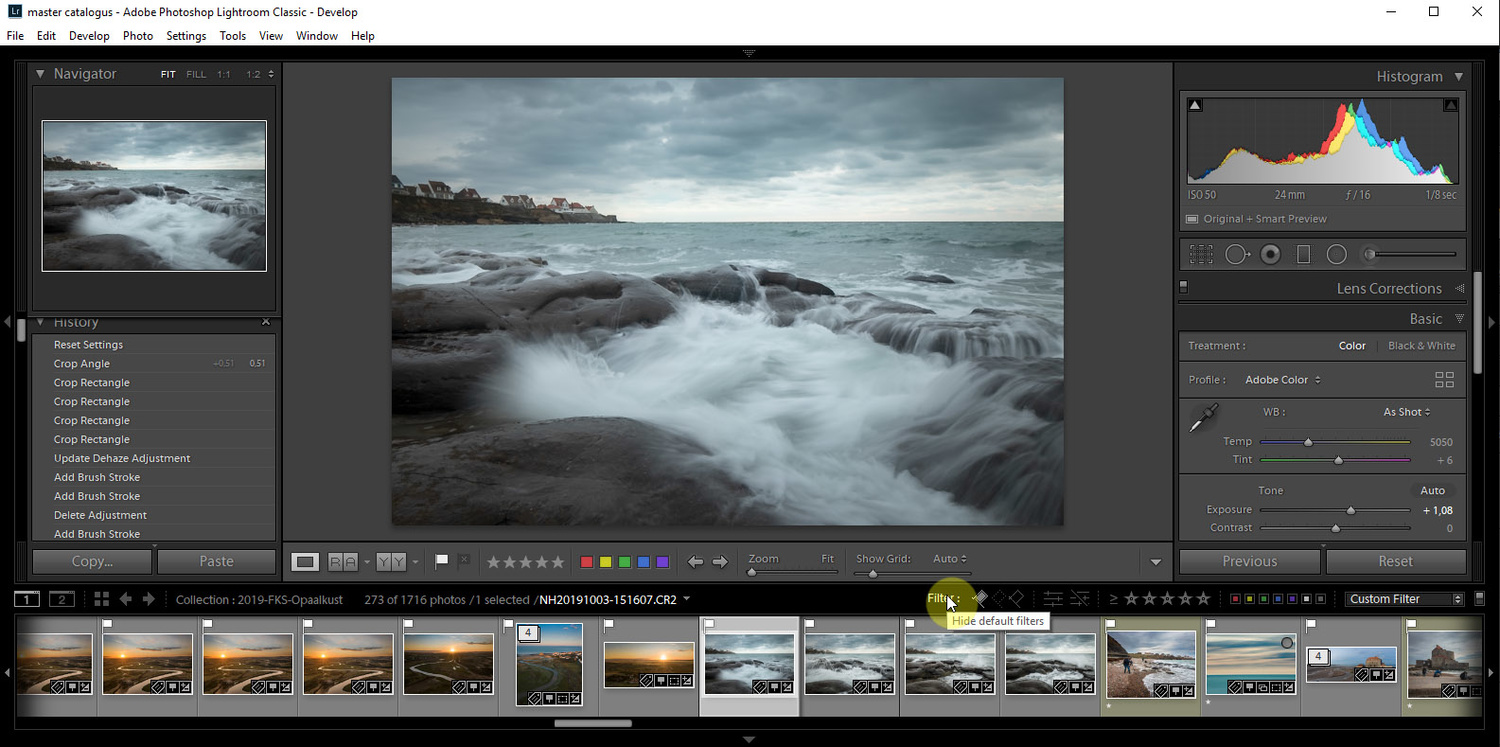
By double clicking on the work "filters" the different filter options will be visible. This way it is very easy to filter the images in your library or collection.
5. Use Flags for Selecting Images
If you need to select images, it is advisable to use flags. By pressing the letter P a white flag will appear. By pressing the letter X a black flag will appear, which means rejected. By setting the option auto advance in the photo menu, Lightroom will automatically go to the next photo when you have added a flag status. This way you can go quickly through your images. Once every few weeks or months you can choose all rejected images for a quick and simple deletion.

Using selection or rejection flags make it easy to view only the selected photos, or to periodically remove all rejected photos.
6. Do Not Show the Histogram While Culling
Lightroom shows a histogram when you open a photo, no matter if you are in the develop mode or in the grid mode. By collapsing the histogram panel, Lightroom no longer needs to calculate the histogram when you open a photo. It makes culling in Lightroom much faster.

When going through a large number of photos it can be helpful to close the histogram panel at the right. This way, Lightroom doesn't have to calculate a histogram every time you select a photo. Culling will work much faster this way.
7. Use the Letter O With the Crop Tool
Do you have a problem with composition lines? When you use the crop tool it is possible to show a set of different grids. But also the most common composition guidelines are included, like the rule of thirds, the golden rule, the diagonal method, the Fibonacci spiral, and the baroque method. You can switch between the different guidelines by pressing the letter O when the crop tool is activated. It is also possible to rotate the guidelines by pressing shift-O. This can be very helpful at times.

When the crop tool is chosen, you can view different composition guidlines by pressing the letter O. When you want the guideline to rotate, use shift O
8. Use Alt When Setting Blacks and Whites
It can be wise to set the black and white point of the image. This can be done before you start processing the image, but also after you are done. For this setting you can double click on the word whites and blacks in the basic panel, but then you cannot see what is happening. By holding the alt key while dragging the guide left or right, a mask becomes visible, and you can see what will become absolutely black, or absolutely white. It is helpful with determine the contrast in the photo.

When setting the white point, using the alt key makes it much easier. When something becomes visible, that point will be pure white.

When setting the black point, using the alt key makes it much easier. When something becomes visible, that point will be pure black.
9. Use the Space Bar for Panning
If you use a tool in Lightroom, like a gradient tool or spot removal, and you use 100% magnification, you can press and hold the space bar to temporarily activate the panning tool. You can pan without the need of leaving the tool you are using.

When an adjustment tool or transform tool is used, it is possible to pan through an enlarged image by pressing the space bar.
10. Resetting an Effect
If you have used a gradient with lots of effects, it can be a lot of work to set every option back to zero. By double clicking on the name of the effect, it will reset. If you double click on the word effect, at the left top of the panel, all settings of that panel will reset at once.

When an adjustment layer is made, you can reset a setting by double clicking on the word next to the slider. By double clicking on the word filter, all settings will reset.
11. Use a Mask When Use Sharpening
It is almost never necessary to sharpen the complete image. But Lightroom has only one sharpening tool, that will add the sharpening to the complete image. Fortunately Lightroom has also the possibility to add a sharpening mask. By pressing and holding the alt key while setting the mask slider, it is possible to limit the sharpening to only a part of the image. Everything that is white in the mask will be sharpened. What becomes black won’t be sharpened.

When you add sharpening to the image, the complete image will have that sharpening effect. By masking the sharpening effect, it is possible to apply sharpening to edges only. By pressing the alt key while applying the mask, this will be visible. Only white will be sharpened.
12. Use Shift for Straight Lines
If you want a gradient tool absolutely horizontal or vertical, you can press and hold shift when applying the mask. Another good use for the shift key, is with the spot removal tool. If you need to remove a line, you can press the spot removal tool on the beginning of the line, hold the shift key, and press on the end of the line. Lightroom will automatically make a straight line.
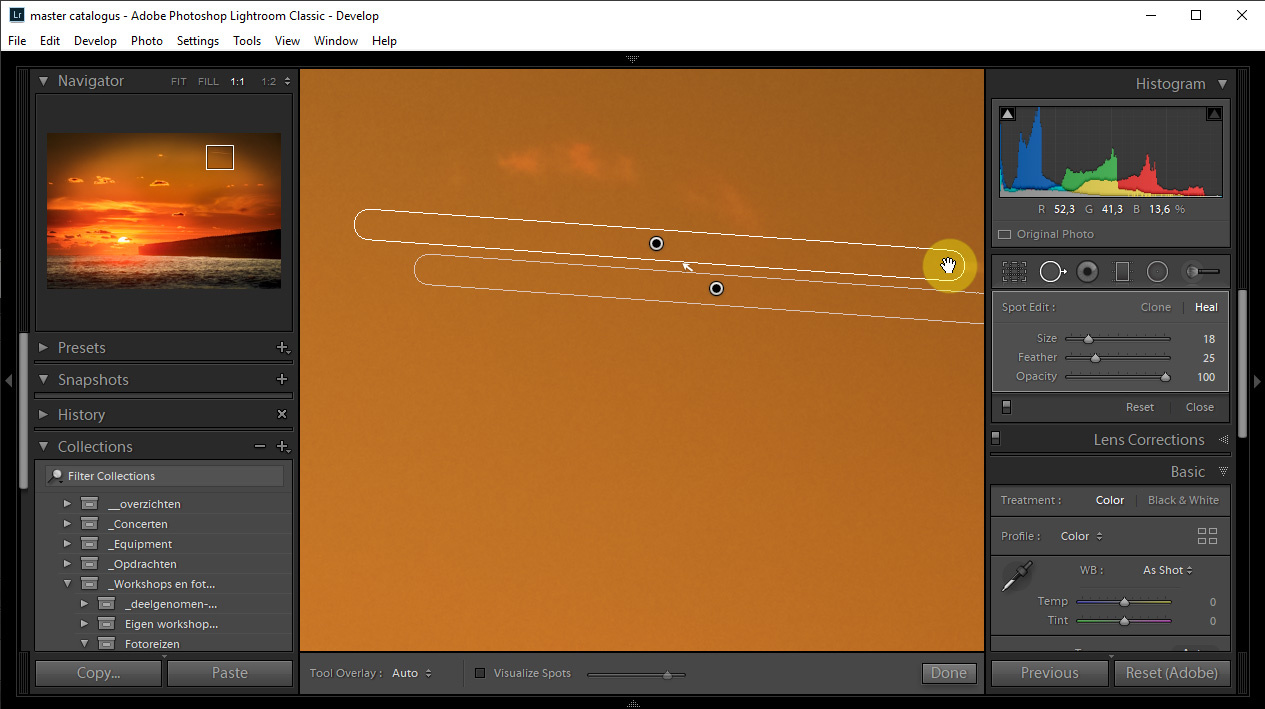
When using the clone tool, you can use straight lines by clicking once at the beginning of the line, press and hold shift, and click at the end of the line. A straight clone line will be applied.
13. Use Snap Shots
If you have a great result while post processing, but you want to do another, it is possible to make a snap shot of that first result. Just click on the plus sign in the snap shot panel at in the left. You can give the snapshot a name to your liking, and continue processing, or start all over again. It is possible to make as many snap shots as you like, and return to every one of those snap shots, or switch between the snapshots.

By using shap shots, you can save different post processing variations of one image. Just by clicking on the saved snap shot will apply the saved post processing without losing any other post processing variation.
These thirteen things make working in Lightroom just a little bit easier and quicker. There are a lot of other simple tricks available. If you have a cool helpful shortcut or trick for easy processing in Lightroom, feel free to share this in the comment below. The more tips that are gathered below, the easier working with such an extensive program like Lightroom will get.


Collapse the histogram?????? No way.... the histogram is critical to choosing images that have "the best" exposure....
That’s what your eyes are for 😆
Histograms stay constant while a the screen will have limitations and variations.
I never believe my lying eyes when it comes to exposure, indecent or otherwise 😎
You don't understand.... collaps only when selecting images. You don't need a histogram for that.
When post processing images the histogram is important indeed.
Agreed! The histogram don't lie!
I have one great tip:
Switch to another software such as Capture One Pro, On1 or Affinity.
Problem solved.
:D
Yeah right.... I never had a problem... :p
What kind of problem do you have? :D
But it's as slow as LR is. And with CO 20 they did a new devel engine like the one in LR with same shitty results.
Or Bridge and ACR.
Set sharpening and noise reduction to zero and save as the default. Only apply sharpening after you're finished all other edits, and sync across the images. Keep in mind that, by default, Lightroom applies sharpening to images on import unless you manually set it to zero. So "not applying sharpening" is not the same thing as not having it altogether. I've found that this makes a huge difference when jumping between multiple images. Same with local adjustments (graduated/radial filters, brush). Lightroom drastically slows down when it has to render sharpening / local adjustments. This seems especially true on higher resolution images, like 30-40+ megapixel files.
Good one. Something I will try. THanks
if you're in library module sculling they don't use NR and sharpening.
True, but once you click into the develop module the first time on any photo, or render 1:1 previews, that initial preview goes away and any changes in the Develop module are applied to a new preview. Problem is, sharpening is turned on by default... so even if you just need to zoom into the image to check focus, you've just applied sharpening, which immediately slows the load time for that image down. At that point it doesn't matter if you go back to the Library module, because the new preview has sharpening applied.
Now, I think it SHOULD matter, because I think Lightroom SHOULD be able to create new lightweight, static previews, but sadly it doesn't seem to work that way. Lightroom is always in this weird state of either not loading a preview of an edited image properly (i.e. the preview is pixelated, has color banding, etc) or it's trying to refresh the preview based on the changes applied in the develop module (which slows the load time down). But it never seems to be able to properly (or, at least, consistently) load an updated preview, and I think this has a LOT to do with the performance issues. And, as I pointed out above, it's most noticeable when certain changes have been applied, like sharpening and local adjustments.
So, back to what I said before... set sharpening to 0 by default, and don't apply local adjustments until much later, otherwise if you have to scroll back and forth between edited images, it's going to slow down drastically.
Lastly, even if we assume that you're culling in the Library module without ever touching Develop... I think it still depends on what KIND of previews you load. Embedded & Sidecar... should work fine. Standard Previews? I think those probably include any Develop settings that were present at import.... like sharpening.
"One tip for an Improved Lightroom Experience"
Rewrite Lightroom code from scratch!
If you are a programmer.... be my guest. :p
Find someone who will sell you their Lightroom 6(fixed from 7) license and never pay for the subscription again!
What has that to do with working with LR?
"Tips for an Improved Lightroom Experience."
The experience includes paying for it in the same way that owning vs leasing a car has an impact on the experience of a car.
Without that $10 payment, I've saved nearly a thousand dollars. I've also not had any issues accessing my image catalogue or the software not working.
Paying per month or one time does not change the way you post process your photos. A lease or a bought car does not change the way you ride your car.
You're comment is not wrong but... Your title calls out the Lightroom experience and not specifically the Lightroom workflow. So with that, I will not concede. Bang for your buck.
Ah... hahaha - you're right
Love 12 and 13! Thanks!
I'd like to add:
10 - Can also be done by double clicking on the slider itself
5 - Turn on CAPS LOCK and it'll automatically go to the next image when you apply a flag, star rating or color. 0 just skips that one. I also think you can apply the flags with the up and down arrows...I might be making that up though.
YES... that is a great tip, CAPS LOCK for auto advance. Thanks thanks thanks. :)
And 13 can be done by doing a virtuel copy so you can see all copies side by side in a grid view.
That is what I normally use, but snapshots can be handy also, especially when you only want one image to show in your selection
I did not know the CAPS LOCK feature. Nice.
Great article!
I have looked for the composition guides before and never found them, great tip!
I have a love/hate relationship with LR6, but bottom line I can move through photos faster with this program than I can with others, so these tips are appreciated...
LR is not perfect, but it does the job I want. These little tips can help a lot
8 - “For this setting you can double click on the word whites and blacks in the basic panel,“
But you have to hold down the Shift key too.
Thanks for your article. I’m going to try the Histogram tip
I did not know you also need to hold the shift key for that. Thanks.
Yes, otherwise it just resets the slider.
Ah yes. Of course :)
Possibly the best LR tips article I have seen. Thank you.
You're welcome :)
My number 1 tip for a better Lightroom experience is to get rid of all those unused presets. Each preset you have slows lr by a tiny amount as the develop tries to create a new demo thumbnail for every preset just in case you mouse over them. I used to have hundreds (with vsco packs and a ton of personal presets) I've culled down to a handfull and my lr jumped hugely in processing speed. For reference i'm running mostly from a 2015 Macbook and have almost no lag time anymore.
I only have a few I made myself. I never used those large numbers of presets like vsco. Cannot see the point of those...
Good to know these can also slow down the speed. Thanks
Nice tips. I prefer star rating to flagging, cause for some reason flags are not written to xmp, but star ratings are. So if you want to transfer/backup RAW+XMP instead of catalog, or if you lose the catalog, ratings wont be lost.
Flags are only to "flag" the one that will be thrown away; the rejects. Every half year I throw away those rejects. The remaining have the star ratings.
Just go to C1..
Explain why that has anything to do with a better LR experience.
Good solid tips.
It is about things that can help with your workflow, not about expectations. But I guess you already knew that
Thanks for the rips, Nando.
Some good tips there, regardless of the comments from the experts
Thanks.
These experts keep us sharp ;)