
The introduction of profiles in Lightroom and Adobe Camera Raw was a significant addition to editing for Adobe users. Not only can profiles improve your editing power, but they can also simplify your post-processing workflow.
Profiles can be added either by importing them or converting a preset to a profile. You certainly won't want to convert all of your presets, but you may find that you can condense several presets into just one robust profile, thus making your editing easier and more precise.
Profiles aren't a complete replacement for presets, as each has its unique advantages and disadvantages. They are also not exclusive, as you can use both a profile and a preset on the same image.
In this article, we'll also cover a few secrets about profiles and presets that you might not know.
What Are Profiles?
Profiles are a set of instructions that determine how the information in a raw file is processed. Think of them as setting the base interpretation of an image. They are non-destructive and can be changed at any time without any loss of quality.
Until the introduction of profiles, there was just one profile available: Adobe Standard. The debut of profiles in Lightroom and Adobe Camera Raw saw the addition of six new Adobe Raw profiles; Adobe Color, Adobe Monochrome, Adobe Portrait, Adobe Landscape, Adobe Neutral, and Adobe Vivid. According to Adobe, profiles "... were created with the intention of providing a unified look and feel, regardless of which camera was used."

Default Adobe Raw Profiles
Clicking the four squares on the right side of the profiles section in the basic panel will show the profile browser. The Profile Browser, by default, displays a grid of profiles, and a preview thumbnail. There is also a large thumbnail and list mode available. The Profile Browser also hosts an Amount slider to increase or decrease the effect of the profile; however, it is disabled for the Adobe Raw and Camera Matching profiles. The amount slider can also be disabled by the creator of a profile.
Profiles differ from presets in the following ways:
- Profiles can be applied to existing edits without changing them.
- Profiles don't move the sliders leaving the full range of adjustments for further editing.
- Profiles can be adjusted via the amount slider to increase or decrease the effect from 0 to 200%.
- Profiles can include Lookup Tables (LUTs) that Lightroom doesn't have.
- Profiles can be previewed in the Preview Browser without having to mouseover the preset to see how it looks.
The most significant advantage of a profile is the ability to use Lookup Tables (LUTs). The use of LUTs is beyond the scope of this article, but if you know what they are, you can assign one when you create the profile.
Another significant advantage of profiles is that you can combine them with presets. Selecting a profile will set the base look and feel of the image, upon which a preset can be applied to further modify that look.
Disadvantages of Profiles
The main disadvantage of a profile is that because the sliders don't move, you don't know what has been changed, which makes "undoing" something more challenging. Also, if a preset includes a radial filter, for example, you can't edit or move that filter.
Profiles are best used for global image changes for color and tone. Local adjustments such as filters and brushes may not appear where you want them to if the image orientation or size ratio is different than the preset was created for, so be careful with those.
Using Clarity, Highlights, Shadows, Dehaze, etc. can increase the time it takes to render a preview image. You don't need to avoid them, just be aware that there is an impact on performance when using them.
When Should You Convert Presets into a Profile?
One of the best reasons to convert a preset into a profile is the presence of the amount slider. If you have two or more presets for what is essentially one look, but different strengths of it, that may be the perfect candidate for using just one profile. There's no longer a need to have presets named like this:
- Summer Light
- Summer Medium
- Summer Strong
- Summer Intense
Since you can control the amount slider, decide on a default preset strength, convert that preset to a profile, and then use the amount slider to reach the desired effect. Not only will this make finding a specific preset quicker, but it will also be easier on your system resources, and might even speed up Lightroom.
Secret #1: How to Convert a Preset into a Profile
Converting a preset into a profile is easy, but there is one catch: you can't do it in Lightroom, you have to use Adobe Camera Raw (ACR). If you didn't know already, Lightroom and ACR share the same raw conversion engine, presets, profiles, and settings. Changes you make in one, also appear in the other.
To convert a preset into a profile, you'll need to do one of the following:
- In Lightroom, Select a raw image that is suitable for the preset that you want to convert. Right-click on it and choose Edit In > Edit in Adobe Photoshop. Once in Photoshop, select "Camera Raw Filter" from the "Filter" menu.
- Or, open Photoshop, then open your desired raw image, Camera Raw will open automatically.
Once in the Camera Raw interface:
- Click on the presets tab, then select the preset you wish to convert.
- While holding down the Alt key (Option on the Mac), click the New Preset button in the lower right corner of the presets tab.
- The New Profile dialog will open instead of the New Preset dialog. Name your profile, and if desired, create a group for it.
- Click OK to save your profile. You can now cancel Camera Raw.
- If you have Lightroom open, you'll need to restart it to see your new profile.

While holding down the Alt/Option key, click the New Preset button in the lower right corner of the presets tab
More Profile and Preset Secrets
There's more hiding in the ACR interface than you might think. Just as the "New Profile" is hidden until you press the Alt/Option key, there are a couple of more things hiding behind that Alt/Option key.
The following secrets are described for profiles, but they also work with presets as well.
Right-clicking on a profile will invoke a context menu that presents several options related to our profile:

Profile Info: Displays a dialog with information about the profile, such as Name, Group, Description, Copyright, and Contact info.
Add to Favorites: Adds the profile to the favorites group.
Rename Profile: Opens the Rename dialog for editing the Profile Info.
Move Profile: Opens a dialog that enables you to specify the group that the profile should belong to.
Delete Profile: Deletes the profile without any confirmation.
Manage Profiles: Shows the manage profiles dialog that allows for the showing and hiding of profile groups.
Import Profiles & Presets: Imports profiles or presets by browsing for a file.
Of these, the Rename Profile menu is probably the most useful. The Name and Group are used in the Profile Browser, but the Description, Copyright, and Contact info aren't displayed in the grid or list view for the profiles, only the Profile Info dialog.

Standard right-click rename
Secret #2: The Secret Rename Profile Dialog
But wait, there's more! If you hold down Alt (Option on the Mac) and right click on a profile, you'll get the same context menu as before. Note: You may need to hold down on the right mouse button, as pressing Alt while the context menu is displayed will dismiss it.
When you select Rename Profile (while holding down Alt/Option), you'll get a different rename dialog.
Along with the information in the previous rename dialog, you'll now also have options for Cluster, Short Name, Sort Name, various Applicability Settings, and an option for Support Amount Slider!
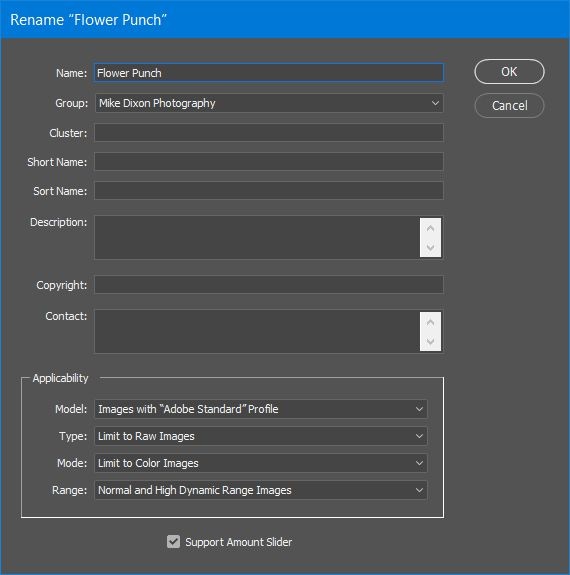
Alt/Option right-click rename
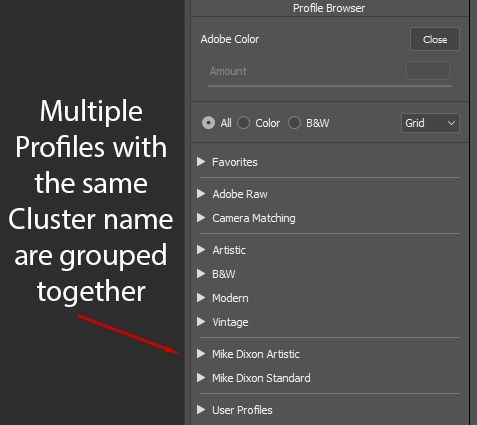
Secret #3: The Cluster Option
The secret here is the Cluster option. When specified, all profiles with the same Cluster name will be grouped together in the profile list. This provides great organizational ability.
To group your profiles together, specify the same Cluster name for all of your profiles. This Cluster name is not visible in the profile browser, so it's suggested that you name it something like "YourNamePhotography" or "YourWebsiteAddress.com." You'll also need to make sure that you specify a group other than "User Profiles" to enable this option.
Secret #4: The Short Name Option
The Short Name option in the rename dialog may not be of obvious use if you've already given your profiles a short name. If you have a long profile name such as "Drama Dragan Effect" and a short name of "Drama," the short name will be used in the profile browser grid/list, and the longer profile name will be shown as a tooltip when the mouse hovers over the profile short name.

Profile Name is displayed as a hover tooltip when a short name is specified
Secret #5: The Sort Name Option
Many of us have a thing about being organized, but often programs don't always sort items as we would prefer. The Sort Name provides a means of controlling this. For example, if you have a set of grain profiles or presets, the logical order would be "None, Light, Medium, and Heavy." However, alphabetically, they would be in a different order. By specifying sort names like "Grain 1," "Grain 2," etc, you can achieve the desired sort order. You can also see how this used in the default Lightroom Presets under "Vignetting."

Sort Name is used to specify the sort order instead of being sorted alphabetically
Conclusion
Powerful yet flexible. Profiles can be an addition to your current workflow, or they could be something that completely changes how you approach your post processing. Either way, the options are nice to have available. Advanced grouping, naming, and sorting options enable you to organize your profiles and presets logically and topically.


"Profiles don't move the sliders leaving the full range of adjustments for further editing." This is not true. I saw a video on YT, where this was proved. If you move the shadows slider to +50 and you save it to a profile, after you have only the rest 50 to modify, doesn't matter, that you have the whole slider (100) to move! The same with brushes in LR, but not for all sliders, afaik. You cannot modify 100 shadows (for example), after with Brushes another 50*on the same spot... But prove it, if I'm wrong, I would be the happiest..:-D
This is really informative .. thanks, Mike! I did not know about the "support amount slider" option.
I know this is an old article, but the colors do not match when creating a profile. I left the exposure and WB as shot with the tone set to Low, Med, and High are even further apart from the original. It's close but I do notice a difference. Hopefully, the author can revisit this subject with more info.