A long time ago, I got to visit a friend down in the south of England. We drank (quite a lot of beer), we ate (lots of chocolate brownies), and we set up to shoot a moody portrait.
I am going to show you how to easily add texture to any background to your images in Photoshop! This a technique that I learned when I first started experimenting in Photoshop, and I have used it since on many images. It's quick, easy, and can give you great results without having to spend time with overcomplicated selections (although you will need to make a quick, rough selection).
This is a technique that I learned from and that is still used by two Photoshop greats, Glyn Dewis and Calvin Hollywood, and I recommend you go check out their websites, which hold a wealth of Photoshop knowledge, tips, and tutorials. I learned so much from them in the early days, and I think you could too. Anyways, on with the tutorial!
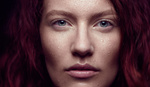
Before we start, for this technique to work, you need to have shot your image with a gray background. To keep the image interesting, make the lighting interesting. If you light it so it looks flat, it will more than likely lead to a boring image. Be dramatic. Play with light and shadow.
First, open up your image in Photoshop.

As you can see, I shot against a gray background. I used one flashgun with a portable softbox, camera right. I feathered it away from the model, more towards the background. This gives us the nice effect of light and shade on the model. It also makes it look like the light could now be coming from a light source on what will be our wall (once the texture is added).

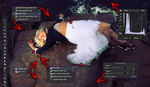
Your next step is to make a quick and rough selection around the model. For this purpose, I more than likely use the Magic Wand tool. I usually have my tolerance set to around 10-13, as it sets how different in tone and color a pixel can be. So, with our tolerance set to 13, Photoshop will select any pixels that are the same color, and any pixels that are 13 shades darker or 13 shades lighter. You can up the tolerance if you wish, but I find it easier to control at a lower amount. Once you have your model selected, it should look something like this:

Now that you have made your selection, we need to save it for later. So, go up to your top bar in Photoshop and go to "select" and choose "save selection" from the drop-down menu. Go to the name dialog box and type in whatever you would like to call the selection (in this case, "Shelly mask"). Click "ok".

Once the dialog box disappears, your selection is saved, so press CTRL+D to deselect. Next, open up your texture in Photoshop. I chose this concrete wall texture.

Bring it into your Layers panel, and make sure it is above the model layer.

Now we need to load the saved selection from earlier. So, go back to your top bar and click "select." Then, click on "load selection." The load selection box will pop up. Go to the channel box and choose your saved selection from the drop-down menu. We saved it as "Shelly mask." Click "ok." Your saved selection will now appear on top of your texture layer.

Next, go down to your adjustment layers and click "add a new layer mask." Your model should appear masked in.
 As you can see, this does not look very good: the mask looks rough, and the texture and the model do not blend seamlessly. Well, this next step is when the magic happens. Change the blend mode of the background texture from normal to soft light.

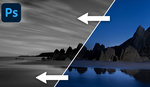
Look at that: the texture now blends in with the lighting on the gray background. The masking around the model also looks far better (but may still need a quick cleanup). The soft light blend mode darkens or lightens the colors, depending on the blend color. If the blend color (light source) is lighter than 50% gray, the image is lightened as if it were dodged. If the blend color is darker than 50% gray, the image is darkened as if it were burned. In layman's terms, it blends the light and the darks of the texture image onto the gray background, even blending in with the light on the model layer. You can also use the technique with the overlay blend mode, but the results will be more contrasty. Using this technique also blends the hair of your models, although our mask here was a little rough. Zoom into your subject to make sure the mask is looking good and watch for spots which need a little cleaning up, like the hair at the back of the model's head.

All you need to do is select the brush tool, make sure it is set to white on a very soft setting and a flow of around 15-25%, and slowly brush over the hair. It will paint the texture back in and blend perfectly with the hair.
And that is it: quick and easy textured backgrounds! All the effects you see in the final image, the textures, blood, and writing were all added using the same technique and using the same saved selection and layer mask to mask it off the model.

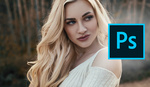
Once you get the hang of this easy technique, play around with it and see what you can create. It opens up many more possibilities. I also use it in model portfolio shoots if I feel the image background needs a little character added to it.


Above is a selection of other images I have used the same technique on. Using this technique gives you far more options for the final image. You can use pretty much any texture although some work better than others. Stone, concrete, and wood blend well. You can even blend decay textures on top of them to distress the texture you already have.


Just as important as what to put in is what to take out, like that distracting text tattoo on that otherwise gorgeous model, that adds nothing to the shot.
To be honest, I don't see how this adds something to the photo. It doesn't really change- or maybe it is just me. I also like playing with the backgrounds and I was very much into adding them (btw, there is a good manual on that- https://photo-works.net/how-to-add-background-to-photo.php ) but in the long run it is nothing if you shoot anything but fantasy plots.
Depends. In this particular instance I think it adds to the overall motif. Of course background mods range from creative license (like here) to helping to isolate a subject or product, etc. I've sometimes modded backgrounds all day on product location shots where things needed to be removed or added, and as well as when weather suddenly changes from that sunny day that the product needed to be associated with versus the unwanted cloudy skies that showed up. I've done background mods all the way back to the photo-optical days.
Yeah, that definitely depends and I know some really good shots that looked completed with different backgrounds but in this case I don't see a lot to change. It may be just me, of course!
Thank you! It's nice to have something step-by-step that isn't a video.
thanks
Thanks