
Weather and conditions permitting, the Perseid meteor shower puts on an annual show that blows stargazers away. Use these five photography tips to capture this dazzling spectacle.
1. Find a Good Spot, and Bring a Chair
While darkness is your friend, don't fret if you're stuck in the city. I've observed and photographed Perseid meteors successfully from under the bright lights of a major city. The Perseids can produce up to 70 meteors per hour in perfect conditions, though many of the dimmer ones won't be captured by the camera, especially if you're not in a dark spot away from city lights.

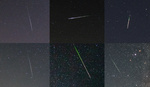
While not the most visually pleasing, this image proves that you can capture Perseid meteors even in unfavorable urban conditions. Notice the bright skyglow caused by light pollution.
You can use a Dark Sky Map to find a location optimal for photographing or viewing. Public parks are great, but be mindful of curfews. You can look for local star viewing parties, or find a nearby observatory and see if they're holding public events.
Once you arrive and your eyes have adjusted to the dark, try to avoid looking directly at car lights or non-red flashlights. Red lights do not disturb your night vision, so putting a red gel over your flashlight or using a light with a red setting is recommended. Even a brief flash from car headlights can cost you 20 minutes in readjusting back to night vision.
Visually observing the meteors is half the fun, but standing up craning your neck to the sky for hours is not. Bring a chair and/or blanket along so you can relax with your eyes to the sky. Meteor showers are often misunderstood — a shower will be spread out over several days, with one night being its peak. You won't see a flurry of meteors streaking across the sky in a flurry unless you're witnessing the rare, unpredictable event of a "meteor storm". The most shooting stars I've witnessed within one minute is about four.
2. Set Your Camera to Interval Timer Mode
Most newer DSLRs have built-in interval timer modes. Interval timer shooting for a meteor shower is practical as it not only prevents vibration from depressing the shutter, but once you nail the settings you can "set it and forget it.”
I use interval timer mode with my shutter speed between 20 and 30 seconds (depending on focal length) with just a second or two between exposures. Depending on how wide your focal length is set, 20 seconds on a wide angle will typically produce nice round stars with no oblong trail movement. Be sure to zoom on your test images to see how the stars (the static, non-shooting variety) look.
You might be tempted to put the frames together into a time-lapse to show the meteors off, but this would probably be a waste of time. A meteor will only last one frame, making them barely noticeable and quite underwhelming when put into time-lapse video footage. Typically, you won't be capturing enough bright meteors for a video, rather you'll edit the few isolated frames where you caught impressive ones.
If your camera does not come with built-in interval timer capability, you can buy an inexpensive interval remote that allows the same functionality.
3. Focus, Focus, Focus
Getting correct focus might be the trickiest part of photographing meteors. Once you've mastered focusing on stars however, it becomes easier each time. If this is your first attempt, or you become frustrated, your instinct may be to simply set the lens to infinite focus, but this can be a mistake. Many lenses are designed so that the infinite mark doesn't focus exactly where you need for astrophotography purposes. I've noticed this to be most true with my prime lenses, which I use occasionally to capture a slice of sky with a foreground object like a cliff or tree.

This image was taken with a prime lens pointed at a high angle upward. With a little luck and patience, a decent meteor was captured in the background.
To gain accurate focus, point your camera to the moon or a bright star, then using your Live View, zoom on your display as far as it goes and manually focus for tack-sharp stars. If you find your "sweet spot" and it doesn't match up with the infinite mark on your lens' focus ring, you can mark it on the focal ring of your lens for future reference. Keep in mind that any marks on your lens could reduce its resale value.
4. Figure Out Your Settings, Then Leave It Alone
As with any photography genre, you will need to get the proper settings — not just for exposure but also for optimal capturing of stars with no trailing. Also, a sturdy tripod is necessary to keep the camera still and at a proper angle to the sky. I usually aim the lens at a 45-degree angle or higher, then lock the tripod arms down securely to ensure the weight of my lens doesn't drag the tripod head back down.
Shooting in manual mode is crucial. As I noted earlier, 20 seconds is where I start with the shutter, adjusting as needed. The ISO setting will be dependent on how much of a boost you need in exposure. Your f-stop setting will be dependent on exposure as well as depth. If you are shooting a dynamic landscape, you'll want to increase the f-stop number enough to bring everything into focus.

Another image from when I was just learning landscape astrophotography. A bright meteor was captured, but the shutter speed was too long and produced oblong star trailing.
Once you have your exposure settings, there's seldom a reason to change them unless you're re-framing a lot. And if your lens has image stabilization, be sure to turn it off. Counterintuitively to what you might expect, this feature can ruin a long exposure.
5. Process Your Images the Right Way
Especially if you're in the city and dealing with fog or light glow, your raw images may come out looking flat and underexposed. Using a principal similar to "push processing" film, most landscape astro photos are brightened in post-processing, with a boost in contrast to bring out sky detail and cut down on haze. Experiment with the raw sliders to bring out maximum detail. Because sky conditions can vary from shoot to shoot, you might need to create a new processing preset for every shoot. In general, however, I brighten the exposure a stop or two and increase contrast, as well as bringing the black point down. The clarity slider will also bring fainter stars and/or meteors out to the forefront of an image.
Photographing meteors requires skill and patience. If something doesn't seem right, don't give up, just try adjusting your settings. Most of all, have fun! You're viewing the best free show on the planet.
The peak night for 218 is Sunday, August 12. Most meteors will be seen after 11pm, after the radiant (point where they originate from) rises above the horizon. The shower will wane through the following week but there are still chances to see meteors.
Lead image by Raman Deep via Pexels.


"Your f-stop setting will be dependent on exposure as well as depth. If you are shooting a dynamic landscape, you'll want to increase the f-stop number enough to bring everything into focus."
Strongly disagree on this point.
If you use higer f numbers you will get less meteors and those you will get will be much fainter. You are shooting for meteors, not for the landscape, so you should ALWAYS use the lowest f number possible for this kind of photography.
If you really care about the landscape and can't focus it properly because of the shallow DOF just take another exposure with a proper f number before or after you start shooting for metors then merge em in post.
Agree! Meteor shower wont peak till 11pm. From sunset to then you'll have ample time to get a really good foreground to blend later. Come 11pm your focus is on the meteors till you leave.
The radiant won't be above the horizon until about that time, however you should start seeing them soon as it's dark. The higher the radiant, the more you will see. Keep an eye out and have fun!
Pablo, good point on opening the aperture. Opening all the way will definitely help catch fainter ones, but in my opinion the faint ones aren't very impressive on images. Feel free to share anything that proves me wrong ;)
But yes, I definitely recommend always a lower f/stop for astrophotography of any kind. Only increase it enough for what you need.
It doesn't just help you catch fainter ones but also makes the one you capture far brighter.
There is a great explaination here, only downside is that he's as a scientist so it's pretty math heavy http://www.clarkvision.com/articles/meteor.photography/
6. Live somewhere that doesn’t have the burden of clouds and rain whenever there is a sniff of an astronomical phenomenon.
When opening an article about the Perseid shower it would also have been quite nice to maybe mention WHEN it can actually be seen...
11pm your local time is the start, Peak is 2am.
My apologies. Peak is tonight, and you don't have to wait until 11pm - as soon as it's dark, you will be able to see meteors.