You don’t need a big studio, and you don’t need to travel to an exotic location to create incredible photos. All you need is a space to work in, even if it’s a small one.
For every photographer out there with a great studio space or the budget to travel, five photographers are working out of their home or garage. When I first planned this tutorial, I had those home-bound photographers in mind. But, with the recent directives to practice social distancing, and in some areas, total lockdown, due to COVID-19, many photographers are finding themselves creating at home because there is no other option. But whether you’re working in a small space due to choice or necessity, the goal of this tutorial is to give you the confidence you need to start creating.
Here are some broad steps you can use to get started. Feel free to add or subtract to these as you go through the experience. Some of them you might do without even thinking about it, and others might not apply to your circumstances, but they'll give you something to think about and some direction.
Keep in mind that, for this tutorial, we had to use a space that fits the photograph and a film crew, but the principles are the same.
Nail Your Concept
The first thing to consider when working in small areas is the same thing you should be thinking about before creating any visual art: "what am I trying to say?" In the video, I talk about how every decision I made, from the dress to the makeup and the props, was meant to serve a story. It doesn’t have to be a complicated story, but having some idea of what you want to say and why you want to say it will help you put together a cohesive image, from wardrobe to model and props.

BTS taken by Olga Tenyanin (@olgieshmolgie)
Choose a Space
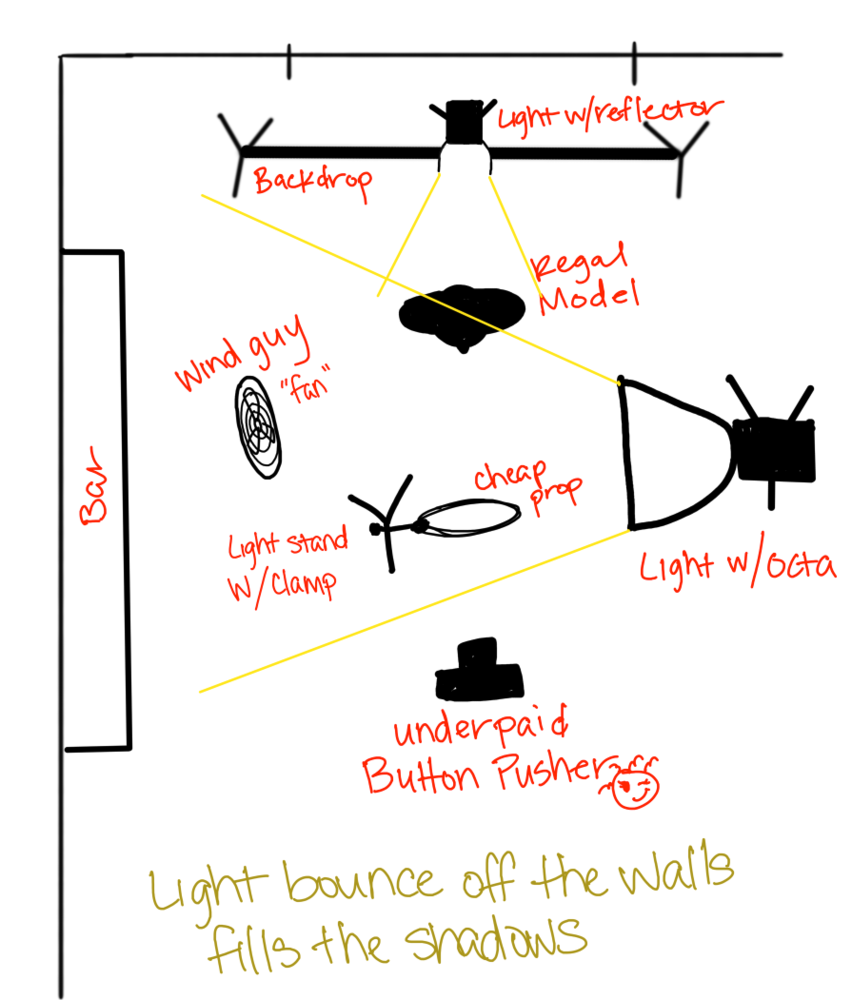
Next, you need to settle on a space that most closely fits your needs and your vision. For this video, I needed enough space for a 4x6 foot backdrop, a couple of lights, and the distance for a three-quarter length shot on a 50mm lens with a full-frame camera. Out of all the spaces in the house, the downstairs family room gave me the most flexibility.
When you’re looking at available spaces, weigh the pros and cons of the space against what it will take to create your vision. Try to do as much problem-solving as possible to make sure space will work before you commit to it. If you have the option, I would always suggest a space that has neutral-colored walls, because small spaces have lots of light bounce, which could mean color contamination. If your only option is colored walls, you can hang black fabric from the walls to stop light bounce and give you a bit more control.
Luckily, I didn’t have to take that step with this space, but it did have a sliding glass door that let in lots of light. That was a problem, because I wanted to use strobes for the tutorial, so I fixed the issue by blocking the door with my backdrop. Most issues with small spaces can be solved with a little creative thinking and being willing to make some concessions.
I needed to keep the lighting very simple to make enough room for the model, gear, and crew. It’s a good thing simple light can still be gorgeous and compelling. That’s why I chose to use the Elinchrom ELC 500 and 125 studio strobes. They’re compact, light, and easy to use, and with the Rotalux 39” Deep Octa, which is my favorite modifier, I knew I could create lovely directional light that suited my vision, even in tight quarters.
Some Considerations
- Is there enough space for the model, gear, and photographer?
- What color are the walls?
- Will you have light control?
- Do you need to make any alterations, like hanging flags on the walls or moving furniture?
- Is there too much ambient light contamination?

BTS taken by Olga Tenyanin (@olgieshmolgie)
Troubleshoot the Light
Once you’re set up, no matter how much problem-solving you’ve done beforehand, there will always be a few things to work through. You’ll need to make adjustments in your lighting, such as adding or changing modifiers, or moving your light to get a more flattering shape. Don’t let these kinds of adjustments frustrate you; this is just part of the process.
Get things in position, and take a shot. Check your histogram. Check the camera display or your computer screen if you’re tethering. Spending some time to make sure you’re creating the light you want will not only give you a better image but will teach you what works and what doesn’t work in your space. Maybe you can use the walls as a bounce for fill light. Maybe you’ll discover you like having the light close to your model because the falloff is more dramatic. All this is part of the process and should be embraced.
A Few Questions You Can Ask Yourself as You Evaluate Your Light
-
Is the exposure right?
-
Are there any hot spots?
-
Is the light shape flattering and what I wanted for this shot?
-
Do I need fill light?
-
Is the falloff too fast or too slow? (For those that don’t know, “falloff” is used to describe the transition from light to dark. The closer the light to the subject, the faster the light transitions to shadow, or falls off. This is a taste issue, so the only right or wrong answer is what you like. For an incredible example, check out this excerpt on the Inverse Square law from Peter Hurley’s Lighting the Face tutorial.)
-
Is the light quality right for this image? (hard versus soft)
-
Is there enough or too much light on my backdrop?
-
What does the light say about my image?This is less about working in a small space and more of an artistic question, but it's worth asking.
These kinds of questions will help you dial in whether the light needs to be finessed and how. Take those steps and do a bit of creative problem-solving to make the light work in your space. Maybe you want softer light and you don’t have a bigger modifier, but you do have a large, white wall. Maybe you have low ceilings and can’t get your light high enough for the downward-facing light you want, but you can have your model sit and tighten your frame a bit. Maybe your light is too bright for the small space and you can’t turn down the power anymore, so you use a smaller aperture or hang a couple of curtains in front of the light to further diffuse it. There are always ways to work around problems if you take your time and apply a bit of creative thinking. If you're working with a client, see if you can do this step before your shoot, so things are dialed in before your client arrives.
Get Shooting
Once you’ve got your light dialed in and you’re ready to go, you can focus on the little things, like coaching your model to give the right expression and pose. Here is a diagram of the setup I used in this tutorial and a second diagram for what things could have looked like if I had worked alone or in a space too small for assistants.

Small spaces don’t have to be bad spaces. In fact, if you’re shooting in your home, you have quite a few advantages, such as the ease of access and lack of additional rent and utilities. Don’t get frustrated if the only space you have to shoot in is your bedroom or the corner of your living room. Get creative, do some problem-solving, and make the most of the space you’ve got. You can make incredible images in almost any space with a little determination and some practice. Your space doesn’t have to be pretty, and your setup doesn’t have to be expensive; it just has to get the job done.

Model Hollie Blu (@hollies_world)
Practice Post-Processing
If you’re interested in post-processing, that’s another tool at your disposal that isn’t reliant on the size of your shooting space or your location. Yes, it does take practice, but it’s a skillset you can use for the rest of your career and can fill in the gaps when you don’t have much control over your location. In the image below, I actually photographed the model in my garage the day after I took these backplates of the landscape near my home. I set up my lights to mimic the natural light in the backplates and composited them together. You’d never guess the model was photographed in a cluttered garage.

Model Scott Ables

Model: Scott Ables, Assistant Kate Woodman
If you combine your photographic skill with a bit of Photoshop magic, you can create anything you want, anywhere you want. The only limit is your imagination.


Amazing work! You're not only very talented, but very generous with your knowledge. Kudos on the delivery also - very good teacher.
Much appreciated, thank you!
This is great! I love this. Maybe another one that focuses on natural light, lights found at home for those who dont have any lighting equipment at home. Only because we literally can only leave for the grocery stores lol
I'm sure that's something I can do ;)
That would be amazing.
You're so welcome!
Nice tips and thank you. In our apartment in Russia the ceiling is white with a thin clear plastic about 1/4 of an inch from the surface. I was shooting some head shots of our daughter and bounced a single flash up at the ceiling. The plastice spread the light evenly and bounced it back down the same. I never experienced this before and love the excellent exposure it created. I don't know why the ceiling was made this way, but I am glad it was. Gave me some new ideas. Thank you for these ideas and keep it up.
I'm so glad to hear this was helpful, and that you've figured out some creative ways to make your space work for you, that's awesome! I hope you'll share your experiments here ;)
Just found earlier why many apartments in Russia have the plastic just under the ceiling. If or when any damage may occur due to age/stress/the people upstairs, etc....the plastic will catch or slow down any debris. After 60 years of shooting...I learned something new that day. Most all my assignments were in Russia and other European countries. Thanks again and have gun.
Great article. Glad to see that I am not the only one who suffers from space. I am shooting in a 3x3,50m space (about 9x10 feet). Sometimes I wish I had more space, but on the other hand: it's there, it's cheap (it's a unused guestroom) and I love it.
I used autopoles for the background system (two rolls of seemless paper, cut to 2,40m width, black and grey) and some cheap ceiling supports from the workshop with black curtains to block the light from the walls and wardrobes. Nothing is permanent fixed, if I have to, it takes about an hour to remove everything and turn it back into a guest room.
Way to make the most of your space! I'm a huge proponent of working what you've got. It teaches you so much! Then when and if you do get the chance to expand, you have so many more possibilities :)
Great portrait thank you for the tips