One of the great benefits of using modern digital cameras is the high degree of customization options available. Menus, button configuration, touchscreens, and more can be customized for specific scenarios. In addition to programmable buttons and menus, all modern cameras include a feature called Custom Shooting Modes, which allow the user to save and recall personalized user profiles. In this article and video, I explain CSMs and how using them can greatly improve your photography and user experience.
What Are Custom Shooting Modes?
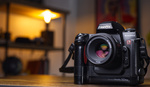
Custom Shooting Modes are designated in your camera by the letter C, followed by a number. Most cameras will have a minimum of 3 available, designated as follows: C1, C2, C3, etc. In Canon's EOS system, three such modes are included, and in Fujifilm's X system, a user can set up to seven specific profiles. At first, it is easy to confuse a custom shooting mode (which I will refer to as CSM for short in this article) with customizable menus or buttons, but these are completely different functions. Here's the difference: CSMs are global settings that affect the entire camera, and are used to save a dedicated user profile that can be instantly recalled. Additionally, a CSM includes a specific shooting mode like Program, Aperture Priority, Manual, etc. (see the photo below where there is a little "M" next to C1 indicating that this particular CSM includes manual exposure, for example). When a CSM is registered, it memorizes and recalls not only menu settings, button layouts, autofocus settings, and the like, but it also remembers a specific shutter speed, aperture, ISO, white balance setting, image quality setting (like RAW or JPEG), and picture profile. It might be easiest to think of it as taking a virtual snapshot of your camera’s settings at a moment in time, which can be instantly recalled when a similar shooting situation occurs.
Why Should You Utilize Custom Shooting Modes?
Now that we understand what CSMs are, let’s talk about why they are such an important feature. Custom Shooting Modes not only greatly improve overall workflow and the logistics of shooting, but they also make it easy to be consistent when a repeated photographic situation occurs. For example, in my camera, C1 is the setting I use when taking headshots at my studio. When I set the camera to C1, it instantly changes to manual mode and recalls the shutter speed, aperture, ISO, white balance, focus method, raw settings, button and menu configuration, picture profile, and every other setting I initially registered. Since my headshots are created in a controlled studio environment, the camera is ready to go without having to double-check every single setting before a session. This not only helps tremendously with consistency but makes the next shoot much more streamlined since I only have to make small adjustments depending on my specific client instead of starting from scratch each time. It also guarantees that I don’t accidentally have the camera set to JPEG instead of raw, for example, which is a mistake we’ve all made at some point and something that can derail an entire shoot.
C2 in my camera is set up for street and family photography. One of the biggest changes for me is in regards to exposure simulation. In the studio, I don’t want the EVF to simulate exposure, since I am using strobes, so I have exposure simulation disabled in my C1 setting. But when I am out with my camera taking family photos, on-location portraits with natural light, or street photography, I prefer to take advantage of exposure simulation, so I can see exactly what I am going to get before pushing the shutter button. Additionally, my autofocus method differs when set to C2, as well as my base ISO, white balance, picture profile, among other things. So, instead of having to dig through multiple menus and manually change all of these settings one by one, all I have to do is choose C2 when I am out of my studio, and I’m good to go for outdoor portrait sessions.
") Custom Shooting Modes Equal Less Missed Shots
Custom Shooting Modes Equal Less Missed Shots
It’s easy to see the utility of Custom Shooting Modes, but there is another benefit as well. Using CSMs will lead to fewer missed shots and silly mistakes. For example, if you are a portrait photographer and also a sports shooter, setting a CSM specifically for sports guarantees that the camera is already set to Shutter Priority with an ideal ISO, focus mode, etc., so there is no way to forget to make these changes to each set before your shoot begins, for example. Another scenario where this comes into play is when working with portrait clients. Early on in my headshot and portrait career, I would spend the first 10 minutes of a session fiddling with every setting, starting from scratch! This would naturally create stress for me, and awkwardness for my client, who had to just stand there and continue to be assaulted with flash bursts as I figured out what I was doing (I'm exaggerating a little, but you get my point). A wisely set CSM will come to your rescue in situations like this.
It’s Well Worth the Time Investment
For a long time, I ignored the Custom Shooting Modes in my camera, mostly because I didn’t understand what their use was and also because I didn’t want to take the time to set them up. In general, I don't consider myself a big tech-head, and I also avoid reading instruction manuals if I can and prefer to just figure it out on the go (yes, this is just laziness). Unfortunately, I would rarely remember the settings I used from one shoot to the next, so without the CSM, I was creating a lot more work for myself and delaying consistency in my images. Conversely, the small amount of effort involved in the initial setup of my CSMs has saved me countless hours over the years and kept me from making avoidable mistakes with clients in my studio. It also has improved my client interactions since I don’t have to make major adjustments at the beginning of each session, just small tweaks. So, if you are not using Custom Shooting Modes yet, now is the perfect time to set up this very useful feature. It will improve your images and workflow and make your life much easier in the long run!


I own an R5 and with the 3 custom modes + a current selected photo mode. So you can toggle through 4 different setting. I use Fv and the three C modes and I quickly go through all 4 just by touching the M Fn button. Should also be noted you can do the same in video mode and have 3 more fully unique setting there. I do 30P / 24P / 24P crop for video.
Great tip!
Thank you. And after spending all this time customizing your camera don’t forget to save the setting to a memory card so you’d load then onto a second body. In the Canon is on the same folder of the custom shooting modes.
I don't often shoot vid, but both my A7R III bodies have a custom mode set for video. Setting the custom modes on Sony isn't as smooth as it should be though.
I haven't shot with a Sony in quite a while but I remember the menus being extremely frustrating.
The problem is that setting the C1/C2 menu (on that model at least) was frustrating. Not ruling out user error, but I found it not as smooth as it should've been.
I'm strange in that I don't mind their menus. Once you learn how to use the 12-slot custom menu it's actually really easy and fast. All the settings you need arranged exactly how you want. Never need to take your eye from the viewfinder.
Press the middle button, use d-pad/wheel to select item and options. Not my camera, just something off the web.
That's a big part of it - just getting used to the menu system you are using.
Same here, for the longest time, never used them; and I was to lazy to RTFM. :)
I have my MR(memory recall)1 set for full auto (wide area focus, eye-af, auto iso, etc) for portraits.
MR2 is set for single focus point in case eye-af is having trouble; or when not shooting portraits.
Hi. Greetings from Singapore. Can you kindly provide a "Custom Shooting Mode" applicable for the Nikon D5 camera please?
I'm pretty sure Nikon uses the same nomenclature: C1, C2, etc. but I could be wrong as I don't use Nikon cameras.
I've never read an entire camera manual until I got my R5. I suggest you do that for your D5. It's worth it.
My Lumix G9 has five custom mode settings. I use all five for various circumstances (landscape, architecture, wildlife, night sky and monochrome) to ensure that I didn't forget something on the fly. All settings are saved off to other media so they can be reconstituted should I need to reset my camera body. I also keep a spreadsheet of all the components of the custom settings in my go bag for ready reference. This prevents me from having a momentary "flash of brilliance" that obliterates something I've already set up and tested with something less effective that I forgot was less effective.
Now that is some serious organization! And a great idea too.