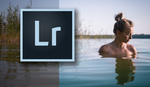
When it comes to processing your digital images, there are so many tools available to you and sometimes the process can seem a bit convoluted. Personally, I like to use a mix of both Adobe Lightroom and Adobe Photoshop to make the most out of my images. Perhaps I'll throw Capture One in the mix one of these days, but for now all of my postproduction work is done using Adobe software. This brief tutorial goes over one of the lesser-known tools that exists both in Lightroom and Photoshop, the Dehaze tool.
Adobe introduced the Dehaze tool in a CC software update in 2015. As the name denotes, the Dehaze control allows uses to adjust how fog, haze, and mist appears in their images. The slider control allows you to either reduce the amount of haze, or increase it, depending on which way you slide the controller. I'll be honest with you, I didn't use it all that much until about a year after it had been incorporated into the software. I started messing around with it just for fun, mostly to see what it was capable of doing, and I discovered that this tool is effective for so much more than simply adjusting whatever haze might show up in your images.
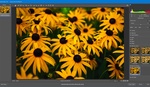
Because of it's unique ability to adjust image tonailty while impressively preserving colors and details without completely crushing your shadow areas, the Dehaze tool has become one of my go-to resources for adjusting image contrast and detail in my post-processing workflow. I don't often use the control to adjust any actual haze within my images simply because it's pretty rare for me to have a lot of haze in my shots out here in the desert. Instead I have found that this tool, when used correctly, can be incredibly useful when it comes to bringing out details in lighter and slightly overexposed areas within my images. At least for my work, Dehaze has been particularly useful in bringing out more details from my skies and distant horizon lines.


In the simple before and after comparison above, the only difference between the two shots is that the Dehaze tool was used selectively to process the “After” image. You can see how much more of the sky came out in the edit simply by selectively applying the Dehaze adjustment. The shot in this example is the one that you can watch me process in the quick tutorial video linked above. In the video, I go through how I use the Dehaze tool in both Lightroom and in Photoshop. For my own images, I find myself using this tool all the time and in each of the programs. I have even used the adjustment tool from time to time when I'm processing portraits because of its unique control over image tones. I love how quick and powerful this tool is and the ease of use makes for better images with less computer time. Make sure to comment below if you found this helpful or if you have found other uses for the Dehaze tool that I haven't highlighted.


I'd never tried this until reading this post. Wow! It probably isn't suitable for ALL images, but the one I tried it on was a sunset portrait on the Maine coast. I've always liked the shot, but was a little unhappy with it being flatter than I wanted. Not anymore! Indeed a powerful tool. Thanks.
I think you're absolutely right, there will always be some instances where it just isn't necessary, or it isn't even helpful. But those times when it comes in handy....it really comes in handy! Glad to hear it helped out for one of your images, you'll have to share the shot some time so I can see the result!!
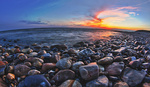
In a hi-res version, this unplanned shot has become my business card/logo/brand. It was shot within a few minutes of sunset on the coast of Maine by a friend with his Samsung Note3 phone. The left pic has had minimal processing and slight sharpening. The right one is the left plus +55 Dehaze. Even in this lo-res version, the change in color seems pretty clear.
That's awesome!! You're absolutely right, the colors and textures are so much more vibrant after the use of Dehaze. That's a great shot!
When the feature first came out, I thought I'd never have an application for it. But after editing some travel photography in more humid parts of the world, its real utility shines. In some cases you can really push Dehaze quite far and retain realism while cutting through hazy atmosphere. In fact, I got some pretty cool results editing shots in Yellowstone on a foggy morning to create crisp yet ethereal images.
One extra feature that would be a nice complement to Dehaze: a "De-blue" function to bring back some color separation when dealing with hazy conditions. There are also some times when a "De-red" would come in handy, particularly in SW United States during forest fire season when the haze has a reddish tinge. I can do all that manually, but if LR tied a color adjustment to low-contrast areas it would save me a heap of time.
That's awesome!! I'd love to see your Yellowstone shots, they sound epic!
I completely agree with you about a secondary function for controlling the blue that tends to get pushed when you're increasing the dehaze control. I haven't ran into my reds getting increased as a result of the Dehaze yet, definitely blue, but some more color control as a secondary initiative to the dehaze would be incredibly handy!
I'm not a big fan of how fake the overly-blue sky looks. I prefer more realism. That said, I do find the 'dehaze' tool to be incredibly valuable, somewhat of a contrast tool on steroids. I just always apply it very gently and am cautious to walk away and come back with fresh eyes after using it because it is so very easy to end up with overly-processed-looking photographs.
Also, if you are ever shooting through a fence, the "dehaze" tool does well to rescue washed-out (from the out-of-focus wire fencing) pictures. Not a miracle-worker, but it is a great tool when used with moderation and in the right circumstances.
I too have used it to recover details in skies. Combined with a grad in Lightroom I've pulled back details that don't seem to come back as nicely with other sliders. Add a bit of saturation and you can get a improved sky.