Infrared photography can be an absolute blast, but it normally takes some specialized equipment and post-processing to pull off. This video shows you how to try it out relatively cheaply and easily to see if it's right for you.
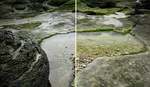
Infrared photography is one of my favorite ways to invigorate my creativity when it's starting to slack. I'm particularly fond of the electric way it renders foliage. The problem is that modern cameras all have infrared-blocking filters. There are two ways around this: using an filter or having your camera converted to shoot in infrared. Each has their benefits and drawbacks. When you have a camera converted, you can shoot at normal shutter speeds, but the process is relatively expensive and your camera will no longer shoot normal-looking files. On the other hand, an infrared filter is relatively cheap, but it forces you to shoot long exposures. This is because the filter only blocks visible light; your camera's infrared-blocking filter is still there, but because the front filter is blocking the visible spectrum, it allows the sensor time to accumulate the little bit of infrared light that makes it past the blocking filter. If you're just interested in trying out the genre, I highly recommend going this route before you convert a camera and sticking to black and white to start. This great video from e6 Vlogs will show you all the quirks and get you up and running in no time.