Photographing forests is one of the harder parts of landscape and nature photography. This editing trick might change how you approach your subject.
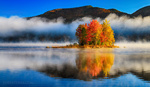
Walking through a forest covered in fog can be absolutely magical. It is without a doubt one of my favorite aspects of landscape photography. The calmness and serenity are unmatched. Each time fog is forecast, I try to find time to get out and photograph a forest. Over the past years, I have had my eyes on a particular row of beautiful, gnarly, old oak trees. I often pass it when I go for a walk, so I have had a good amount of time to analyze how I could photograph it optimally.

The Concept
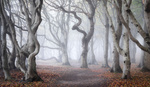
Since I wanted to capture the gnarly trunks and branches, I knew it had to be during winter or spring when there were no leaves on the trees. On top of that, I had to avoid them being covered in snow. Although I think it could look good, I was sure I would prefer the layer of green moss on top of the branches to the snow.
Besides the gnarly look of the trees, I also figured they were placed rather optimally between two hills. This meant I would stand on one hill and photograph the trees straight on and have the trees on the other hill as a background. Check out this exquisite illustration:

Photographing the trees like this, I avoided including the sky and created a “closed environment” in the photos. The last ingredient is very heavy fog. Fog is the only thing that can create a proper separation from the background trees. On top of that, fog also creates a very atmospheric and mystical environment, which complements the trees.

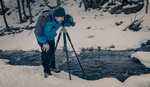
The Settings
To get the photos, I used a telephoto lens at varying focal lengths. For the camera settings, I used a closed-down aperture between f/11 and f/16 to get as much of the trees in focus as possible, as low an ISO as possible to get as clean base files as possible, and I used a tripod to nullify the importance of the shutter speed. To get even cleaner files in the very flat scene, I “exposed to the right” without clipping the highlights.

The Editing Trick
Once you have all your photos, it is time for some post-processing. I personally use Camera Raw, but you can do exactly the same in Lightroom. I also know that both Capture One and Affinity Photo has the same option. You need to find the slider, which is named “dehaze.” In and of itself, it is not really a trick, it is rather that the dehaze slider works particularly well for foggy photos like this. In the video above, I show how the dehaze slider compares to the other sliders, and it surely stands out and makes a significant difference. Dependent on the amount of fog, you might need to be quite aggressive with the slider.


I cannot exactly explain how the algorithm for the dehaze slider is designed, but it somehow manages to bring out the details of foreground elements more than background elements. With a combination of heavy fog, a scene with good depth, and the dehaze slider, you can bring out the details of your subject, yet keep the eerie atmosphere of fog and the separation from the background.


Since I figured out this trick, it has opened up many new opportunities for beautiful and atmospheric forest photography.
 Be sure to check out the video above as I show the entire concept and how I finished the editing in Photoshop and removed the unavoidable noise. Leave a comment below if you found this useful, and let me hear if this trick is something you would use?


I totally agree with you here. Used this trick on my snowy shots, locally, I have to say, but with the same intention of bringing the detail back and therefore create more depth. Great article and video, as usual. ;)
Thanks a lot, Aritz! Yes, it works really well during snow :D
Who I want to be when I grow up:
I had to lol at "exquisite illustration"!
Haha! It takes hard dedicated practice! xD
I wish I could say the same about the Dehaze algorithm as Mads says "I cannot exactly explain how the algorithm for the dehaze slider is designed". I spent quite few sleepless nights with my fellow friends and colleagues to figure out a good algorithm which is now in one of the mentioned application (the Danish one).
Basically haze scatters light on the scene which adds a certain color to the photograph. Usually it is grey or blue in nature (maybe orange for sunsets). The more far away the given pixel is, the more dominant this addition becomes. A dehaze algorithm would substract that color from the pixel color. A perfect dehaze algorithm would be able to build a 3D model of the scene from that single photograph, so it would know how far the given area is, so it would subtract less for the close subject than for the distant one. Sadly such algorithm is not feasible for many reasons, so certain trickeries are applied to achieve acceptable results.
By the way, may I ask why is it an "editing trick" to apply dehaze slider to remove haze from the image?
That's very interesting! I figured there ought to be some kind of "depth perception" from the algorithm.
Splitting hairs, it is less of an "editing trick" rather a technique to use, once specific conditions are present ;)
Some great tips my friend!
Thanks a lot, Mikkel!
Came for the tips, stayed for the exquisite illustration <3
Haha, it is a piece of art for sure xD
Interesting trick, will try and see if it works out for me. I usually work on color depth in Photoworks, but with winter snowy photos it's different, there isn't much color.
Bugga; I was waiting for something new lol. Still all great information for those who don't know .
There is also a slider at the bottom of the Lr5 develop panels that not many know about . In the camera calibration panel, drag the blue primary saturation slider to the right . Often just 25% is enough . The other colours are also handy but the blue seems the better for that little extra WOW factor. Bit like Selective colour panel in Affinity and likely Ps
Way off topic : Try the `/~ key to flag 'and' unflag in lightroom . I found that by accident years ago and have noticed only one tutor mention it since . And they say I'm a slow learner :lol:
Cheers -- keep safe :)
Awesome!