
The character of your portraits is conveyed by many different elements, but a crucial one is the eyes of your subject. In this short tutorial, I’ll show you how to make eyes pop without making them look fake.
There are tons of techniques to edit the eyes in Photoshop, and while all of them can be useful, the one I’m about to show you is straightforward to use and tends to leave your subject natural-looking. For this method, we are going to rely on a simple black-and-white adjustment layer to make the structure of the iris more crunchy by adjusting the luminosity of each color channel.
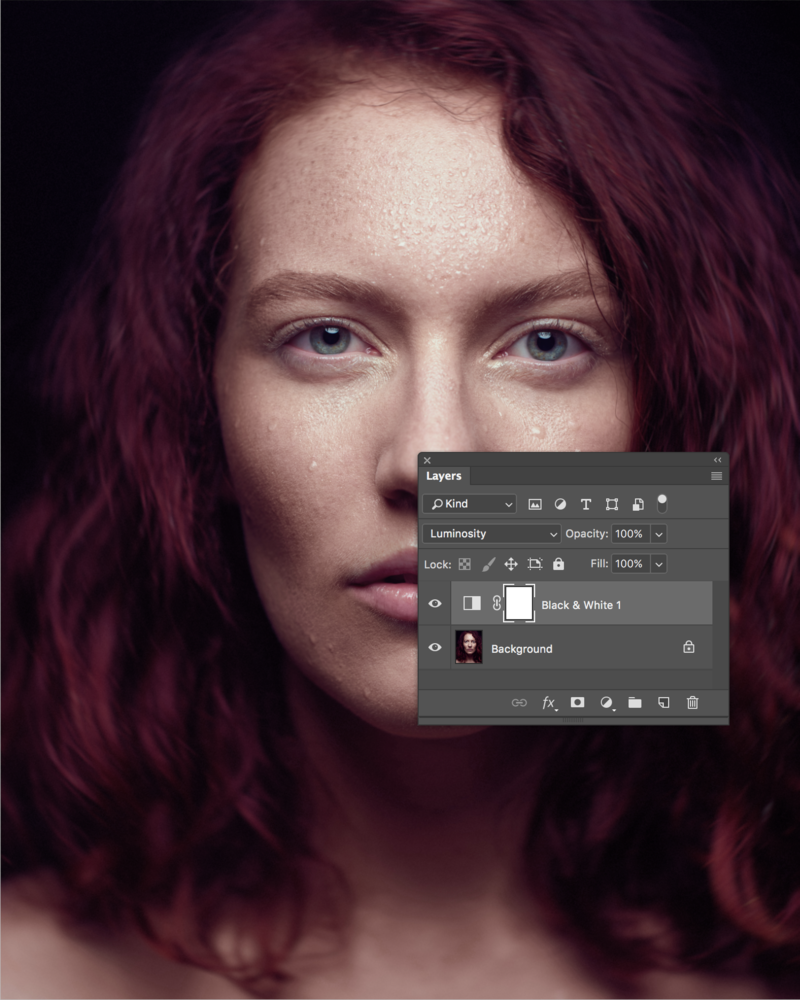
To get started, create a black-and-white adjustment layer and change its blending mode to Luminosity.
We are now going to invert the mask and fill it with black. To do so, press Cmd/Ctrl + i on your keyboard, or click on invert in the properties panel while having the mask of the layer selected. Then we want to make the adjustments to be visible only on the iris of our subject. So using a white brush, paint on the iris. Use a soft brush to make the transition between the adjustment and the rest of the image as smooth as possible.

With our mask adjusted and the blending, let’s tweak the settings to make the eye visually stronger. As we are using the luminosity blending mode, by moving the sliders on our black-and-white adjustment layer, the saturation and hue won’t change. There is no right or wrong in this process: rely on your taste and feel to find the proper settings.


And that’s it! You are done. The technique is no more complicated than that. One thing to help you out and make the structure more visible is to contrast the two most perceivable colors. In my example, this would be blue and cyan. As the cyan was in the lighter areas, I brightened up the cyan while I darkened the blue zones.
If you want to go further, you can even tweak this by adding a curve in the clipping mask to the black-and-white layer. Then, play with the different channel of the curve to bring even more contrast out of the eyes. Just be careful not to go too far with it: while bringing out the texture and luminosity out of the iris can make your portrait stronger, overly retouched eyes will ruin your image every time.


With all retouching, always ask yourself "does this look human?"
Too many take retouching (eyes, skin [especially frequency separation lately], body) way too far, in my opinion.
Better yet does this look like the person I photographed. I think FS has it's place in retouching but I myself am glad I never leant it so I don't use it. Then again I love the look someone like Desiree Mattsson has in her images, even tough they are way out there in terms of retouching.
Interesting technique, I was using Brightness/contrast layer for similar thing, but this technique looks more promising, thank you for share!
Been trying to following your instructions but can't get pass the invert doesn't change color. Probably not your instructions I just don't understand photoshop it drives me crazy.
A slightly easier method I often use in PS: create a curves adjustment layer over the background. Leave it set to 'normal'. In the properties box click on the 'finger' icon and set an adjustment point for the pupil and second point on the curve for the lighter tones of the iris. Select the pupil point and tap the down arrow several times; select the iris point and tap it up and to the left several times. You can fine tune this for your image. Select the adjustment layer (Command+A), and fill it with black, masking (hiding) the effect of the adjustment layer. Deselect the adjustment layer. Using the brush tool (set to 100% white) paint on the iris and pupil of each eye. Since the adjustment layer is set to 'normal' this will effect both the saturation and the contrast of the iris and pupil. If you're happy with the results you can flatten the image and save. If you create a smart layer first you'll be able to go back and further edit the effect before flattening and saving. I can typically do this in 90 seconds or less. It nearly always gives me the 'boost' to the eyes that I want.
I usually just D&B the eyes slightly but one thing that IMO makes a big difference which I noticed after I started using more natural light is the size of the iris. What I see in many shot taken with flash is that the iris is expanded since there is modelling light on the flash it self or the modelling light is not very bright. Personally I like a smaller iris so the the color of the eyes and texture pops out more.