There is no doubt that the wide-angle zoom lens is the most popular for landscape photography and is my go-to lens in most of my work. It is however, not necessarily the easiest lens to use as it takes in a lot of the landscape.
In my latest video, I share my five steps to make powerful wide-angle photos. What kind of wide-angle does not matter as different brands have different kinds of wide-angle zooms. Whether it is a 12-24mm, 14-24mm, 16-35mm, or any other combination these five steps apply to all. This article is a brief summary of what I go into detail with in the video. If you want further examples and more tips, be sure to check out the video.
By using the term “powerful”, I mean a wide-angle photo that punch the viewer in the face and hopefully creates a sense of “wow”. It is one of those photos, that make you stop when you scroll your Instagram or Facebook feed. One of those where the photo almost pukes the landscape out into the viewers face. These five steps are very formulaic, but also very popular, so take it with a grain of salt, as there are many other ways to create a powerful and impactful photos.
Step 1
The first step is holistic thinking. There are two approaches to this term: one is to zoom out and think of the photo as a whole, and the second is "the whole is greater than the sum of its parts". What I mean by this is fairly simple. Everything you include in the photo must make sense, do not include elements that do not benefit the photo. The individual parts of the photo doesn’t have to be the most interesting stuff on planet Earth, but adding them together they should work and benefit each other.

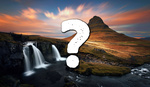
Northern lights, iconic mountain and waterfalls. What's not to like?
Step 2
The second step is to find out what you are taking a photo of. In my opinion, this is very important. You want to show something interesting. Not just a random hill, which does not stand out in the landscape. My rules of thumb are natural features, which stand out in the landscape, or buildings of cultural or historical value such as castles or churches all works great. Generally think of landmarks that pique your interest.

Reynisdrangar sea stacks or iconic to Iceland and a landmark you can not miss.
Step 3
When you know what you want to photograph, the question is how you are going to photograph it. The third step is to make a strong meaningful composition. With a wide-angle lens, you can include the surroundings and make a dramatic composition that really draw in the viewer. If your focal point is in the background, find an interesting foreground that benefit the focal point. The last part is important for it to make sense. In a video I made a few weeks ago, I explained how you should not include random stones just for the sake of creating depth. Why fill up half the frame with a boring foreground? No, the foreground has to help tell the story, give an impression of the location, help the viewer, push an idea or push focus towards your focal point. There are many reasons to include a foreground, but photograph with intention.
I show many different examples and talk about various ways to use the different compositional tools to make powerful photos. I conclude you will have to simplify the photos, which kind off sounds counter-intuitive. Include only a few but very dominant elements that fills up the photo and does not leave space or room for confusion.

See how the foreground streaks continue up the mountain?
Step 4
The forth step is to actually make the photograph in field. The hardest technical aspect of this kind of photography is to get everything in focus. Doing these wide-angle photos, you can end up very close to your foreground. If that is the case, you will either have to photograph with a stopped down aperture, to create a larger depth of field, or focus stack your photo. If you go for focus stacking a tripod is necessary.

Sometimes you need to hit the perfect shutter speed and aperture.
Step 5
You cannot really get around the editing phase when you shoot raw. The final step is therefore to edit your photo. Straight out of the camera, raw files are flat and boring. You as a creator is the one who brings the photo to life. How you edit your photo is entirely up to you. I personally like to enhance the elements of interest in my photos. Draw attention to whatever I want to show and either remove or hide what I do not want to show. There are many ways to do this and there are many different tutorials available for editing landscape photographs. I personally do not restrain myself from heavy editing, but my rule of thumb is to have my eyes accept what it see and respect the light.


These were the five steps. As I said they are very formulaic, but there are big room for differentiating your compositions. Check out the video to see all the different examples I show. I share even more tips and tricks concerning composition.


Spot on Madsy 👌🏻
Thanks as always, Hans! :)
Quality content Mads! :)
Thank you, Aritz! Much appreciated :)
Very good Mads. Thank you. There are exceptions to all rules though. Ie.; Step 4 - "The hardest technical aspect of this type of photography is to get everything in focus." True if that is ones' intent. One can also defocus, blur, etc. to create a moody scene or evoke other feeling or even surrealism if that is their intent. But point well taken. As for Step 5 - one can get around the editing phase if shooting film and the creativity is set in-camera and the final product is what one is looking for. But your points are correct and well stated. Thank you sir.
You are very correct. I try to disclaim as much as possible in the video and in the article. Luckily there are many ways to do it :)
Good stuff. Bought your timeblending seascapes video course yesterday. Useful.
Thank you so much, Martin! Greatly appreciated :)
I have already told it, but I will repeat it:
"Your photos are really beautiful!"
Hehe, thanks a lot, Laughing Cow ;)
Hey Mads, I stumbled across your videos via YouTube recommendations. Your photos and tutorials are very inspiring! I've been marathoning your videos and soaking up as much information as I can before my trip to Iceland next month!
I really appreciate how you don't force your videos to be over 10 minutes long. You fill them with meaningful content and they are as long as they need to be.
Thanks for all your work!
Thank you so much for such a kind message. Happy to hear you like the videos :)
So many times I haven't used my wide angle on trips because of lack of time at the location. Now I will make more time and use your suggestions!
I hope you get some good photos :)
So true!
Thanks a lot, Kai :)
Amazing content Mads!
Thank you very much, Christian! :)
Well written Mads - always quality stuff coming from you!
Thank you very much, Mr. Beiter, always appreciated :)
You're welcome. Happy you like the posts and videos :)