
Composition is one of the hardest things we deal with as photographers. It is complex and can seem like a neverending pursuit. Today, we’ll look at five simple ways we can approach a scene and come away with an effective composition.
There are so many “rules” in composition. They are all good to learn about and will help over time. The one thing that all of these rules have in common is that they essentially point to ways you can give more visual weight to your subject, ways you can pull the viewer's attention to where you want it.
I like to look at visual weight as my guideline each and every time I make a photograph. Before I press the shutter, I always ask myself a few questions. First of all, “what am I photographing?” Second, “what information do my viewers need to understand that?” Third, “what are the elements in the scene in front of me that I can use?”
Pare It Down
The overarching idea I want to talk about with regards to composition today is paring your composition down to exactly what it needs to give weight to your subject and draw your viewer to that. I spoke about this recently in a short video I made but wanted to elaborate here for Fstoppers’ readers. It’s important to note that not every composition needs to be simplified like this and not every composition will benefit from following these techniques. These are just guidelines. Just like anything in photography, none of these are a magic bullet. Each point here is a way to draw your viewer’s attention, not create the perfect photograph. With those in mind, let’s get started!
Depth of Field and Motion Blur
Perhaps the simplest way to give weight to something in your frame is to make it sharper than the other parts of your frame. Sharpness is a form of contrast in photography and objects of higher contrast tend to stand out more to the viewer than those of lower contrast.
By widening your aperture, you are able to make use of selective sharpness. For example, if you focus on the eyes of a person at f/2 and allow the background to become blurred, you will immediately draw more attention to the eyes. In the image below, your eyes go straight to the couple before exploring the rest of the scene. They are the sharpest part of the image.

The same applies to motion blur. By using a slow shutter speed and panning with the motion, you are able to keep a moving subject relatively sharp while blurring the background. Conversely, by keeping the camera still and allowing motion to blur, you can also draw attention to the moving subjects. This play of sharpness allows you different ways to get your subject noticed.

Move in Closer
Getting closer to your subject has two main benefits when drawing the attention of your viewer. First, it can cut out the clutter in your scene. Second, it will make your subject larger in the frame, which increases its visual weight. These effects are multiplied when using a wide angle lens.
Unless you’re trying to give the feeling of how messy and cluttered a place is, cutting out as many superfluous objects as possible from your composition is usually beneficial. A great way to do this is to simply move closer to the subject you are photographing. The waterfront market in the old town of Hoi An, Vietnam is absolutely chaotic. Every couple of steps, you will pass another seller peddling goods, and the mix of locals and tourists shopping there makes it tough to move at times. However, I wanted to create a simple frame that showed one single element of the market. So, I moved in closer and closer until I got to the frame you see below.

One other effect of moving closer is that the subject renders physically larger in the photograph. This is extremely apparent when using a wide angle lens as objects closer to the camera become significantly larger than those farther away. Even with a telephoto lens, moving closer will make your subject appear larger.
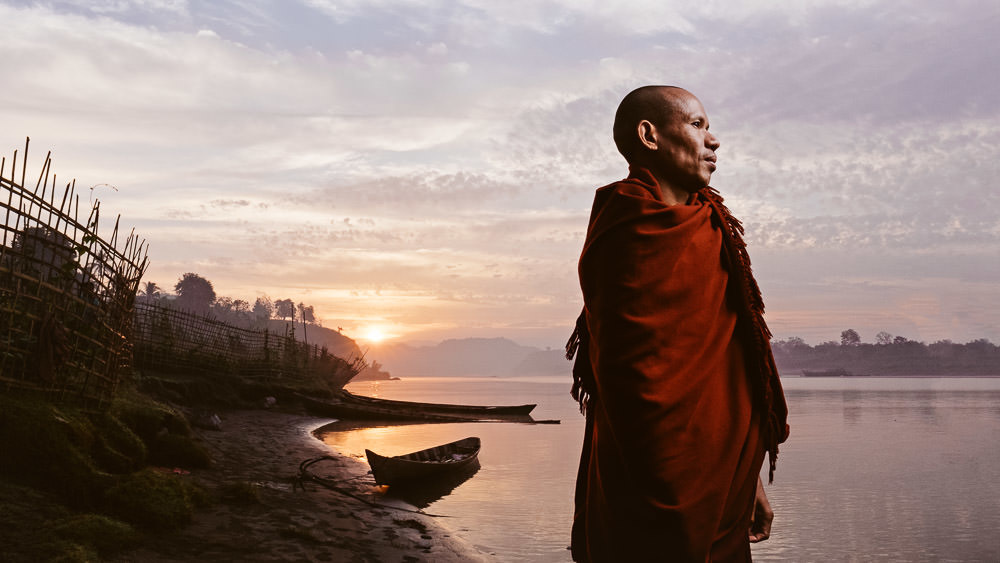
The boat in the image below could easily carry twenty of the monk you see. However, the use of a wide-angle lens here makes him appear larger and thus gives him more visual weight. This image would be completely different if I had used a 200mm lens.
Go Minimal
In stark contrast to the previous point, I’m now going to suggest you move back. If there is a simple background behind your subject, moving back and allowing the subject to become small in relation to it can also work to accentuate the subject.
When the subject is small against a wider background, it can often be the first thing you look at. This works best when there is a large contrast difference between the subject and the background. To that end, look for backlit scenes, subjects that are much darker or brighter than the background, opposing colors, or create a difference in sharpness to help the subject stand out and not get lost in the scene.
Although the background here is rather busy, your eyes will still go to the novice monk I chose as my subject. His robe is significantly different in color and contrast from most of the scene, making him stand out from the background.

Light
Light can be an excellent way to simplify your frame and give visual weight to exactly what you want your viewer to look at. It is the contrast that the light creates that draws the viewer’s eye to where you want it to go. One patch of brightness in a sea of darkness will instantly have your viewer lock in there before exploring the rest of the frame.
When trying to achieve this, look for light that has a specific direction or is hitting one thing and not others. The key here is to illuminate your subject and keep other things relatively dark. Doorways, the entrances to alleys, and windows are great places to look for this sort of light. When using light such as this, just make sure you expose for the highlights and try not to have anything brighter than your subject in the frame.

Obscure
If you cannot use any of the above techniques to simplify your composition and draw visual weight to your subjects, it can benefit you to look around and see if there is something you can obscure part of the scene with. Placing an object in front of other objects in your scene can help to cover up clutter or create a minimal composition where there isn’t one.
In the image below, I needed a way to hide my softbox and also reduce the amount of the farm and mountains I would be showing. However, I still wanted to illuminate the subject and have her in the field. So, I made use of a tree stump and my wide angle lens to ensure that all those distracting elements would be covered up.

Bringing It All Together
In the image below, I started from a standing position. This didn’t work at all. It didn’t capture the energy, the light, or remove the distracting crowd behind. By getting low down and choosing a much wider lens, I was able to fix all of these. First, the light illuminated the dust from down low. This was perfect for the late-afternoon scene. Second, that dust then obscured the crowd. Finally, I was able to get in very close with the ultra-wide Fujifilm 10-24mm f/4, which captured the energy of the dance perfectly.

In Conclusion
I’m not suggesting that you kick back and think about all of these options for composing a scene as it unfolds in front of you. The point here is that these are tools. As you learn them and use them, they will become second nature. You’ll start seeing things as they happen. You’ll also have tools with which to work a scene. Learn these tools and practice them. They will become your fallbacks when looking for a good composition.


Great article! Thanks for the tips.
You're welcome! Glad it was helpful.