Shooting with flash can seem daunting at times, but it also opens up a whole new world of possibilities to take some truly epic photos that just wouldn't be possible with natural light. As a minor control freak, I was drawn to shooting with flash pretty early on in my career because I wanted to have control of the elements that made up my image. I didn't like the idea having to rely on what the sun was doing to determine whether or not I would be able to create the image that I envisioned. I wanted control so I took it. If you’re on the fence about whether or not you should start shooting with flash, this tutorial is for you.
As photographers, it’s really easy to think that the gear we use determines the quality of the images we create. Sure, having nice gear may help us get to the final result easier and quicker, but not having “great” gear is no excuse for not taking great photos. In this video I used one of the cheapest speedights on the market, which was also beat to hell and slightly broken, to create some portraits that any client would be happy to pay top dollar for. All it took was a little bit of creativity and I was off to the races.
When shooting with a speedlight on camera, it definitely helps if you shoot in a location that allows you to bounce your light off different surfaces to create different lighting effects. In my case, I was shooting at Cumberland Park in Nashville, Tenn. which was right across the river from downtown. I personally love shooting in this location because it has a lot of different architectural elements that allow me to bounce my flash and create dynamic lighting.
Bouncing Off a Side Wall
For the fist shot, I found a spot that I was happy with and placed my model where I wanted her. Going into this shot, I knew that I was going to be bouncing my flash off of the wall to my left. I made sure to place my model close enough to the wall to allow for the flash to bounce with enough power to illuminate her face. If you put your model too far away from the wall, even at full power, there is no way for a speedlight to illuminate your subject.
When I was setting up the shot, I made sure to set my camera exposure for the ambient light in the background which in this case was an aperture of f/8, a shutter speed of 1/160 s and an ISO of 100. Now I had a problem on my hands as my subject was underexposed. I knew that I would need to use flash so I popped my speedlight onto my camera and pointed the flash directly at my model. What I was left with was an image that, technically speaking, was correct but the harsh light from the direct flash was anything but flattering and it certainly didn't look natural.
To remedy that problem, I pointed my flash at the wall beside me so I could bounce the light and create a nice soft light that illuminated my subject and also looked natural. One thing to keep in mind when bouncing your flash at a wall is that you will have to increase the power to compensate for the fact that the light has to travel a greater distance than it did when firing it directly at your model.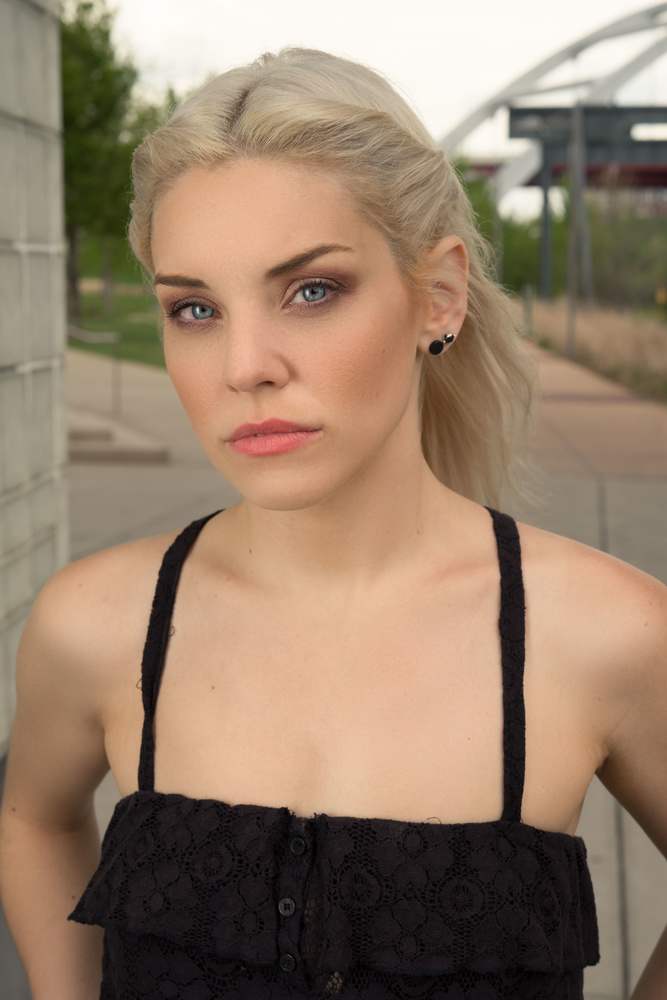
Bouncing Off an Overhead Surface
For the second shot, we set up beneath a small walking bridge that had a silver reflective surface which made for the perfect situation to bounce my flash. When I took the first shot with no flash at all, my subjects face nearly fell into complete darkness.
When I turned my flash on and bounced it at the ceiling, I still ran into a small problem where I had some unflattering shadows underneath my model's eyes, nose, and chin. Although that looked better than the shot with no flash at all, I wanted to fill the shadows in a little bit.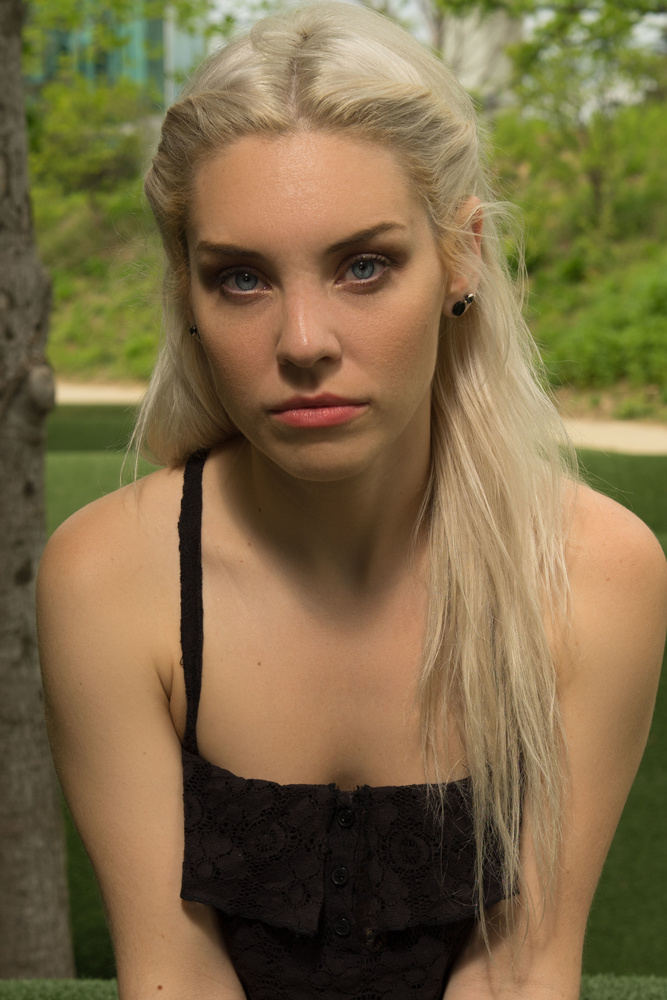
Most speedlights have a fill card built into them, but in my case, I was using an old broken flash and I couldn't get my fill card out. Not to worry, I just pulled a business card (or you could use anything that has at least one white side) out of my wallet and secured it to my flash with a rubber band. One advantage to using a business card rather than the fill card built into your flash is that you can shoot with your flash pointed upward while in portrait orientation while a built in fill card only allows you to shoot landscape with your flash pointed up. After I secured my fill card I took another shot and just like that, the harsh shadows underneath her eyes nearly disappeared.
Of course, there are still some shadows, but not nearly as drastic as they were in the shot without the fill card.
Bouncing Off a Surface Behind You
The third and final example I am going to show you is how to use a wall behind you to bounce the light and create a nice even flat light on your model. In this situation, I wanted to bring the exposure of my image up a little to create the look I wanted for ths shot. I had two options to do this, either lower my shutter speed, which was already at 1/160 s or bring my aperture down which was currently at f/8. I decided to change my aperture to f/4 which meant that I would have to decrease my flash power to make sure my model wasn't overexposed. Since aperture controls flash output, decreasing my flash power was what only option for getting the correct exposure.
I went ahead and took a shot with just natural light and to be honest, I was was pretty happy with how it looked but I wanted to fill in some of the shadows so I took another exposure with my flash on. Both shots look great but the image with the flash has a much different look to it which might be something that your client wants. I know that I prefer the shot with flash over the natural light shot.
One thing to keep in mind when bouncing your flash off your surroundings is to avoid walls that have too much color because you’ll be left with a weird color case on your subject if you bounce off colored surfaces. Another thing to avoid is trying to bounce your flash off surfaces that are too dark. A dark surface will eat up all the light coming out of your flash and you’ll drain your battery trying to do something that won't produce any results. Finally, just remember to get creative. I just gave you a few examples of shots that you can try, but I encourage you to try out other possibilities and share your results with me. If you have any questions please feel free to leave those in the comments section below, and also feel free to share your images there as well.


As always, great educational video. This provided good pointers for people who aren't even beginners.
Thank you Shelby
Great post although for your third example I tend to prefer the natural light look which is already very very soft and gives more dimension to your stunning model !
Thanks for checking it out and you're definitely not wrong about the last example. Like I stated in the article, they're both correct shots but the one with flash just gives it a different look. Just personal preference.
Well the point of the article wasn't to tell people that they should, it was just to prove that you can. There are plenty of photographers who just don't know how to shoot with off camera flash. Clearly your work speaks for itself and this article wasn't meant for you.
I really like the look with off camera, but using on camera bounce essential takes it off camera. Good techniques for fast paced weddings where you don't have an assistant or time. Key is to know how and where to bounce.
I disagree. Shooting a smaller system is sometimes so much easier. And a flash on camera especially if you're on your own is a lot easier to work with than even a speed light on a stand. Let alone a big octobox + a real strobe on a battery and all the fancy gear I actually got rid off because it was too much of a hassle. For that reason, the article covers the 3 possible ways to get soft even flattering light with an on camera flash (above, side, behind) and I mean it's well done. There's nothing wrong with the example photographs and the model is stunning.
In most cases, I find that the less gear I have the better. The more you have just increases the chances of something not working and not to mention time it takes to setup/teardown to move locations.
What are thoroughly written and illustrated post. Thank you for an enjoyable read
Thank you so much for checking it out!
It certainly doesn't hurt haha
At times on camera flash is the only available lighting option. These are helpful tips for making the best use of that option.
It's also a lot less conspicuous than carrying around a big light stand and modifier. Especially when time is of the essence.
Been there, done that. Less conspicuous and more practical in many cases
definitely, although there are some limitations to what you can do but it's a good option if the situation calls for it.
What's a good way to do this if you're working in a forest preserve or something similar where you don't have much to bounce off of? Is that when it's best to take it off camera?