Live music session recordings have always been a pillar of the YouTube community, as much as movie trailers and sneezing cats. But over the last few years, thanks to the VEVO dscvr & Sofar Sounds movements, they have seen a great surge in popularity. Here is our essential guide to filming and editing live band sessions.
Multiple Takes.
The easiest way of adding a high production look to your live session is to not shoot it live at all. By doing multiple takes, you can get shots that would be impossible if you were to film in one take. For example, you would want a wide shot of the band throughout the video to cut in and out of, but during the guitar solo you want to get tight into the strings. Thirdly, you need a camera on the lead singer for the whole track. You could place a few cameras on tripods, or better still, rope in a few extra camera operators to solve this problem. But what if you have only one camera? What if you can’t afford more camera operators? What if when it comes to post, half of your footage features a camera operator in frame thus shattering the illusion of a session recording? What if the static camera shots end up looking uninspired next to your roaming camera? Shooting multiple takes solves all these problems, but also conjures up a few of its own which we'll discuss a bit later.
Find a Sound Guy and Play to a Click.
One of the best pieces of advice an experienced filmmaker gave me when referring to all types of filmmaking, was "not to try to do everything yourself." Whenever possible, bringing in a sound engineer will be invaluable to the final production value of your video. Try to strike a deal with new studios, or engineers just out of college. You’ll find that your skill sets marry perfectly for productions like this, and the collaboration is greater than the sum of its parts.
Even the best musicians in the world will find it hard to remain perfectly in tempo for multiple takes, so wherever possible ask your sound engineer to send the tempo, or click track, through to in-ear audios. This will save you a ton of time in post.

Capture B-roll.
If it is not possible to get the band to play to a click, then this means reviewing each shot to ensure audio and visuals are synced up. Three or four takes should ensure you always have something useful to use that is synced, but if you are struggling, better to put a small piece of B-roll into your video rather than a sloppy looking clip. This could be a close-up of the Kick Drum, a shallow depth of field shot of a microphone, or a clip of some of the audio recording equipment.
Tell the Story of the Music with Light and Movement.
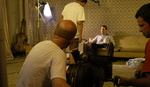
Given most recording studios have no windows and aren’t built for filming, you are going to have to come up with your own lighting solution. Your lighting setup will depend on what you can afford, but LED lights like Aputure Amaran AL-528W Daylight LED Flood Light would be my recommendation given they are lightweight, don’t overheat, and are affordable. Pushing the light through a diffuser will create a larger and more attractive looking light source for your subject’s key light. When filming The Broom Cupboard Sessions, we use a diffused light on the lead singer, then key lights on the other members, often keeping one side in shadow to create some drama with our lighting.
Another easy tip to capture more interesting frames is to get the band to face inward to each other. This will gives the whole recording a fly-on-the-wall feel, and provide opportunities for some elegant over the should shots, as well as interesting steadicam takes if you have something like a DJI Ronin-M, or our favorite piece of equipment right now, the DJI Osmo Raw.
But don’t shoot with a steadicam just because you have one. Think about the music your artist is playing and try to use your camera movements to compliment the sound. Consider shooting handheld for energetic indie rock, or using long smooth takes for a mellow country sound.

Post Production Secrets
Once you have received your master audio from your sound engineer, place a clip marker at the same place for each take including the audio to create a multi-camera timeline. You can find out how to do this in Adobe Premiere Pro in this tutorial. From here it’s simply a case of cutting in time with the music, and choosing the best looking clip. If the band couldn’t play to a click, select your master timeline first, and then move the individual clips around till they sync with the audio.
We do a lot of these, so time saving tactics are deployed all the way throughout the process. We shoot and edit in ProResHQ format. This gives us the flexibility to edit in real time using the original files whilst maintaining enough information to give the videos a nice color grade. But this is really going to depend on your camera and your processing power.
We also start with a template file in Premiere Pro so that our YouTube channel remains consistent which again, saves lots of time. Once the first draft is cut, it’s time to share it with the artist. Whilst wetransfer.com is a fantastic free tool for sharing up to 2GB at a time, we prefer to upload to Vimeo on our Vimeo Plus account, then share with the artist using a password protected area. After working on refining the syncing for an hour or so, it’s quite easy to come blind to small errors, so it’s worth getting the artist to provide feedback at this stage, so that you can tighten the master video up knowing exactly what to look out for in the second, and final edit.
Whilst many of your viewing figures will depend on the quality of the artist you are filming, there are some key decision you can make in the production and post-production phases to attract hits and watches because of the beauty of your visuals. Refining your process and collaborating with a good sound engineer will provide a platform to offer regular and reliable live sessions to your local music scene. Make sure you price your service so that it works for both you, and the emerging musician community. We like to price our sessions very competitively as this is a great way to work with new clients, with the aim of securing official music video contracts.
And lastly if you start to secure regular bookings, terrific. Just make sure you invest in a good pair of earplugs!


Some excellent tips and really good music. This post is timely for me. Thanks!