
I do mostly outdoor photography and anyone who does this can get bitten by the night sky bug. All those beautiful stars and the dramatic Milky Way beckon, but for many beginners it seems an impossible task. They think of needing tracking mounts, ultra-long exposures, and complicated processing. The good news is, it's not all that hard to get started with a fairly modest investment.
For purposes of this article, I'm going to assume you have a good DSLR, a decent tripod, and can get to fairly dark skies. My focus, so to speak, will be on getting good shots of the Milky Way assuming you are just starting out on your quest.
The key to achieving nice Milky Way images is you're going to need a good lens to do this, and you probably don't own a lens that is going to make Milky way photography easy. The happy solution is a Rokinon 14mm f/2.8 lens (they are branded Samyang in Europe, and they are made in Korea). Usually selling for about $300, they can take excellent Milky Way images, won't require you to invest in a tracker, and are fast enough and have good enough optical quality to produce an excellent image. The lens works well on full-frame sensors and APS-C sensors. Rokinon has been producing this lens for a very long time, and even though the cost is very low for what it does, it is pretty much the go-to lens for Milky Way astrophotography. It's certainly the most popular choice for many photographers.

The Rokinon comes with mounts for many popular cameras including Canon, Fujifilm X mount, Micro Four Thirds, Nikon, Nikon AE, Olympus, Pentax, Sony A mount, and Sony E mount. You'll want the basic Rokinon lens, autofocus really isn't needed for sky photography, and we're trying to get this done with a minimum of expense.
So assuming you have the lens in hand, what's next? The Milky Way is visible this time of year, but it's even brighter in the summer and fall. You'll want a moonless night, and be far away from city lights.
With the Rokinon on your camera, you'll want to set focus at manual and try infinity. The infinity marker is not always exact, so try it at some settings on either side and use what works. Then open your lens to f/2.8. Set your camera to bulb or T for time exposure so the shutter can be held open. Better to use an inexpensive cable release for that, so you aren't really touching your camera, but in real life, if you are careful, the Rokinon image is so wide that small vibrations likely won't appear. You'll need to be on a tripod; no one can hold a camera steady for a shot like this.
Astrophotographers often use the 500 rule to determine exposure time, dividing 500 by your focal length. Since the Rokinon is 14mm, that gives you about 35 seconds, but with modern cameras that rule begins to fall apart. With my Sony a7 III I use 14-17 seconds. My Canon 6D used the same exposure time successfully.
A good ISO would be 3,200 if your camera allows it. With less than a full-frame sensor I might suggest 6,400. But I've seen older cameras do pretty well with 1,600 ISO. Variables are how dark your sky is and how clear and non-turbulent the air is.
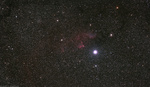
The image below was taken with a Canon 6D and the Rokinon with a 14 second exposure at ISO 3,200 and at f/2.8. The yellow glow is light from a nearby city.

Some cameras offer noise reduction, a separate image taken with the shutter closed that runs the same time as your initial exposure. I don't recommend it as it is time consuming and not always effective.
Shoot in raw format, it will allow you to get the most from your image when you post-process it. There are a variety of excellent tutorials for processing Milky Way photos on the web. Some of my favorites are this video and this article. You'll need Adobe Lightroom or Photoshop or any editor that allows you to manipulate raw files. One of the critical things to get right in post-processing is to get the white balance correct. Even far away from cities, the sky will glow with color that comes from city lighting. At the start of any processing session, you'll want to get as neutral a sky as possible.
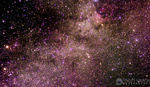
Image below with Sony a7 III, Rokinon lens at 17 seconds, ISO 6,400 and f/2.8

Chances are, many of our readers will have everything they need to get started getting rewarding Milky Way photos, except for the lens. You can spend more on a wide-angle prime, but the Rokinon really hits the sweet spot. And it does more than just night sky photography. It's used for landscapes and architectural photography too. It's not really a high-end lens, and you'll likely see some vignetting and distortion at the extreme edges of the lens. Those artifacts can be largely reduced in post. I've also heard that some of the Rokinon lenses don't work well out of the box, but I have friends who use them and have a good experience. If you see mechanical or optical issues return it and try again. The Rokinon really is a bargain, but it won't have the build quality of something more expensive like a really fine and well regarded Sigma Art prime. Still, the Rokinon results will be pretty close to the quality you can get with more expensive lenses.
The most important thing is that the Rokinon will get you going, and if you follow the basic rules, you'll get images that will amaze you without a big outlay of cash. Please feel free to share your experiences below in the comments.


Nice article, the Canon 6D + Roki/ Samyang 14 is definitely the best performance to the dollar combo for Milky Way shots.I’d like to get an Irix Firefly 15 tho, a bit sharper in the corners.
The 24 f/1.4 is also very good... 6D + Rokinon 24 f/1.4 @ f/2 untracked, 10 x 15s stacked
I was going to mention the 24 f/1.4, it can definitely it's almost the same price but can give you much better results because it captures way more light, plus you can get the same angles you can shot with the 14mm doing panoramas while the opposite isn't possible.
Only downside of the 24mm is that apparently it has a huge sample variation, plenty of people had to return it because of misaligned optics that caused uneaven frames, however if you get a good copy it's one of the best astro lenses!
My 24 f/1.4 was soft in left quadrant yet tack sharp everywhere else. I can’t stand coma / bad star shapes so I sold it and plan to get the Irix for Milky Way season which is just 2 months away now
If your camera will mount it, the various Tokina ultra-wide zooms with an f/2.8 aperture are also a good choice; for modestly more money you have a more versatile lens.
A program like PhotoPills, while not strictly necessary, will help with other challenges that can vex the newcomer: 1) ensuring that you shoot when the moon isn't up 2) pointing your camera at the right spot for the Milky Way and core 3) choosing a place to set up to get a nice foreground image (rock formation, light house, etc) 4) shooting at the right time of the year and night to get a pleasing core.
The ole astro bug. Good article. It's always fun to see just how noise free and clean I can push a final image for large print.
A good site to use to find a place to go is https://darksitefinder.com/map/ It helps to be west of the Mississippi.
Also, I use LENR, I think that it makes a difference for a single exposure.
Good article. I shoot astro on fuji crop sensor with the rokinon 12mm f/2. Great for landscape too. When using the 500 rule make sure to use FF equivelant focal length. F/2 gives me good single exposure results at 20sec for the xt2.
I've found my X-T2 and 12mm combo great for 20 seconds too. Now that I track, i don't worry about it. :-P
Canon 6D + Rokinon 14mm ISO-6400 25s
Deals Gap, TN Definitely a great starter lens.
Is that gap at Cloudland Canyon?
No, here is the "Google Plus Code" to show you exactly where. Plus codes are googles version of GPS coordinates. Just input the code in google maps search bar.
Plus code= G23F+FG
It's a Trap! Run Away! Hide! Do not listen to this.
Yes you can get into the field pretty cheaply. But it does not stop there. I did not own a camera and got interested in Nightscapes. So I got a camera, a tripod, and the Rokinon Lens. It is all downhill since. More tools, better tripod, Full Frame camera, a new lens.. it does not stop. Next step is a few more lenses for different types of shots.
Then the editing. Single image shots are ok, but now I want to stack to reduce noise. I want to blend foreground images stacked with sky images stacked. I want to buy a tracker and do tracked shots.
Run away! Before you go down the rabbit hole Alice!
Lol honest comment
"Uuuh that Samyang lens is a bargain..." aaaand you just ended up with a 14.000$ Takahashi FSQ130ED Super Apo, congratz for the purchase!
So far I have not got into true AstroPhotography and gone down that rabbit hole. But I know till eventually happen.
Past the Event Horizon down the AP black hole lol no coming back nowl 😂
I agree, but having a backyard observatory AND a Takahashi FSQ I love the simplicity of getting out with minimal equipment... DSLR, lightweight tripod and Rokinon. Incredibly satisfying.
mel
Those people almost look like trees on the lead image.
YES RUN!! BUT the best unseen shots with human eyes will be had like having a microscope for germs! 6 years down the rabbit hole!!! Only Lr/PS has the lens correction for the R 14mm. It serves good. If and I Say IF (any camera and lens will work my first T2i/1022 lens [16mm]) you are gifted with a Sony A model (first A7S 2014) the 1635 f/4 great start But you will want WIDER so the 1018 f/4 aps-c used in FF at 12mm (90 degree = to 18mm FOV not 112) but no dove stars/coma or the 1224 G f/4, I get day like at night. for those with deep pockets the 1224 GM f2.8 just use a lower ISO. 500 rule was for film now digital you have pixel, pixel height and distance between use PhotoPills app Spot Stars NPF rule default for regular web accurate for poster prints 1/2 accurate for no star trails at 600%. For the really wide the widest Voigtlander 10mm f/5.6 yes 50 sec BUT 30s pin point at 3200 like day time! $950 AND Chipped (you will want in any lens). Jan or Feb start month a cold 5am start, Jun/Jul all nighter last light blue hour to first light blue hour, Aug to Nov sunset to 1 or 2 am. For screw filter lenses Hoya Color Intensifier to start BUT with NEW LED city lights may never need. Low cost tripod Befree Live Aluminium tripod lever, video head $249 has a half ball leveling center with a 500 head for parallax adjustment for panos later, I have a closet full $$$! Today 2020 Software/Cameras/Lenses are so good the rabbit hole gets smaller, Just go no faster than 2.8 waste if faster!!