
A rainbow is arguably the most beautiful optical light effect created by sunlight. It is formed by millions of raindrops that break the sunlight into different colors. Shooting a rainbow is fairly easy, but there are some nice things to know about.
Rainbows take many forms. There are multiple bows, bows that cross, red bows, twinned bows, colored fringes, dark bands, spokes, and more. For a rainbow you need two things; sunshine and falling rain. The raindrops break the sunlight in different wave lengths, each having its own characteristic color. A rainbow will always show the colors red, orange, yellow, green, blue, and violet, as seen from top to bottom. A rainbow always appears opposite to the sun, which means you will have the sunlight coming from behind. Therefore you will often have the risk of capturing your own shadow, especially when the sun is low on the horizon and shadows are very long.
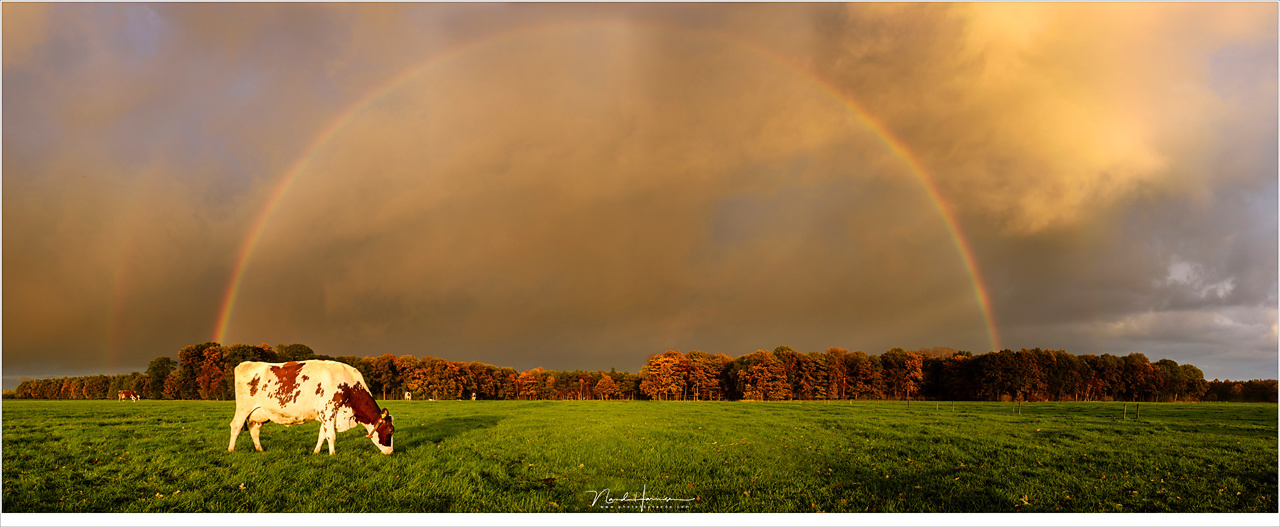
A Dutch landscape; rainy skies and a cow. A panorama shot during sunset (Nikon D810 with 35mm | ISO180 | f/9 | 1/40 - zeven vertical images stiched)
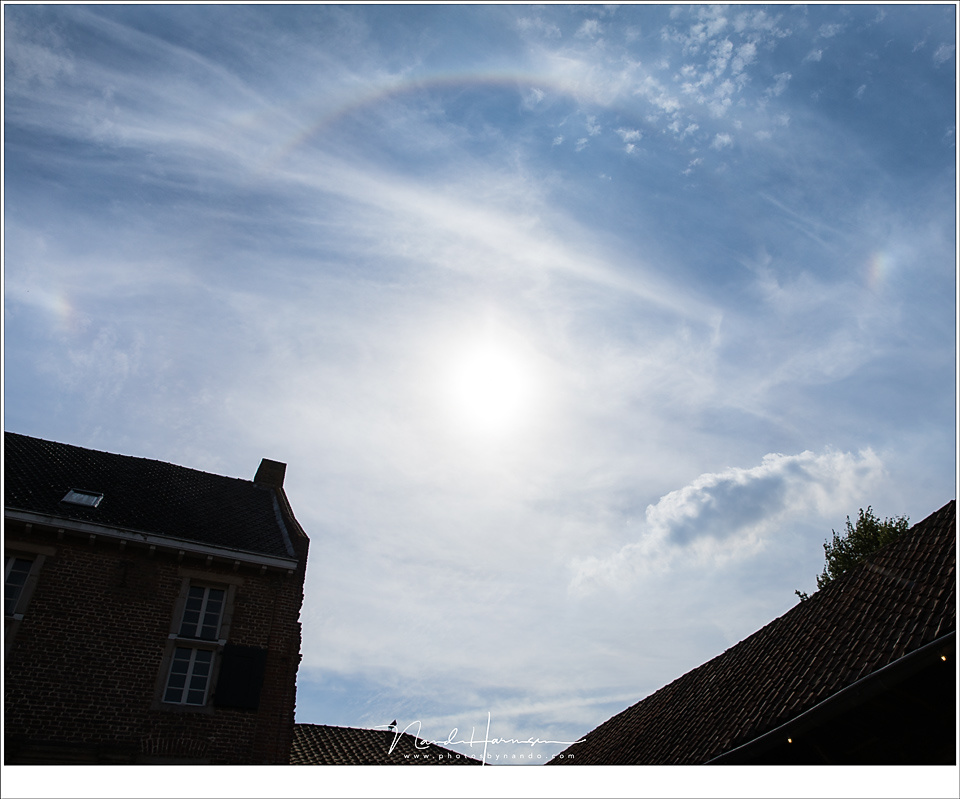
A rainbow may seems very common, but in reality it is not. At any given location, there are less than ten rainbows in a year. Halos around the sun are much more frequent.

A halo around the sun over Trælanípa at the Faroe Islands. Halos are more common than rainbows, they say. (Canon EOS 5D4 with Laowa 12mm | ISO400 | f/8 | 1/2000 | four vertical images stiched)
How the rainbow will appear depends on how high the sun is above the horizon. The closer to the horizon, the higher the bow will appear in the sky. But also when the sun is high in de the sky, a rainbow may be visible low at the horizon. From a high vintage point, it might be possible to see not only a bow, but an almost complete circle. This can be witnessed on a high mountain peak, or from an airplane.

When the sun is low at the horizon, the rainbow is reaches high into the sky (Nikon D810 with 35mm | ISO64 | f/8 | 1/60 | eight vertical images stitched)

With the sun high in the sky, a rainbow will appear very low at the horizon. A secondary rainbow can be seen also (Canon EOS 5D3 with 70mm | ISO200 | f/8 |1/640)
Because of the dark clouds behind a rainbow, heavy with raindrops, the colors will stand out very well. Foreground can even be lit by the sun, making a wonderful contrast with beautiful light. You may even see streaks of falling rain in the sky.
A rainbow is not just an arc of colored rings. In reality it is a shining disk that is brightened very strongly towards the rim. That is why the sky is always brighter inside the bow, something that is very noticeable when the rainbow is very bright.
A beautiful rainbow with a clear bright area below the primary bow. Watch how the colors of the secondary bow are inverted. (EOS 1Dx with TS-E17mm shifted | ISO50 | f/8 | 1/80)
The brightness of the rainbow depends of the size of the raindrops. Large drops will produce narrow bows with very intense colors. Small drops will produce broader bows with less bright colors. When the drops become even smaller, the colors will fade gradually, and you will end up with a colorless arc, better known as a cloudbow and fogbow.

A fogbow early in the morning after sunrise at the Skeleton Trees of Noir Flohay. (Canon EOS 5D3 with TS-E17mm shifted | ISO100 | f/13 | 1/80)
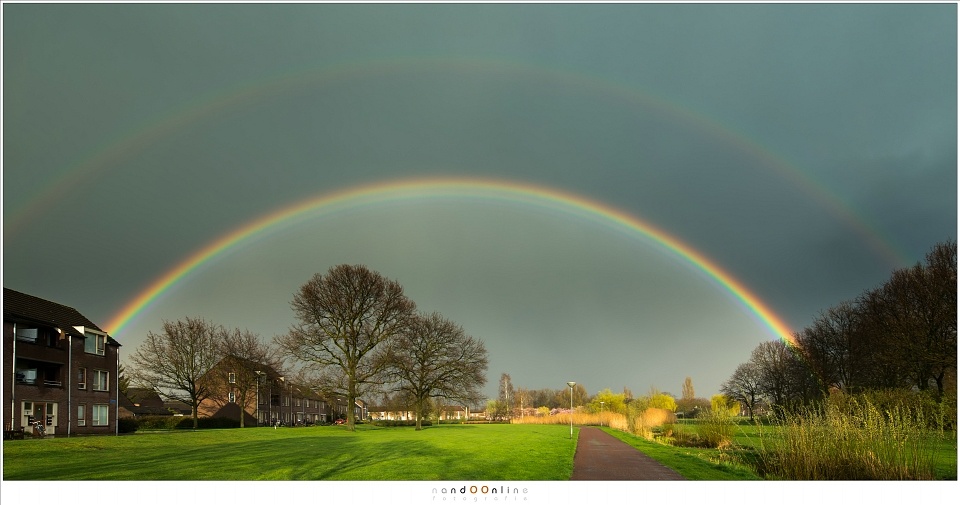
A rainbow is often companied by a second bow, less bright, and a bit higher in the sky. Perhaps you never noticed that the colors of these second bows are inverted. The start from top to bottom with violet, blue, green, yellow, orange, and red. The funny thing is, the sky between the two bows is noticeable darker than elsewhere. It is called Alexander’s Dark Band. There are occasions when a third bow can appear, although I never witnessed that.

A bright primary rainbow together with a secondary that has inverted colors. Both can also be seen as a reflection in the water. The primary has some fringes. (Canon EOS 5D3 with 28mm | ISO100 | f/9 | 1/60)
When you look carefully at the primary rainbow, you might see some green, pink, and purple fringes. The amount and spacing of these fringes vary from minute to minute. The fringes are called supernumerary bows. This optical effect will be more visible when the raindrops are very similar in size.

A great example of supernumerary bows, at the top right side. These fringes can be visible when the raindrops are very similar in size. (Canon EOS 5D4 with 70mm | ISO125 | f/8 | 1/160)
A rainbow can be seen at any place where small water drops form. Not only during rain showers, but also from a water hose at your own garden, or near waterfalls. Officially these rainbows are called spraybows. When you are near a waterfall, make sure you have the sun from behind and there is a big change you will see a spraybow. By following the trajectory of the sun through the sky, it is even possible to predict where a bow might form. This can help finding a great composition for your photo.

Not a rainbow but a spraybow at the largest waterfall of Europe: the Krimmler Wasserfälle in Austria (Sony A9 with 16mm | ISO100 | f/8 | 1/80)

The largest waterfall of the Faroe Islands, called Fossá. I choose a location with the sun from behind to capture the spraybow (Canon EOS 5D4 with 16mm | ISO100 | f/9 | 1/25 | four horizontal images stitched)
While sunlight produces rainbows during the day, moonlight can also produce a rainbow, called moonbows. These moonbows are very rare because the moonlight is not very bright. You need an almost full moon, rain opposite to the moon and you need to be at a very dark location. The biggest change of catching a moonbow is near a large waterfall at full moon.
Although I have captured halos around the moon, and moondogs, I never had the change of captured a moonbow.

A rare sighting of a moondog, These are not rainbows, although moondogs, and sundogs, show rainbow colors. (EOS 5D3 with 45mm | ISO400 | f/5,6 | 2 sec)
Never use a polarization filter when you photograph a rainbow. By polarizing the light, the rainbow will disappear. It is not necessary to completely remove the polarization filter, but you need to turn the filter until the light is not polarized. The effect of polarization is visible in the before-after examples I shot of the waterfall Fossa during my recent trip to the Faroe Islands, and in an older example I shot in the Austrian Alps.


When want to photograph a rainbow, don’t wait until you see one. Make sure you already are at the location where you would like to shoot the rainbow. And if you see one, just photograph it. Don’t care about composition yet, because you never know if it will stay visible for long. After the first photo, you have the time to find a composition. Who knows, perhaps the bow may become brighter.
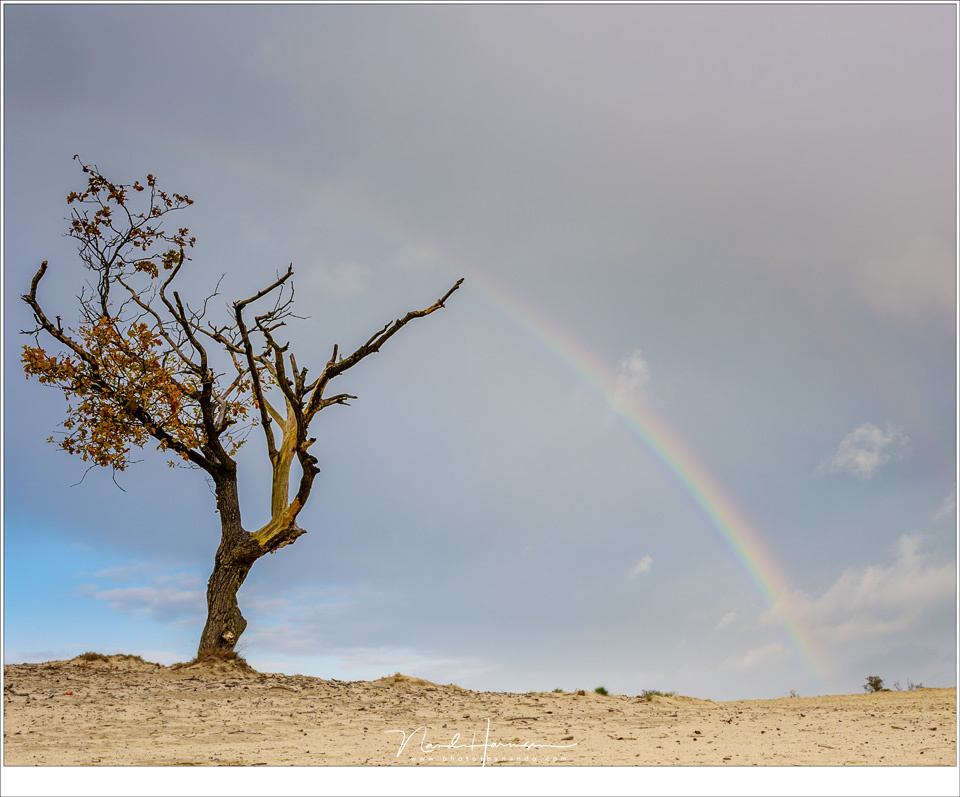
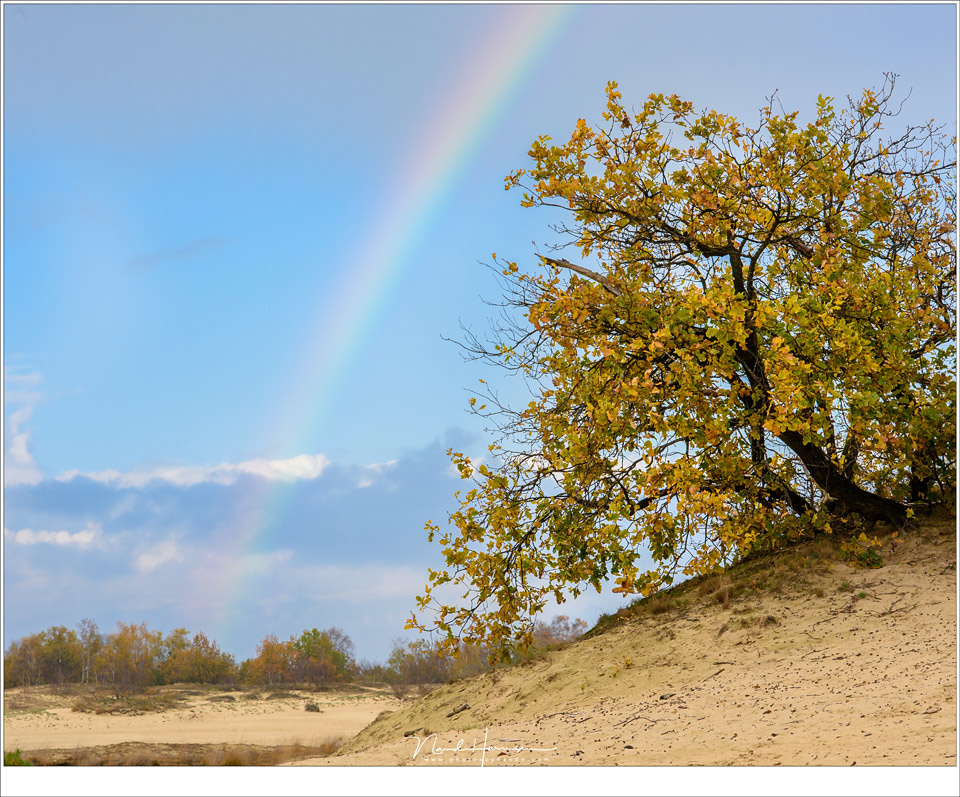
Although you may feel like shooting the complete bow in one frame, it may be interesting to capture only a part of the rainbow. You can even play with a shallow depth of field, showing the rainbow colors in the background of your subject.
Trying to make some composition with a rainbow and elements in the landscape (Nikon D810 with 35mm | ISO64 | f/11 | 1/60)

With the sun high above the horizon this rainbow appeared just above this small settlement at the Faroe Islands (Canon 5D4 with 90mm | ISO200 | f/9 | 1/125)

Take a picture of the rainbow and then you can take your time to search for a nice composition. I managed to capture one, together with one of the many sheep at the Faroe Islands. (Canon EOS 5D4 with 70mm | ISO400 | f/8 | 1/800)

Even with a reasonable small depth of field you can capture the colors of the rainbow. I used it in this picture as a backdrop (Canon EOS 53 with 140mm | ISO200 | f/8 | 1/30)
A picture of the rainbow is rarely interesting. Try to integrate it into a landscape photo (Nikon D810 with 85mm | ISO160 | f/11 | 1/100)
The best time to shoot a rainbow is often during sunrise or sunset, because the bow is at its highest place in the sky. It can be very large and impressive, requiring an ultra-wide-angle to capture it in one frame. If you don’t have a lens available that is wide enough, shoot a panorama while holding your camera vertical, and stitch the individual images in Lightroom (or similar editing software). You might even capture a so called redbow, which is basically a rainbow in a reddish sky that can occur during rain showers and a setting sun.
With the sun low at the horizon you might capture your own shadow also. By choosing your foreground wisely it may become easy to use the clone tool to remove the shadow. But you can also use trees or other objects to hide your own shadow. Or just keep your own shadow in the frame. Just be creative with this and try different things.

A red sky during sunset, with a rainbow that is almost completely red. This is called a redbow. A keen eye will spot also lightning at the right side of this shot. (Canon EOS 5D3 with 17mm | ISO200 | f/13 | 4 sec)
Not all colored bows in the sky are rainbows. Halos, arcs, iridescent clouds, coronas, and sundogs are not considered rainbows, although they may show the rainbow colors. The difference is quite easy; rainbows are produced by light reflecting in raindrops, all the other ones are produced by light reflecting in ice crystals. But often these optical light effect are very photogenic also.
Although halos, sundogs and circumscribed arcs can also show rainbow colors, they are something completely different. Nevertheless, these atmospheric optical effects are also great to photograph
Have you made beautiful or special pictures of rainbows, moonbows or fogbows? Please let me know in the comment below, and I invite you to show that image also.


Any tips on post processing for rainbows to bring out the subject?
I have a shot from a ten thousand foot mountain pass looking down on a bow over capitol reef that I struggle to get right.
Drew, it's funny you asked because I was just about to post a tip after reading this article. If you have and use Lightroom, then use the Dehaze slider. It will really make the rainbow pop and look way better than it does in-camera. If you don't use or have Lightroom you should get it, it's actually still $9.99 a month for the creative cloud that also includes PS, etc. Plus there is a cool new "Texture" slider that is awesome!
Patrick, thanks for the response and tips. I am stubbornly stuck on lr 5.7 (the last desktop version). I don't think it has a dehaze slider but I will look into what that slider does.
Just post-proces the images as any other. You may want to use contrast or (indeed) a dehaze slider in LR, but you have to be careful because the contrast will become very harsh very quickly
Nando, thank you for the reply. Was hoping you had a secret trick, but those are probably more rare than rainbows in reality. Here is the specific shot I was looking to get more pop out of the rainbow.
By looking at this picture I guess the rainbow wasn't that bright at that time? In my opinion you cannot create something in post processing that isn't there. By enhancing a rainbow like this it will very quickly become artificial. I would leave it the way it is in your picture, and wait for a brighter one in the future
Great article and a refreshing read! I love learning new details about common things we often take for granted. Thanks for sharing.