
After a recent landscape session in the rain, I was shocked. Reviewing the files at home, I found that I accidentally shot in JPEG. Is all lost now? Let’s take a look at this very underrated format.
'Professionals Only Shoot Raw!'
One of the first lessons which I learned in photography was “Raw is better than JPEG.” Period. Since that time, I rely on my Raw files, no matter if it's for documentary work, private photographs, or landscapes. Especially for the latter, raw is superior: A supposedly better effective dynamic range makes recovering shadows and highlights easier and the white balance always stays under control.
While climbing deeper and deeper into the rabbit hole of photography, I learned that JPEG isn’t all that bad. Seemingly, there are also photographers who prefer this format. Many of them come from the Fuji camp. Fuji offers different film simulations which found an avid fan base amongst its users. But why limit yourself if you can have full control of your photographs?

Shot in JPG by accident
How Compression Works
After All, JPEG is inferior in its attention to detail. The Raw format offers you information about each and every pixel, while JPEG is an already edited format. Your camera collects data on its sensor, interprets it, and produces a developed file. There are two reasons why JPEG exists: It consumes less memory space and it doesn’t necessarily need to be manually developed.
The reduction of data happens by compressing an image. When we write “xxxxxxxxxxxxx” we store twelve letters on a sheet of paper. We could also compress it to “12x” for only one-fourth of the space. Image compression is much more complicated but relies on the same principles: You summarize data to save memory space. When saving and opening a JPEG file many times in a row, compression will ruin your image.
In most cases, some information will already get irreversibly lost with the primary JPEG file. Your camera develops your image and if it decided that there is no contrast between an area of pixels, they will look all the same. No matter how far you’ll pull the contrast or clarity sliders.

A rule of thumb: The less detail, the smaller the file size.
Can You Shoot Landscapes in JPEG?
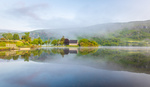
When recently I found that somehow I changed my camera’s file format from Raw to JPEG, I was shocked. It sometimes happens to me, when I miss the button for changing the ISO, which is right above the button for changing the file format on my Nikon D750.
After the shock, I was surprised: It didn’t even matter. I could edit the photograph exactly in the way in which I had in mind while shooting. It even saved me some time, because the photograph wasn’t as dull and boring as I usually find my Raw files before they are cooked into a (sometimes) tasteful photograph. I just had to care for minimal exposure changes and a few local adjustments. Was I wasting time and memory space all my life?

I didn't need a Raw file to create this edit.
I felt like an absolute beginner and a conspiracy theorist at the same time. How come everyone only shoots in Raw when there was basically no downside in my edit? I quickly realized that my landscape photograph of rainy scenery at a cloudy coastline wasn’t really representative of the average dynamic range of a landscape photograph.
What I needed was a direct comparison and some pixel peeping.
JPEG Tested Under Harder Conditions
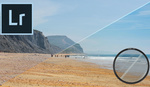
When the weather got a bit better, I tried out some locations where I expected harder conditions for landscape photographers: caves at the beach. Inside the caves, there would be far less light than outside. A situation, where it is almost impossible to cover the full dynamic range within one frame. Yet, the original JPEG file looked better than expected.

The JPG straight out of camera.
The “Picture Control” menu of my Nikon D750 gives me the option to choose between different JPEG development styles. Even though the different styles don’t look very different, “vivid” or “landscape” were my favorites. The final photograph definitely looks appealing, but is it enough? I don’t expect it to compete with a properly edited Raw file.

An editted Raw file of the same scene.
Here, I found a lot of freedom to edit. Uncovering the hidden structure underneath the shadows was no problem, just as getting more detail in the sky was done within a shift of a slider. Even though it wouldn’t necessarily be my preferred way to edit this photograph, local adjustments helped to get a lot of detail back into the lone rock, which seemed to be lost in the JPEG. But was it really? To double-check the JPEG capabilities, I also edited the JPEG file in Lightroom. Much of the detail was still available, too.

The JPG carried a lot of hidden detail as well.
The Limitations of JPEG in Landscape Photography
In these examples, I took a lot of care for a good exposure, which would allow me to bring back the detail in both highlights and shadows. While one could see the difference in the quality of JPEG files, it wasn't as bad as I had expected. In fact, I’d claim that you can’t see the difference in low-resolution images.
Same counts for underexposed photographs. Even in the darkest shadows, the Raw files will still offer us the chance to recover detail, even though there will be some noise in the final image.

Even a JPG edit of a really low exposure looks fine from the distance.
The JPEG files on the other hand, really struggle with very dark parts of the images. A lot of artifacts appear, along with colorful spots. You can get rid of some of them by using the “Detail” panel in Lightroom. Eventually, the dark areas will look like a bad print on canvas, though.

Zooming in to 100%, the lack of detailed information becomes visible.
Just like the recovery of shadows, getting detail out of the highlights is not a big problem with the Raw files. However, there will be blown-out areas, which will hopelessly be lost. Before the structure completely disappears, these highlight areas will also lack color information. You can’t shoot into the sun and expect to see all its details. Again, it’ll probably be fine as a social media picture. Especially in prints, bigger areas of blown-out highlights appear rather ugly.

Even blown out highlights can be recovered with Raw files to some extend.
My D750’s JPEGs, however, really look horrible when I try to recover highlights. There are no artifacts as we could witness when recovering the shadows. Instead, there is simply nothing hidden behind the white areas. Pulling the exposure to the left, I couldn't find the slightest idea of a shape in the sky. White only becomes gray.

In case of JPG-files, this information is hopelessly lost.
Use JPEG Only When You’re Sure
There are a lot of downsides of JPEG depending on the purpose of your images. Especially when you can’t cover the full dynamic range, you’ll have problems with the edit. But why would you use JPEG if you’ve got to edit the photographs anyway?
When you need to send or upload your photographs quickly, a well-cooked JPEG might be superior. Sports photographers and photojournalists often rely on quick transmission. You can experiment with your in-camera settings and pre-sets for JPEG development until you'll find a good recipe that works for many cases.
Especially when you want to quickly upload your photographs to social media, a JPEG-file will be quickly transmitted to your phone, where you can easily edit it because of its small file size. A lot of detail gets lost during the upload anyway. On the other hand, many advantages of Raw files will also be visible on your social media channels. Even on 1080 x 1080, severely blown-out highlights will be an issue.
My own experiments with JPEG are limited to my Nikon D750 and my everyday camera Olympus EM10. How is your experience with other cameras and brands? Does JPEG work for you or is it an absolute no-no for you?


Do you actually know of editors that don't allow exact recompression? As I understand it, that would be a violation of the standard.
Well, no, I haven't done the experiments myself, but I'm allowing for rounding errors, users not saving with exact same compression settings, etc.
(Which would be "user error", I know, but hey that's life and cannot happen with formats that do lossless compression. Regardless, why repeatedly open _and save_ a file if you do not edit it in between in some way?)
The standard is designed so that rounding is not an issue for recompression, providing the implementation is faithful to the standard. Of course, if you change the compression settings, you're going to get a different image. That's JPEG working as designed. The image is *supposed* to be different if you change DCT settings.
The exact recompression should apply to any 8x8 block for the discrete cosine compression stage. So you should be able to edit a part of the image and not affect the other parts.
True but you'll still see a degradation in the parts that you edited and that's the whole crux of the issue.
That is quite different from the sweeping statement in the article. Even limited as you have just done, there is also a philosophical issue of how to measure the degradation of a part of the image that was changed. Since it was changed, you can't go back to the original to see what it should be.
"Regardless, why repeatedly open _and save_ a file if you do not edit it in between in some way?" I'm just commenting on what I consider to be an overly broad statement in your original article, which I've becoming sensitive to since you're not the only person to say it recently. I use JPEG as an output format only. I would never recommend it as a good format for storing an image between edits.
Here’s a possible, if a bit far-fetched, real-world situation that I don’t think would be a problem and the article claims would ruin the image. Let’s say I get a JPEG from somebody to print. I look at it, and I discover a dust spot. I open up the file, fix the dust spot, and save it under the original name. Then the customer calls and tells me to remove a different disut spot. I open up the file, fix the dust spot, and save it under the original name. That sequence repeats itself a few times.
Because the DCT takes place in 8×8 pixel blocks, as long as none of the dust spot edits were in the same block, they would all have been decompressed, changed, and recompressed only once, even though the whole file had been decompressed and recompressed many times.
Not precisely how editors and JPEG works. Although the DCT occurs on 8×8 blocks, their is also the coefficient quantisation and the colour compression occurs on every pixel. (JPEG JFIF only saves full colour data when set to 4:4:4, which is NOT the standard default setting).
Also, although the DCT is processed on an 8×8 block, the compression, (if not set to 100% quality), is done across the entire image.
Furthermore, when the JPEG JFIF is decoded for editing, it is decoded to a full 24 bpp RGB image, and, provided their is a change, aside from meta data, (such as rotation, dpi, etc., and certain other processes such as cropping, and if the image width and height are a multiple of sixteen), the entire image is always re-compressed. Even if a certain block was not touched at all, its re-compression may result in changes, as the reproduced 24 bpp RGB is an estimate of what was there originally, and the new values may not necessarily equate to the same DCT, CQ, nor chroma subsampling.
Whereas most good editors will only re-encode the image if a change was made (outside of changes mentioned above), the re-encoding will result in image degradation.
You said " the re-encoding will result in image degradation."
I just ran an experiment. I read a TIFF image into Matlab, and wrote it out again as a JPEG. Then I read the JPEG, changed one pixel in the lower right corner, recompressed it and wrote it back out again. Then I read that JPEG in, changed the same pixel to another value (I chose the iteration number), and wrote it out again. I did that 100 times. I had 100 files. I compared the last file to the first JPEG written from a JPEG, masking out the rightmost and lowermost 8 columns, and looked for differences between that file and the first JPEG written from reading a JPEG. There were none. There were some small differences between the JPEG written from the TIFF and all the others.
…and your settings were…?
What I would do, is take the 2nd and 100th files, crop the lower and right-most eight pixels, (assuming the width and height are a multiple of eight), save those, then do a DIFF on the two files. I only had to do it twice with a 256×256 file to see a difference, but did it ten times to illustrate. Doing it 100 times is meaningless, because after a time, the perceptual differences become minimal.
Still, although there was basically no perceptual differences between number 9 and ten, there were actual value differences, which could be detected by direct pixel comparisons. Also, I did not use Matlab. I used a very popular image manipulation program in its default configuration, (the default quality setting was 72%, the default colour setting was 4:2:0, the default set for American TV and cable broadcasting), then did it again at quality 80%, 92% and 100%, at default (4:2:0) colour, and 4:4:4 colour.
To be fair, in my example, The original was a PNG file of line art, (my logo), and I changed the pixel at fifteen across, fifteen down, from the top left. It was also a series of drastic changes from original colour to RGBA(0,0,0,255,), then RGBA(255,255,255,255), and back and forth. (I also only compared the files where the pixel were all black, thus, I actually did it twenty times). the change was in more than just the second row/column of eight.
«…and looked for differences….»
I really do not care what you see. Set the quality high enough, and use 4:4:4, and most people will not be able to tell the difference. If by “looked” you mean that you checked for actual differences, other than appearance, then that is fine. Also, I did not use Matlab.
But still, what were the settings?
These are PNGs pixel peeping at the first, the second, and the tenth, at default settings.
I do not know if FStoppers re-compresses JPEG JFIF files on uploads, but these are the original JPEGs at 72% 4:4:4, 80% 4:4:4, 92% 4:2:0, and 100% 4:4:4.
As I said, I used Matlab default JPEG compression settings. In Ps, I used quality = 9.
Here's the comparison code without the masking:
inImage1 = single(imread(inFile1Name));
inImage2 = single(imread(inFile2Name));
diff = inImage2 - inImage1;
diffNulled = diff(diff ~= 0.0);
size(diffNulled)
histogram(diffNulled);
If there are no entries in diffNulled, the files are the same.
“Default settings” is meaningless. What are the settings?
p.s., ‘≃0.0’ is not the same as ‘=0’. Indeed, with a 256×256 image, over 656 pixels can be different by one bit, or 27 pixels can have all bits altered, and still have ≃0.0 difference. The size of the file (in pixels) will define how many significant digits one needs to show whether the files are different.
Also, do not change the least significant pixel. Change the pixel at position 16×16, or 32×32, or any pixel which lacks a border with three other blocks. If you look at my example, the vast majority of the change was in the upper,left quadrant of the 16×16 area I showed. The pixel changed was the (7,7) pixel (started at zero, (8×8) starting at one, top left), the right-most, lower-most pixel of the top-most, left-most quadrant. Even then, less change can easily be seen in the lower,right and lower.left quadrants also, and not so obvious in the upper,right quadrant.
You changed the lowest-most, [EDIT] [DEL]left-most[/DEL] [INS] right-most [/INS] [/EDIT] pixel, then crop off everything within eight pixels of it, and say, see, no change. I say, because of CQ, and Yuv compression, the entire image will be subject to change.
[ASIDE] I also mention that this is true, because the re-opening of a JPEG JFIF does not (and cannot) accurately reproduce the pixels, and, when I was posting my last reply, I noticed something. My browser and my viewer had the green colours slightly different, although both images were on the same monitor, and the input/output profiles were the same (websafe sRGB), because that is just how JPEG JFIF decompression works. Ergo, two different JPEG libraries will re-encode differently, simply because they decoded differently. [/ASIDE]
If you really want to know if the files are the same, try a checksum on them. Even if they differ by one bit, the checksums will be different. Ensure that no metadata is saved, or, at least changed, especially regarding date/time metadata, as any change to the metadata will result in a different checksum. EXIf data can be stripped, or duplicated to be identical, using Exiv2 or EXIFtools. An MD5 hash will suffice.
Even then, do not alter the least significant pixel. try pixel (7,7) —when counting from zero, or (8,8) when counting from one— then crop the top eight, and left-most eight rows. then do your checksum.
[EDIT]
P.s., it would have been much easier to just do what I had asked. Run a diff on the two files.
{$ diff -s inFile1Name inFile2Name }
[/EDIT]
"p.s., ‘≃0.0’ is not the same as ‘=0’."
It's exactly the opposite. It selects all elements of the array that are not equal to zero.
"“Default settings” is meaningless. What are the settings?"
https://www.mathworks.com/help/matlab/ref/imwrite.html
'Quality' — Quality of JPEG-compressed file
75 (default) | scalar in the range [0,100]
I used 8-bit precision, which is the same as Ps uses for JPEGs.
"You changed the lowest-most, left-most pixel,"
I changed the lowest, right-most pixel.
"The size of the file (in pixels) will define how many significant digits one needs to show whether the files are different."
That is silly. I'm selecting *all* of the nonzero pixels, counting them, and displaying their histogram.
"Also, do not change the least significant pixel. "
I ran another test changing pixel 100,100 in all three planes. Same result: when the corresponding block is masked out, files 2 and 100 are identical.
Okay, Jim, let me address a few things here. First, the erratum.
ERRATUM: "You changed the lowest-most, left-most pixel,…" should have read, "You changed the lowest-most, right-most pixel…." In any case, the result would have been the same; It was tied as the second most insignificant pixel, with all pixels within eight pixels of it deleted. I stand corrected, and will make the change for future readers. …But I digress.
On to other corrections and observations.
*JPEG JFIF vs JPEG SPIFF*
JPEG JFIF replaced JPEG JIF before JPEG JIF ever really got off the ground. It fixed a number of short comings of JPEG JIF. JPEG SPIFF was released to fix some shortcomings of JPEG JFIF, but the standard was barely ever adopted.
JPEG JFIF (from this point on, just JFIF), does NOT do grey-scale, and only does 8-bit colour, and does not do lossless compression. Clearly from the Matlab poor documentation, it is referring to JPEG SPIFF, (from this point onward, just SPIFF), which is fine, since, officially, SPIFF supersedes JFIF, and ought to be saved with a {.spf} extension, and has MIME type, {image/sjpeg}.
However, officially, any file with a {.jpeg} or {.jpg} extension, is a JFIF file, with MIME type, {image/jpeg}. Matlab is playing loosely with the standards. Because we were referencing {.jpeg} files, my comments were limited to the ubiquitous JFIF standard, and not the rarely seen, hardly used, SPIFF standard.
*The Colour Compression Algorithm (Chroma Sub-Sampling)*
The only way to change an aligned 8×8 block and not change anything else, is for two things to be true; the first is that it must use a 4:4:4 colour compression. (The second is to use fixed, general-purpose Huffman tables with fixed DC coefficients, or constant components. More on that later).
If the colour compression is 4:2:2, then the minimum coded unit is 16×8. If 4:2:0 colour compression is used, then the MCU is 16×16. If one can change the pixel at 100×100, and not affect the 8×8 blocks at (103,95), (95,103), and (103,103), (counting from zero, as one ought to do), then one's colour compression is clearly 4:4:4. That is why it makes a difference as to what your defaults are, which you still did not state.
Again, this illustrates why cutting off all the 8×8 blocks left of, and above the right-most, lower-most pixel is relevant.
[ASIDE] Thank you for that useless link, but before I posted, I did do my research, and found that the Matlab website was NOT helpful. I had asked for “default settingsssssss!!!! Plural! You gave me one setting, ignoring the colour compression setting which I stated was important. [/ASIDE]
*The DCT, DC Coefficient, and Huffman Coding*
So I promised more on that later, and here it is. The image below shows advanced options available for saving a JFIF. The values are partly taken from the original image, using the {“Save using compression settings from original image,”} option.
The first one we see is *{Optimised}*. This means that, instead of using general purpose Hoffman tables, the best Huffman tables for this particular image will be used. This means examining the entire image, and re-calculating the best Huffman tables, for better compression. If one changes one pixel in a significant part of the image, then the Huffman tables will be re-calculated across the image.
This becomes important when an image is decompressed, then re-compressed, as a de-compressed image is highly improbable to match the original image, (as you have pointed out). It will become obvious later.
The second is {Smoothing}. This is indeed part of the JFIF standard, and becomes important when one is dealing with images of text, or line art. (That is why some programmes will ask what kind of image is it, “photograph, line art, text, mixed”). My example was line art to make the changes more obvious, and ought to have had smoothing turned up for a better outcome. Photographs ought to have smoothing turned down, as is my default in this particular application, to avoid ghosting along high contrast lines.
When not at a zero value, this setting affects the entire image during compression, and we will skip this for now, as this is a photography forum, and not a line art forum. Smoothing ought to be off.
Next are *{Use arithmetic encoding}* and *{Use restart markers}/{Interval}*. The first option does away with Huffman tables, creates better compression, but uses the entire image for optimised compression, affecting not simply the changed block, for the same reasons as the {Optimised} setting.
{Use restart markers} means that the image will be encoded in sections the size of {Interval}×MCU(rows). In this particular case, only sections which have been changed will need to be re-encoded. It is equivalent to having multiple JFIF files concatenated, (in a very over-simplified sense).
{Progressive} does more than change the order of processing; it also changes the way the compression is done, almost always resulting in a smaller file. (Progressive PNG encoding almost always results in a larger file). I am unsure of if, much less how, this can or will affect pixel appearance, so I will presume no effect and skip it.
{Subsampling}, I already addressed. It affects the MCU size, and thus, how much of the image will change when using standard Huffman tables with fixed DC coefficients. It is NOT always an 8×8 block as you asserted.
Finally, (almost), we get to *{DCT method}* The choices are {Fast Integer | Integer | Floating-Point}. Now it is showing here as Integer. Was that the setting used in the original image since we said to use the same values as the original file? There is no way of knowing since, once the DCT process is completed, only integer values are saved, (by rounding). However, it does affect the pixel values. (Mostly it affects the speed of encoding, the efficiency of encoding, and ultimate file size. Aside from the side effects it has on pixel values, it does not affect decoding.
Using the first option, greater liberties are taken with pixel approximations, and less likelihood of accurate colour reproduction on each successive encoding. The third option will result in greater pixel value integrity.
Finally, (and this time I mean it), the {Load Defaults} and {Save Defaults} buttons. Even if the Matlab website was helpful enough to show what the applications shipped default values were, it still may not tell me what *YOUR* default values are.
When I asked for your default values, I expected to get *YOUR* default values. That way, I would have been better able to explain why your little tests seem to show a result other than the expected behaviour of a typical JFIF re-save.
*CONCLUSION*
When a typical, optimised JFIF file is re-saved, especially when not using 100% quality setting, (although using 100% quality is no guarantee), their will be degradation in image quality. Whereas it is possible to create a JFIF file which can suffer changes to some parts of it without affecting other parts,† this is not the typical behaviour, and represents edge cases.
† This includes not optimising, not smoothing, using standard Huffman tables, using restart markers with an appropriate interval, using 4:4:4 chroma sub-sampling, and floating-point DCT.
[EDIT] Forgot to load image. [/EDIT]
Who cares? None of it is relevant. Do this test: shoot raw and jpg which are underexposed by 3 or 4 ev - then push them in post by 3-4 ev - see what your results will be. But hey, shoot jpg if you want - it is really up to you, don't let anyone tell you what to do.
IMO; those using jpeg need to be a better photographer than those using raw capture ---- now do I need to explain why I use raw :lol:
Laughing at some of the comments here on what is right and wrong. It's art - there is no right or wrong way to do it. Do whatever works for you and makes you happy.
Good post that pretty much says it all in a nutshell. And good photo examples.
I recently wrote a blog post in which I tried to create a sort of simplified cheat sheet for the whole dynamic range thing:
https://jimhphoto.com/index.php/2020/05/14/dynamic-range-for-dummies/
Isn’t there something else to discuss? If you shoot jpg and are happy with the results, do so. At the end of day, it’s about the print. Personally, I cannot make an excellent fine print from a jpg. So, I shoot raw. When I fully process a raw file and want to share it electronically, I create a low resolution jpg file with the raw file edits. I have two DSLR bodies; the first thing that I did upon unboxing them was to set them on raw. Neither body has evert shot a jpg. That doesn’t make me right; it makes me happy.
Considering that, these days, most photos are viewed on a computer screen or mobile phone and only for a few seconds, shooting JPEG with minimal post processing is often more than good enough.
It is not a matter of where they are eventually viewed. It is a matter of what —if anything at all— is done to them between capture, and publishing.
No one views a raw file, anyway, so that is moot. We assume all files being viewed are JPEG, PNG, or WebP. None of them are raw, PSD, OpenEXR, or XCF, regardless of if, or how they were edited.
It's about them highlights! I shoot RAW + JPG but if I had to shoot one mode, that's an easy choice. Use presets to speed up your workflow.
Cameras don't "shoot JPG" they shoot RAW.
You can elect to have your camera process the internal "RAW" file into a JPG.
The only real advantage of this that I can see is when time is off the essence and you can put all the "post prod" setting into you camera and have it output the JPG for you.
As some one mentioned, sport would be a good example where you want to get to press fast and your subject environment is reasonably predictable. Whatever your "post prod" would be won't change a huge amount between shot. So you can just set you camera up to do it for you (sharpness, saturation, etc.,.etc.)
I agree that, in camera at any rate, the file size/storage is unimportant.
I just shoot RAW now because I don't generaly need the JPGs.
But I wrote a simple shortcut that I can drop a raw file on and it extracts and creates the JPG preview (with it's in Camara settings) great if I just want a small image to send via WhatsApp etc. It was very simple on Linux probaly easy on Windows too.