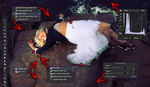
In this video tutorial, watch as I show you how to color match with Curves in Photoshop. Curves is one of the most powerful tools to use in Photoshop, so make sure you try to use it in your workflow.
As the video starts, I jump straight into an easy example to show you in real-time how to use the Curves adjustment. The composite example I show you is one you will come across many times as a photo manipulator. This is when you have two images with two different color temperatures. For example, you have a background image that is shot in natural light and a model shot under tungsten lights. The background will have more of a cool tone, and the model more of a warm yellow-orange tone.
Well, this is where Curves come to the rescue. Most may use Curves for matching tone, using the RGB curve to make an image lighter or darker. You can also go into the color curves separately to change the colors. The best way to do this is to first decide which image you want to which you want to color match. I tend to use the background color balance as the one I will match to. All I have to do now is go into my color curves and make my warm image cooler. It may sound complicated, but if you watch the video, it is straightforward and by far the best way to color match.
This video is great for anyone who wants to start creating better, more realistic composites. A lot of people struggle when it comes to color matching, but this video will make it a lot easier.


Thanks!