There is a megapixel race going on in the camera industry but you can rather easily make huge and highly detailed photos with lower megapixel cameras using this simple technique.
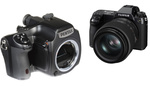
In his latest video, Nigel Danson shows how you can make huge and highly detailed photos by simply stitching your photos together. Even though his Nikon Z 7 is a 46 megapixels camera, the final photo can easily exceed 200 megapixels with the same amount of detail his lenses can produce. The technique is simple to follow in the field. Let us say you are standing in front of a scene, which would look good at 24 mm. Instead of photographing it at 24 mm, just zoom in to about 50 mm and take the appropriate amount of photos that you need to cover the given scene. Danson recommends having an overlap between the photos of 30-50% to give your editing software enough information to work with in the process of stitching .
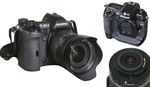
At the start of the video, he shows several different examples to show the different ways you can use this technique. You can use it to create classic panorama photos, but it works just as great for vertical panoramas and panoramas where you have several layers. Relative to the conditions you do not even need a tripod. In many cases, it is much better to not use a tripod as you can shoot faster and make sure the light does not change too much in the process.
As a side-note, you can also use this technique to greatly improve the megapixels and details of your drone photos. Especially drones with only 12 megapixels benefit greatly from this.
Be sure to check out the video above where he shows exactly how he stitch these photos. Is this a technique you have used or something you would consider in the future? Let me know in the comments below.


I would really love to be able to use stitching for the kind of photography I do .... but moving animals and birds in flight just don't hold still. Bummer. Seems like this stitching stuff only works for things that are stationary ..... and many of us have little interest in photographing things that are not in motion.
I often use it combined with a small aperture also known as the Brennizer method. As long as not the entire scene is moving but only your subject it’s possible to take many shots of the subject until you‘ve got what you wanted and then add the additional panorama photos for stitching after that.
Will that work in images where the moving subject practically fills the frame, or is it pretty much only good when the subject is somewhat smaller in the frame?
I mean, if I have a close-up of a running deer, and the running deer is very tight in the frame, with very little of his surroundings included, how does this Brennizer Method work for that? That is primarily the type of image that I am interested in stitching.
This is the kind of photo I'm talking about. It is the full image, with no cropping applied at all. I would really loved to have a way to have shot that buck at 200 megapixels with my 16 megapixel 1D Mark 4. How would you do the Brennizer Method that you describe with this type of situation, when you want the subject filling the frame?
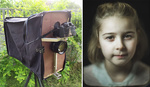
It worked for me in a photo you can see here, the main subject filled the entire screen. https://fstoppers.com/photo/503044
Your picture is a little tight as the foot is missing for example. The process however would be:
After you got the shot of your subject take more pictures that would fill the panorama. Important: fix the focus plane. No autofocus afterwards. Then stitch everything together. There are two outcomes: Stitching works fine because the overlapp was just enough.
Option 2: Stitching actually removes the subject. No Prob. Just stitch the panorama, then load the layer with the deer into the file and align the layer with the pgotoshop function align layers. Make sure to lock the panorama layer. In case of problems, mask out the deer and try to align again. I get best results when using a tripod because of the shallow depth of field.
Cheers
Michael
I am not sure I understand. You say in the photo that you posted, that your subject fills the entire image ..... yet your subject, the girl/bike, appears to be tiny in the frame, with a whole lot of "space" around her.
I want a stitched image of a moving subject in which the main subject fills the entire frame - meaning the entire frame of the final stitched image.
The whole reason to stitch multiple images together is to get much more detail in the subject. In my case, it would be to get a LOT more fine hair detail of the buck resolved. To be able to see each individual hair more clearly and distinctly resolved. I am not sure how this would be accomplished by the method you are describing. I don't want any more of the environment around the buck - that is not the reason I would want to stitch images. I want the buck to fill the entire frame in the final stitched image just the way it fills the frame in the original image thatI posted.
Is there something I'm missing?
I might be missing the point here, but why the hell so you want to see every single hair more distinctly resolved? Have you got some kind of OCD?
I think that wild animals and birds are beautiful because of the fine feather and hair detail. The tiny little hairs and feather filaments are what makes them beautiful. And so I want to resolve as much of that fine detail as possible, because that is the thing about them that I am trying to capture.
Also, I like to print large. But my cameras do not have enough pixels to print truly large images. By large, I mean life-sized. This buck stood about 4 feet 8 inches tall (without the antlers), so I would like to print the image at that actual size. In order to have all the detail that was on the real life deer, I need a very high resolution file ...... otherwise the lifesize print will not look as good as the buck looked in real life, because so much detail will be missing or "mushy" looking.
By the way, your tone comes across as rather angry and disrespectful. You should speak to others with kindness and humility, the way a decent person would speak to another decent person.
Doesn't seem like anyone really answered your question.
The short answer is that it's not possible to do a high res stitch of a moving subject the way you've described.
Basically, in order for a photo stitch to work, the edges of each frame need to match up (plus a bit of overlap)
If you wanted to capture a wider view of a static scene around a moving subject, you could do that, but it still requires moving subjects to be captured in one individual frame, otherwise the frame edges won't line up for the stitch.
Hope that makes some sense.
Thank you for giving me a straight answer, David.
I didn't think there was any way to do what I want to do, but thought I'd ask just to be sure I wasn't missing something. Looks like there won't be any way to capture 200 megapixel images where most of those pixels are on a moving subject. Bummer.
Maybe someday inexpensive camera technology will allow one to .......
To me, considering you are already interested in photography, it seems you are asking a question that’s massively obvious that it isn’t possible to be done. You can buy cameras that are fairly cheap (as far as cheap goes) that give you 45 million pixels to work with. Also you need to factor in that printing life size prints of animals is incredibly expensive and requires specialist printers, then you have to find a space big enough to hang it and also realise that larger prints are not meant to be pixel peeped, you are supposed to stand back and enjoy them.
The whole situation you are requesting just seems hugely unrealistic to real life situations, from the shooting, printing and viewing aspects, it’s like beyond extreme pixel peeping.
I have found the main problem with huge prints, cost-wise, to be the shipping. I was quoted $250 to ship a 72" by 48" print from the printers in NYC to my place here in WA. But any printer that was closer to me was massively more expensive for the print itself.
Of course I only like prints done on metal, so more affordable paper options are of no interest to me.
If I had a bit more money this wouldn't be a problem, but trying to get huge photos printed on metal and shipped across the country is tough on a poverty-level income.
I'm pretty much stuck at 48" by 32" prints, on metal ..... but that just isn't very satisfying ..... nor is it very unique. But I guess it's gonna have to be okay for now, as my image files don't really have enough resolution to look spectacular at 72", anyway.
Have you looked into metallic luster papers? I'm also curious about printing on transparent plastic that could be rolled for shipping and then mounted/affixed to metal backing.
Years ago, I painted on Visqueen, used for greenhouses. It was coated with wax, so not appropriate for this purpose. For my purpose then, I "pulled" my acrylic painting off the Visqueen and then wrapped the painting around a 3-D armature.
Purposeful imagination is a human trick we all possess.
As far as metallic luster papers go, I have had work printed on them, years ago. I do not like that look at all for my bird and wildlife images. Metal prints don't have a metallic look at all. The finish and the look is the same as you get on regular print paper - glossy, matte, etc. There is nothing similar at all about metal prints and photos printed on metallic paper, except that they both happen to have the word "metal" in them.
What I love about metal is the rigidity and the permanence, and especially the fact that there is nothing to do with the print except hang it. No bother with framing, or matting, or putting glass in front of it, or mounting it to anything. Just put a screw in the wall and hang it on the screw and that's it! A bit 4 or 5 foot metal print completely "installed" in less than three minutes flat!
Also, I very much dislike the look of matts and frames and I dislike looking thru a pane of glass, so metal prints are perfect for me. I have used so many different printing mediums, and for what I like, nothing else comes anywhere close to metal for giving me exactly what I want.
But thanks anyway for the suggestions.
Okay, got it. Check out California giclee printer shops in Riverside and San Diego counties. I've used a good shop for large prints in Fallbrook before.
Given what you are trying to accomplish, you will run into limiting factors.
Very high pixel-count sensors or MF/LF film come with a mobility limitation. You can't make a grab-shot with a 4x5 film camera on a tripod.
If your subject is moving then you have the limit of it's motion within the frame. Motion across the frame is more difficult than motion towards/away from the camera.
Shooting from a great distance has an atmospheric limitation because wind and convection will "ripple" the image.
Funny you mention medium format cameras. I would LOVE to use true medium format (not the newer ones that are smaller than standard MF) for action-packed wildlife photography. Or even large format.
Problem is, that those camera systems are lacking truly long telephoto lenses, and they also don't have autofocus systems that can keep up with animals that are moving rapidly and erratically.
It's like they only design MF and LF systems for docile subjects that are right near you. Whatever.
I think the limitations of medium and larger format systems is getting the huge amount of glass to move around in the lenses. I’m sure if they could, the camera companies would have fast aperture, fast auto focusing lenses but motors within a certain size aren’t strong enough to shift those elements.
From what I have read and seen the Nikon D850 is probably the best wildlife camera in the world right now if you are aiming for that maximum res plus AF speed. Most sports/wildlife shooters seem to big up 20mp APS-C cameras like the D500 and D7500 for getting the shot.
I‘m sorry that I didn’t get what you were trying to achieve. As pointed out by others this is not possible to achieve when your subject is moving. In my picture the bike fills out one 18MP frame (no problem that he is moving). The rest is added by panoramic stitching as described. This resulted in a 200 MP image where I wanted the subject placed like this in the first place. But instead of taking one wide angle 20mm shot with 18 MP I took like 20 shots with an 80mm lens resulting in an amazing High Res Picture.
Cheers
Michael
Thanks for the clarification.
Yeah, what you did would be a great way to get 200MP resolution if you are wanting to create environmental portraits, with the subject smaller in the frame. Especially if you have a tripod with you so that you can line all the frames up in a sensible, consistent fashion.
But, as you said, for what I am wanting to do, I just don't see the stitching method as being something that could ever work.
Interesting discussion. I believe a camera array would be the way to capture a moving image in glorious detail... but it represents a number of challenges
1. You need a number of cameras and lenses
2. You need to physically engineer the array
3. You need to program a multi-camera synchronized shutter press... thoughts?
4. You will need a fair budget to do it
It could be done with a larger array of cheaper units... but it would be difficult to do in practice. But hey! It should work!
The stitching itself wouldn’t be too tricky... but with an array of 4, 6, 8 or more units... you could easily find the final images being in the GB range.
The problem, for me, would be that when I am photographing animals that are on the move, that usually means that I am also on the move, as well. I must be quite mobile, in order to keep up with the animals and their erratic movements and behavior. I cannot imagine how I would hike from spot to spot, thru woods and over creeks, etc, with the type of set-up that you are talking about.
But your multi-camera set-up does seem like something that would work for stationary subjects ..... but then again, if a subject is stationary, one can just use one camera, the way the article describes.
Regarding the “Brennizer” method, as I have already explained to others, and to Brennizer, himself, this technique has been around long before Brennizer.
I first learned the technique in the early to mid-1980's. Back then, I saw a photo taken in the early 20th century, done using this technique. That is when I first learned, (by asking). I have since seen the technique described in old books from the 19th century, explaining how to get the 12×8 inch look, from a 4×3 inch camera.
There was even a much older patent for the technique, from much earlier than that. How this accent technique could be named after a man much younger than I, who rediscovered it in the 21st century, is beyond me.
Then again, Columbus is still given credit for “discovering” America, despite four independent groups finding it before him. (He was not even the first European to rediscover America). Others even want to give credit to the Pilgrims on the Mayflower.
I guess it is what it is.