As you advance in landscape photography, you'll likely come across techniques such as exposure blending or focus stacking. But what if you want to do both?
The amount of information you can find online is enough to teach yourself nearly any subject, photography being one of them. Almost everything I have learned about photography outside of experience has been acquired through some form of an online tutorial. When I couldn't find a concise explanation on how to correctly set up a focus stack to use for exposure blending, I had to figure it out for myself. Before you dive into this, I'd like to mention that some of these techniques are intermediate or advanced, so if you're still new to landscape photography, I highly suggest you check out the tutorials right here on Fstoppers. Lastly, I won't be going into how to exposure blend the image, as it would only take too much time, but by the end of the tutorial, you'll have an image ready for exposure blending that is in perfect focus, so let's begin.
Prepare for Photoshop

Prepare and organize your images in your library of choice
The first thing to do is find and organize the images you want to focus on stack and exposure blend. In my example above, I'm using two different exposures, each with four shots of different focal points. You can use as many shots as you'd like depending on the number of focal points or exposures you needed to capture the dynamics of your scene.

If you only change one setting make sure it's white balance
Next, you'll want to prepare your photos to be taken into Photoshop. The most important thing in this step is just selecting a white balance and setting all the images to match. Some other settings you can change to your liking are the color profile, remove sharpness, lens corrections, and saturation. You don't want to do any actual editing here like contrast, adding sharpness, etc. The idea is to correct the image and balance the colors before editing to give us a nice flat image.

Sync all your photos
After you've finished correcting one of your images, you want to select all the images in your set and sync their settings. You do this by selecting the "sync" button and making sure everything is checked in the prompt. This will set all the photos to match the photo you corrected, most importantly, matching the white balance throughout all your images.
Opening Photoshop
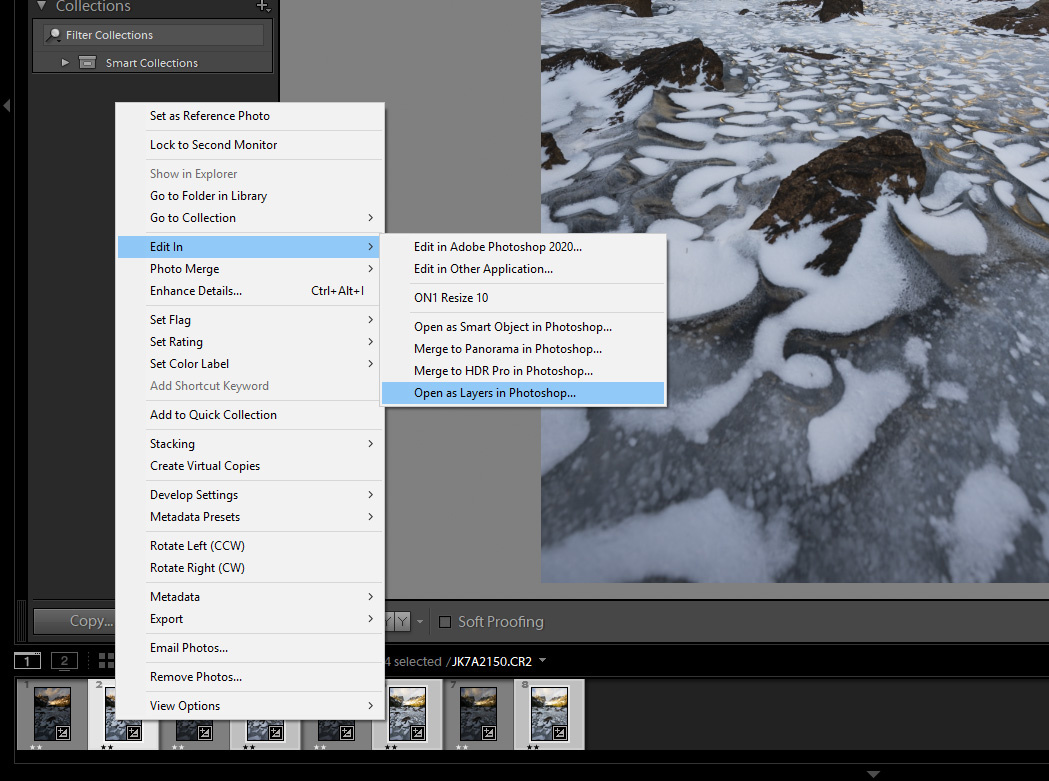
Now that our photos are corrected, they are ready to go into Photoshop to focus stack them. You'll want to select only one exposure at this point; in my case, I'm using the brighter exposure, because it'll be easier to see where the focus shifts between each photo. By holding control (windows) or command (mac), you can select each of your images, then select right-click > edit in > open as layers in Photoshop.
Align Layers

Order your layers from front to back
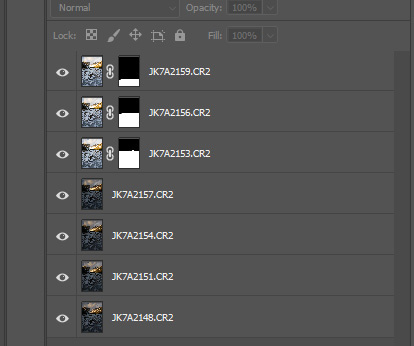
Your first step is to make sure the photos are ordered in the layer panel correctly. You want the top layer to be the photo with the closest point of focus and the bottom layer to be the photo with the farthest point of focus. Make sure the photos in between those also follow the same rule, having the top layers be closer in focus and gradually building focus farther back in the image until you reach your background layer.

Once your layers are in the correct order, we need to make sure they are all properly aligned. Even if you are on a tripod when taking the photos, there will be micro shifts in each image as you adjust the focal point. To do this, simply select all your photos, then edit > Auto-Align Layers, and select auto. Once completed, go through and turn off each layer to see that it correctly aligned your photo together. You'll notice the edges of some photos shifted and are smaller than the document size; this isn't a problem and will be taken care of with the crop tool at the very end.
Masking

Add a black layer mask to your top layer
Now, it's time to start blending between focus points. We will start by adding a black layer mask to our top image. You do this by selecting the layer, then holding alt (windows) or option (mac) and clicking the layer mask icon. Now, your top image won't be shown, because it is filled with black. Remember, filling a mask with white shows your layer and black hides it.


Next, you'll want to zoom into your image and start turning the mask you just created on and off as you go through the foreground of the image. You can do this by holding shift and clicking on the mask or setting a shortcut to enable/disable the layer mask (I explain how to do it in my video above). As you make your way up the image turning the layer mask on/off, you want to find the point where both images look to be in focus.

Using the image above you can see this red lines marks roughly where the focus remains the same in both images
For my image, the spot where my first layer and the second layer are roughly the same focus is around this point. This is where we will make our first mask!

Use the Lasso tool to make your masking selection
First, you'll want to zoom back out of your image, making sure to remember where you found your focal shift; I marked mine in red for this example. Select the Lasso tool (shortcut: L) and draw a line roughly level with where you found your focal shift. This doesn't have to be exact, as you can fine-tune if need be. Also, make sure to select the entire bottom part of the image. Now you will need to fill your selection with white by using the shortcut (shift + F5) and selecting "White" for contents. Alternatively, you can grab the paint bucket tool (shortcut: G) and fill it with white that way.

Feather your selection after filling with white
The next step is to add a small amount of feather to your blend. To do this, make sure you have the Lasso tool (shortcut: L) selected and right-click anywhere within your selection and select to feather. Choose an amount between 10-20 depending on the megapixel size of your camera and select okay. Once again, fill the selection with white by using the shortcut shift + F5.

Adding this feathering will help transition from one layer to the next, creating a smoother overall blend. Notice on the left how sharp the line is while the right side has a nice gradient. This might not be obvious now, but it will make a difference when you start adding contrast and sharpness back into the image.

Remember to select the entire image below where you are drawing your focal plane
The next step is to repeat this process for every layer you have (besides the background layer). Make sure to disable the layer you just finished, add a black layer mask to your next layer, zoom into the image, and find the next line of focus between the images by turning the mask on/off. Zoom back out to select your mask, remembering to select the entire bottom part of the image with the lasso tool, fill with white, and finally add the feather. You can follow the masking direction above for each layer in your image.

Once you have repeated the masking process for each layer, your final document should look like this (minus the layer I used to mark red for focal lines). At this point, it is a good idea to save your image and check how sharp the image is throughout, going from front to back while zoomed in. If you find spots that aren't perfect, you can simply select the mask for that layer and paint white or black to touch up a few spots.
Applying Masks to Another Exposure

Once you have finalized your first image, go back into Lightroom, select another exposure's images (in my case, the set of darker images), then right-click and select edit in > open as layers in Photoshop.

Once the layers have opened, remember to re-order them from foreground to background, as we did previously. Then select all the layers and auto-align them as well.

The next step is to use the masks we created for the first image on our other exposure. In your original file, select all the photos you have with masks; in my case, it's three photos. Right-click and select Duplicate layers > Destination document, which should be set to the name of the tab you just opened from Lightroom. This will duplicate our three images into the document.
Switch to the other document opened in Photoshop, and you should see something like this.

Next, you will want to click + drag each of the layer masks to their corresponding images. Remember, you organized these images from front to back, so the top lighter image will match the top darker image in my example. You will need to repeat this process for any extra exposures you might be using; in my case, I only needed two exposures.

Check to see if your transferred masks match up well in your exposure
Once you have moved the masks, you can select the images you brought from your first document and delete them, resulting in what you see above. That's it! Now, just zoom in throughout your image and make sure everything looks like it's aligned properly and focus is sharp throughout. At this point, you should save your second image.
Opening Stacked Photos to Exposure Blend

Once you have saved all your stacked exposures (in my case, just two stacked images), head back into Lightroom and repeat the same process we did before to bring your stacked images into Photoshop.

The last step is to simply select both layers and auto-align them as you've done previously.
Final Results
That's it! You should now have two (or more) perfectly focused stacked images that are ready to be blended together as if you were just using different exposures you had taken out in the field. After going through this process and exposure blending my photos, this was my result:

If the written tutorial was too much, feel free to check out the video as an alternative. Personally, it's easier to follow along to a written tutorial when I'm trying to replicate techniques or follow steps, but a video can explain things in more depth, so I hope one of them helps! Thanks for reading everyone, and please let me know if you have any questions or comments about the steps I may have missed within the tutorial.
Lastly, before you comment, if you're wondering why I didn't use Photoshop's auto-blend tool to stack my images, it's simply because it doesn't work when trying to blend multiple exposures together that are focus stacked.


The final image looks great. How long did it take?
After where I left off in the tutorial? Probably 30 minutes but I don't exactly remember!
Did you ever try Helicon Focus 7? Would take you about 10 minutes and much less effort to get about the same results.
Never heard of it! Ill look it up :)
Hello everyone, I'm new below, I hope we make pals. I actually liked this post, many thanks for your efforts, thanks to you I figured everything out. In short, I want to share my perceptions. I function as a manager and also get very weary at work, job inhabits 80% of my downtime, but I actually like it and I will not leave there. Just recently I began to get clinically depressed due to the routine, it is not unexpected, I do nothing yet work. My wife suggested me to find a leisure activity. I attempted whatever from angling and searching to stitching and also make-up, but in the long run, I located something that brought pleasure to my life. It is https://vipspinsreview.com.
There you can not just play as well as invest your time, yet likewise save up, as an example, to loosen up in Hawaii, as I did. Try it, you 'll like it
Thank you Varvara Gudenov. Google is obviously not your Comrade.
Does anybody moderate these things and week out spam?
That you for this very detailed article and excellent photo. I use LR and did know about the sync feature. I have the following questions:
1. Why go to all of this trouble (your explanation made my head hurt because it is so complicated). Why not just merge the photos in LR as a HDR.
2. Why pre-process the images before the merger - after all, they were made with the same camera using the same set up. Why not just process the merged image.
3. Focus stacking - I love focus stacking - but only when I am try to bring everything from 2 feet to infinity into focus. This is very long distant shot. The first rock in the foreground must have 6 feet away or more. You were shooting at 17mm and F/8.0. Your lens should have more than sufficient depth of field to capture the total scene in perfect focus.
I would have used my 20mm f/1.8 Nikon also at f/8.0. Shot 3 brackets at 0, +1.0 and -1.0. The only thing possibly moving are the clouds. It they are pretty still, then I would used my 15 ND filter and gone for a longer exposure ( don't know if the longer exposure would help).
Thanks,
peter
Hey Peter,
These are all great questions! Ill try to answer them as best as I can.
1. If I'm understanding you correctly you want me to merge all the photos via HDR to stack the images and blend them? If that's what you are asking it doesn't work. Regardless even if it did work, HDR doesn't have the same results or adjustability as doing exposure blending in my experience.
2. The idea here isn't necessarily to process the images. It's just make sure all the images are the correct exposure for what I want and matching white balances so when I do blend them together they match in color. A better example would be, let's say im blending two exposures together, an exposure for the foreground and an exposure for the background just like my example here. However maybe my foreground exposure is slightly too dark or too bright (Not caring at all about the background because im blending that out). So before taking it into photoshop i'd correct the exposure. I explain it more in the video, but you're basically just making sure the images are flat, not sharpened, exposed for how you want and all matching color.
3. Your scaling is a bit off. The ice in the foreground is actually quite close to the lens and the rock is much closer than 6 feet. You can see my tripod a bit in the shot at 1:38 in this video - https://www.youtube.com/watch?v=OLzD01T3KZk&t=120s.
The rock is in sharp focus right before the rock and a bit after it. Trust me I wouldn't have focus stacked if I hadn't needed to! No reason to do extra work.
Hope this answers the questions!
The article is really awesome! To me, the final photo looks a bit underexposed