
If you’ve ever had lens flare ruin a seemingly perfect shot, this extremely simple technique will save you a ton of headache in post-processing.
Photographing landscapes typically involves shooting many sunrises and sunsets with your camera aimed towards the sun. This inevitably increases your chances of lens flare showing up in your shot. Many lenses and filters have coatings to help but nothing will fully prevent them from happening, especially if you’re shooting the sun directly on the horizon.
After spending well over an hour trying to remove flare from one of my images in Photoshop using a slew of different tools and techniques, I told myself never again. That’s when I figured out an extremely easy method when shooting to skip all the headache.
The Method

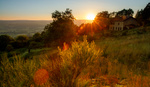
Look at all that glare. Yuck.
First you’ll want to take your main photo. In this case I was taking a panoramic so ignore my composition. Notice all the ugly flare and try to imagine how long it would take to correct the giant red spot below the sun in Photoshop. What do we say to lens flare? Not today!

I hand model in my spare time.
After taking your photo, immediately take another photo with your hand or finger directly over the sun. Depending on the size of the sun in your image it may require more than one finger to block enough light to stop the lens flare from showing up. That’s all you’ll need to do in the field, the rest will be done in post-processing.
Processing

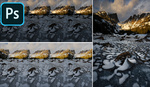
Open as layers through Lightroom.
Open both photos into the same Photoshop document. If you’re using Lightroom you can just select both photos, right click, and choose Edit In > Open as Layers in Photoshop.

Adding a layer mask in Photoshop.
Make sure the top photo in your layers panel is your main shot that contains lens flare. Select that shot and add a layer mask to it using the “Add layer mask” button in the layers panel.

Select black as your foreground color.
Select your brush tool (keyboard shortcut "b") and make sure your foreground color is black.

Brush settings: 400px, Normal Mode, Opacity 100%, Flow 100%
Increase your brush size to a relatively large size, 400 worked for me. Hardness to 0, Mode to Normal, Opacity/Flow at 100%. Start painting anywhere you have lens flare in your image. If you mess up simply switch your foreground color to white (keyboard shortcut "x") and paint to reverse your mistake.

Notice the unnatural glow of the sun.
If you’re trying to remove spots right next to your sunburst you may accidentally start removing the glow that surrounds the sun. This can look really unnatural like you see above.

The red area represents the strength of the brush strokes showing opacity changes closer to the sun.
A way to solve this is by simply adjusting your brush’s opacity to a lower setting ( around 40%) when you are trying to remove a spot near your sunburst. Once you adjust the opacity to your desired strength, gently brush around the sun, switching between a black and white foreground (keyboard shortcut "x") until the results look natural. This may take some trial and error and is a prime example of when a drawing pad comes in handy.

While your first run through of this may take some time, after masking a few images this entire technique will take you less than a few minutes to do. Compare that to the daunting task of trying to remove flare out of an image in post-processing. Not only does it save you time it also increases the quality of your final images.
Conclusion

Without this technique, this image might not have made it into my portfolio.
Learning this specific technique a few years ago opened up my mind to how I was shooting in the field. This might be your first time masking an image or you may be seasoned in the art of blending. Either way it becomes a tool in your work and most importantly changes the way you might approach a composition in the wild. Many of my shots were ruined by lens flare and learning this has definitely increased portfolio worthy shots I've brought home.
I'd love to see what you do with this method or simply hear if this was helpful to you. Did I miss anything or could I have explained these methods better? Let me know below.


Sometimes I like lens flare, if it's clearly defined. It can be very cinematic. But yeah, in this example it doesn't read as such.
I agree! You can actually see in my final image that I left one spot. Having the option is important though and most of the time I don’t want it. Thanks for the comment! Hope it was worth the read :)
Great tutorial. Thanks
Thanks Oliver! Means a lot I can teach (maybe?) someone as talented as you.
Oh, I'm just a regular photog, nothing special. And actually I'm very bad with PS, always good to learn new stuff. Cheers.
Brill! Hopefully of course, you notice the flare before you leave. Reminds me of the technique I read recently on FS about how to take out people who wander into your photo of the building - similar idea - multiple shots etc.
Exactly the same concept! It's a huge help in editing.
really good tutorial. One thing you should probably have mentioned is that the exposure in between the two shots should be exactly the same. Maybe you yourself shot in manual mode and assumed everybody else does as well. For people shooting without manual exposure this method would not work without fixing the exposure. The metering between the shot with the sun and with the fingers would be very different.
You are totally right! I didn't even think to mention shooting in Manual because that's what I always shoot when I'm on a tripod and setup. Ill try to remember this for the future and remind myself of what assumptions I make.