
Recent updates to Lightroom Classic have brought a new level of control over local adjustments: Range Masks. Within this, the Color Range Mask allows you to be clumsy with your adjustment brushes while targeting very specific parts of your image. Here’s a detailed look at how it works.
When Would You Use It?
To make local changes to an image, you have a choice of tools: the Adjustment Brush, Graduated Filter, and Radial Filter. The Graduated Filter and Radial Filter are great for covering regions of an image with an adjustment — such as brightness or saturation — while the Adjustment Brush is better suited to tweaking smaller areas. All of these can then be further refined using a Range Mask, a tool that comes in two flavors.
The first and more commonly used is the Luminance Range Mask. This is especially useful for fine-tuning skies, as it allows you to target a specific level of brightness or shadow. For a detailed exploration, click here.
The Color Range Mask tends to have a narrower range of purposes, but that doesn't mean that it can't be put to good use. It can certainly speed you up by allowing you to be quite loose with your adjustments. As the name suggests, it allows you to restrict your local adjustment to a specific color or range of colors.
Of course, to help you avoid straying into unwanted regions while applying an Adjustment Brush, you can tick “Auto Mask” and have Lightroom assist you. This is particularly useful if you have a definite edge that you want to stay within while making your adjustment.
However, consider this image:

If, for some reason, we wanted to change the paddy fields and nearby trees from green to blue, we could create a brush, set the saturation to zero, and choose a strong blue color from the palette near the bottom of the adjustment panel. Here’s what some loose brushing would achieve:

Of course, I could spend a long time brushing in more accurately, picking out the individual trees. Alternatively, I can go to Range Mask, choose “Color,” and then use the dropper tool to pick out the green in the paddy fields.
In effect, I’m telling Lightroom to choose the colors that I want to target. Clicking once selects one individual color; repeatedly clicking while holding shift allows you to choose up to five colors. I’d advise adding at least a few in order to get good coverage.
In addition, you can click and drag in order to select a range of hues. If the color that you’re trying to target varies in brightness or shifts in hue, this can be useful to ensure that you’ve grabbed all of the colors that you’re seeking.

As a final touch, there’s then the Amount slider, which can be useful for making further refinements over which parts of the image are affected. If you hold Option (Mac) or Alt (PC) while you drag the Amount slider, Lightroom will give you a black and white visualization of how your adjustment is changing, spreading out of the selected areas as you bring the slider to the right.

As will be seen below, this Amount slider is a curious tool.
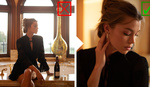
Perhaps the most common use for the Color Range Mask is when attempting to tweak specific colors in an area of complexity while saving you a trip to Photoshop. Clothing is a good example. Consider this photograph:

In this example, I want to intensify the red vertical stripes on the shirt. If I make a global adjustment in the HSL/Color panel, there's no means of avoiding those changes, also affecting the model's skin. To target the stripes, I need to make a local adjustment.
I could spend a long time brushing on the stripes with an Adjustment Brush, hoping that the Auto Mask would help me with my accuracy (let me tell you: it doesn't) and avoid some of the blues and pale shades that are alongside. Instead, I did some loose brushing, switched the Range Mask to Color, and made a series of selections using the dropper tool.
Initially, my results look pretty shoddy as my brushing brings out some of the blue hues that I was trying to avoid:

You can see where my four droppers are grabbing the reddish color, attempting to tell Lightroom which hues to target. You can also see my changes to Shadows, Whites, Blacks, and Saturation that are trying to make the stripes more intense. By holding Option (Mac) or Alt (PC) while clicking on the Amount slider, I can get a better idea of what Lightroom is doing:

To resolve this, I dragged the Amount slider to the left, telling Lightroom not to give any flexibility beyond my choice of colors. Immediately, there's a dramatic change:

And here's the result. Given the speed and ease with which this can be achieved, it's definitely worth trying before assuming that a trip to Photoshop is required.

How Does the Amount Slider Work?
To get my head around exactly what the Amount Slider is doing, I found a color wheel and imported it into Lightroom.

Using an Adjustment Brush at 100% density and 100% flow, I covered the wheel with an adjustment and turned the Saturation to -100, removing all of the colors.

I then switched Range Mask to Color, grabbed the color dropper, and clicked in the middle of the blue so that Lightroom only applied the adjustment to that color. Note that the Amount is set to 50. I’ve included the visualization that Lightroom gives you when you hold Option/Alt to demonstrate better how it’s behaving:


You can see how, despite being centered on the blue, the adjustment extends towards indigo on one side and teal on the other.
Turning the Amount to zero produces the following:


Notably, the region affected is much smaller. As you’d expect, sliding the Amount to 100 percent has the opposite effect:


This is all fairly logical thus far and ties in with Adobe’s own information that the slider will “narrow or broaden the range of selected colors.”
So what happens if you use this image? Will the Amount slider eventually mean that Lightroom thinks that they're close enough to one another that the mask should extend from one into the other?

I followed the same process as the color wheel, covering it with 100% density, 100% flow of Saturation at -100:

I then chose “Color” from the Range Mask options, took the dropper tool, and clicked on the right-hand half of the image. Notably, there is no overlap into the left-hand half, even if you set the Amount to 100:

I had expected that sliding the Amount slider to the right would cause Lightroom to eventually decide that the adjacent green was close enough in the hue that it would kick in. Instead, it seems that Lightroom is smarter than that; it deliberately ignores hard edges, even if the hues either side of that hard edge are incredibly similar. I repeated this experiment a number of times, trying with hues that are only one Hue degree apart in Photoshop's color picker. Lightroom simply does not like the hard edge.
This is probably digging too deep, but here’s one last example using a gradient:

Again, I desaturated, created a Color Range Mask, and used the dropper to pick a shade in the middle. With the Amount set to 50:

The Amount set to zero:

And finally, the Amount set to 100:

In Conclusion
This turned into something of a rabbit hole, but hopefully, it was useful! The Color Range Mask isn't a tool that gets much use, but it's good to know how much impact the Amount slider has when it comes to tidying up loose brushing. At the very least, it's always worth trying to create the changes in Lightroom before assuming that it requires a jump into Photoshop, especially as the Amount slider can afford you some very lazy brushing. And if nothing else, I've learned that Lightroom's Amount slider is a little smarter than I anticipated, knowing how to deal with gradients and ignoring hard edges between hues that are all but identical.
Let me know if you have any thoughts or additional tips in the comments below.


Thanks, Andy! Amazing article
Thanks Ivan! Glad it was useful. 😊
This tool is one of the main reasons I haven't made the switch to Lightroom CC. Only Lightroom Classic has it and I use range masking all the time. If adobe could bring this feature to CC I'd make the switch.
Adobe Camera Raw has it too and I use it all the time.
Great article. Thank you Andy!
Kind words. Thank you. 😊
Great illustrations of the effects. I can use this info.
Good to know! 😊
Fascinating, and really useful in helping understand this tool
This is an excellent, and helpful article. I have used this in LR, however, I did not realize the degree of accuracy this tool can provide. Thank you!
Great article and very well explained, is a tool that I use a lot, in LR and Camear Raw that works exactly the same. Thanks for sharing