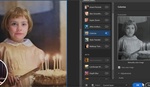
One of the most common things you will have to do when it comes to retouching is taking care of facial hairs and fuzz. This helpful video tutorial will show you how to do just that using Photoshop.
Coming to you from Kayleigh June, this excellent video tutorial will show you how to use Photoshop to remove facial hairs and fuzz on a subject's face. This is a common issue with all sorts of subjects, but thankfully, it is not particularly hard to retouch. The important thing to remember is that depending on the type of genre you are shooting in, you might want to leave a touch of fuzz for the most realistic results. It can be tempting to retouch out every last hair and blemish, but that can end up creating over-the-top results that look too perfect to be believable for certain applications. I generally like to zoom out every few minutes during the retouching process just to keep an eye on how the overall result is progressing and to make sure that I have not gone too far overboard. It also helps to step away for a minute or two after you finish before your final export, then re-evaluate one last time. Check out the video above for the full rundown from June.