
The dynamic range of a camera is something that is considered to be important. A large dynamic range is often preferred. But how can you make use of this in your photography? In this article I will explain how you can use your camera’s dynamic range in post processing.
Finally, you find yourself in a great looking landscape with amazing light. But no matter what exposure you use, a part of the image has blown out highlights, or completely black shadows. Do you recognize this? It is a situation where the dynamic range of the scenery is larger than the camera is capable of capturing.
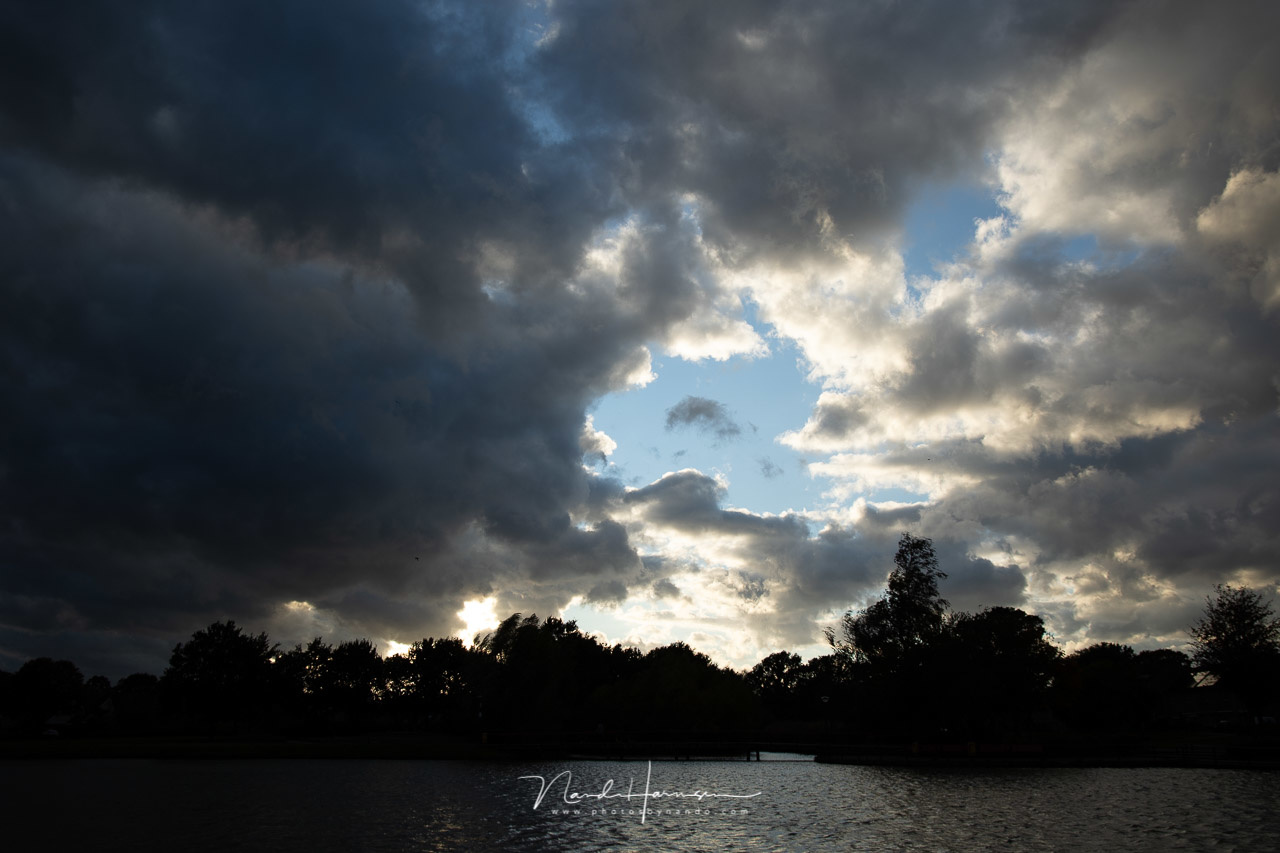
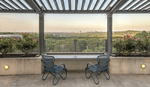
Exposure on the sky will make the foreground very dark

Exposing on the foreground will overexpose the sky
If you find yourself in a similar situation, you won’t be able to capture highlights and shadows in one image. If you are shooting in jpeg, you will need to use exposure bracketing to capture the complete dynamic range. Or you can try to use gradient neutral density filters. If you are shooting in raw file format, you might be able to use the dynamic range of your camera.
How to Set Your Camera
If you want to use the dynamic range of your camera in the best possible way, it is important to set your exposure to the brightest parts in the image. Basically, there are three things you need to do.
1. Shoot Raw
It might be obvious, but there are still people who shoot in jpeg. On most occasions this is fine, and you can achieve good results in normal situations. But when the dynamic range of the scenery becomes larger than a jpeg is capable of registering, you end up with extreme overexposure or underexposure.
These clipped areas in the image can’t be corrected anymore. Only by shooting in raw file format, you have the opportunity to make use of the complete dynamic range of your sensor.
2. Exposure to the Right
It is important to tweak your exposure in such a way that you end up with the largest amount of image information. This can be achieved by exposure to the right (EttR). It means you need to set your exposure so that the histogram will be as much to the right as possible.
By using exposure to the right, the darkest parts of the image will be as light as possible, thus recording the maximum amount of image information in those parts. But you have to make sure no clipping occurs in the brighter areas of your image.
3. Do Not Overexpose Your Image
Perhaps the most important part of exposure to the right, and optimizing your exposure, is to prevent clipped highlights. These highlights cannot be recovered, no matter what. That is why you need to set the exposure based on the brightest parts of the image.

If the bright areas in your image are clipped, which means these are pure white, it can't be recovered anymore. Lowering brightness of pure white will result in dull gray
Clipped highlights are parts that are pure white. In digital photography it is impossible to recover these parts. After all, making pure white darker will just result in dull gray. That is why you may have to place the histogram to the right as far as possible, but never let the pixels touch the right side of the histogram.
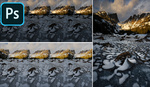
How to Read and Use the Histogram in Lightroom Classic
After importing the image into Lightroom Classic, you can see the histogram, and a bunch of sliders to adjust the exposure or brightness of the image. These sliders are not random. Each will adjust a certain region of the histogram. By hovering your mouse over the histogram, you can see which slider you need to adjust for that part of the histogram.
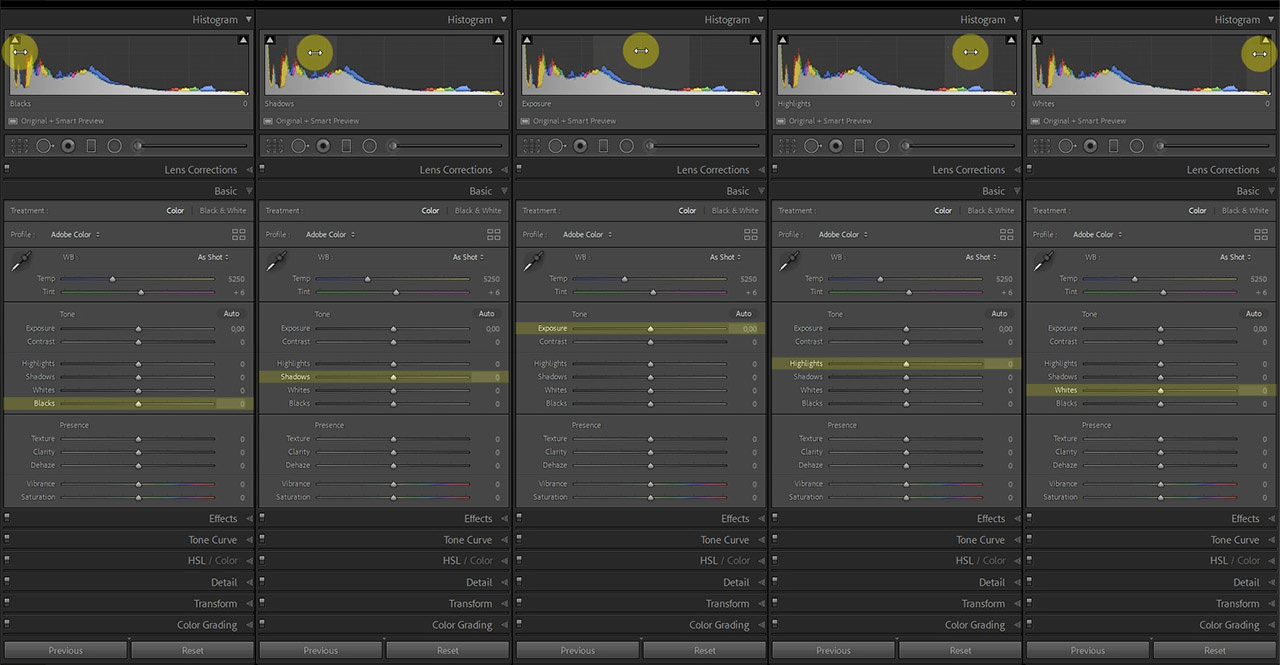
Each slider will adjust a different part of the histogram. Lightroom Classic allows you to adjust a slider, or to drag the histogram itself with your cursor.
Something most Lightroom Classic users don’t know is the ability to adjust the histogram by dragging the cursor over one of the five regions of the histogram. The corresponding slider will change at the same time. But perhaps this is not as accurate compared to the adjustment of the slider itself. You decide which method you prefer.
There are two little triangles in each top corner of the histogram. If you hover over the left triangle, you will see the parts in the image that are clipped black. By hovering the cursor over the right triangle, the clipped white parts are shown. If you don’t see this happening, just tap once on the triangle to activate this option. The triangles will be black if there is no clipping.

These parts are clipped. But only with the current image adjustments.
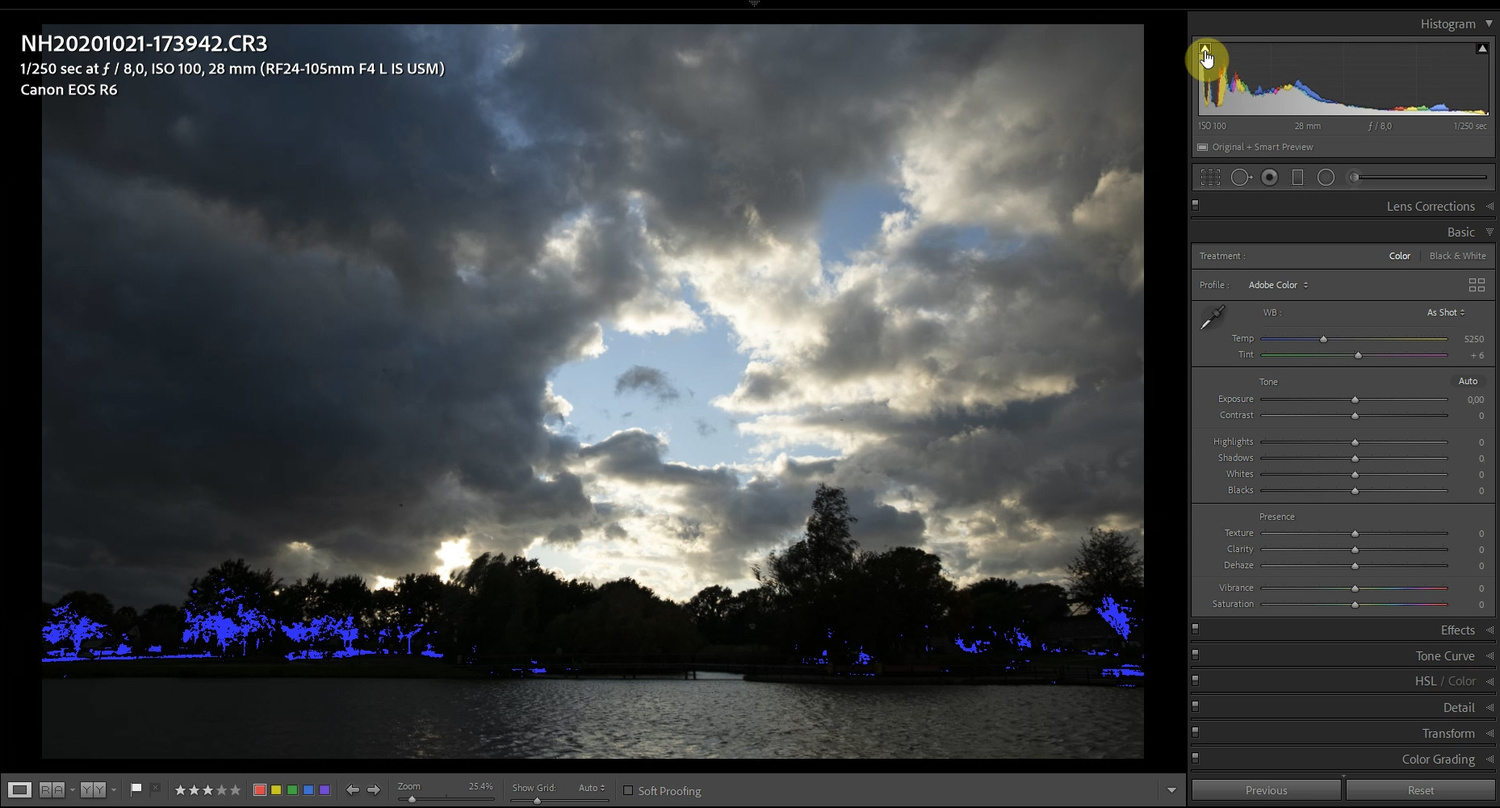
These parts are clipped. But only with the current image adjustments.
Steps to Post-Process the Image
The goal of this post-processing is to recover the darkest parts in the image, without clipping the highlights. To translate this to the histogram, most pixels will have to be relocated to the middle, the part that contains the midtones. This can be done in four basic steps.
1. Recover Shadows
This is the most obvious correction in the image. The shadows can be recovered by adjusting the Shadows slider. In this case, it is possible to adjust the slider to +100, but it can be different from other images. Look at the changes in the histogram. By adjusting the shadows, the corresponding part of the histogram is moved towards midtones.


2. Adjusting Midtones
After raising the shadows, the image still looks very dark. This is because the dynamic range in this particular scene is extreme. In this case the midtones need to be raised as well. The midtones adjustment is done with the Exposure slider. Again, look at the changes in the histogram.


3. Correcting the Highlights
By adjusting the exposure, parts of the sky have become too bright. In fact, parts are clipped. But this is only with the present adjustments. There is still image information in these clipped parts available. It is only clipped because we raised the exposure in Lightroom Classic.
By lowering the brightness in the highlights, it is possible to adjust these parts of the image. This can be done with the Highlights slider. Again, look at the changes in the histogram when adjusting the slider. You may notice how most of the pixels are now located around the midtones area of the histogram.


If you can't recover the clipped white areas completely, you might have raised the exposure too much. Just turn down the exposure until you have recovered every bright part in the image.
4. Optimizing Global Contrast
These post-processing steps will lower the contrast in the image significantly. After all, both the dark parts as well as bright parts have become midtones. This is rarely beneficial for the look of the image. So it's wise to optimize the global contrast by setting the White point and Black point of the image.
These two sliders are stretching the histogram until it touches the sides. It will optimize the contrast in the image as much as possible. This can be done by holding down the ALT key (OPTION key if you are using a Mac) while adjusting the slider.
Adjusting the White point slider with the ALT key pressed, the image will turn black. Only the clipped areas will become visible as patches of white. You need to prevent these patches from showing. The same goes for the Black point slider, except the image will turn to white instead. The clipped black parts will show as darker patches. Try to prevent having clipped black, although this is less important compared to clipped white.


Perform Any Local Adjustments if Necessary
There is a strong possibility the image is not to your liking. The adjustments I have made are all global adjustments, meaning, the adjustments are equally applied over the whole image. In most images, different parts need slightly different post processing.
In this case, I would adjust brightness just beneath the clouds. This can be done with a Adjustment brush, or with a gradient mask. The latter will also brighten the water. A second gradient mask over the water can correct this again.

By adding local adjustments it is possible to add a nice local contrast to the image. Use gradient masks or adjustment brushes.
Often, local adjustments are preferred over global adjustments. But when using the complete dynamic range of the sensor, I think the global adjustment will give a good basic look for further fine-tuning. Just be careful not to perform too many adjustments that have to be partly corrected with other adjustments. You might lose track, which makes it difficult to change a setting without influencing another one.
The end result of my post-processing example can be seen in the before-after image down below. It might not be to your liking, but remember, this is always a matter of personal taste. Perhaps you would have done things differently.


Downsides of This Kind of Post Processing
Raising the darkest parts of an image will increase noise levels, and banding might become visible. This is the biggest downside when using the dynamic range of the camera. This has limitations, which often become noticeable when the dynamic range of the scenery is very large, like the image in this example. How much noise or banding will appear depends on a few things.
First of all, every camera sensor has a certain amount of dynamic range. Some sensors perform poorly, others perform extremely well. Secondly, the quality of the image will degrade when shadows are raised too much. How far you can go also depends on the camera sensor. The last thing that has a big influence on quality is the ISO level. If you use a high ISO, the noise will kick in sooner when raising the shadows. If you don’t want to depend on these three limitations, just use exposure bracketing, or neutral density gradient filters.
Are you using the dynamic range of your camera a lot? Please share your thoughts in the comments below, and share your way of using the dynamic range if this is different compared to my example.


"The midtones adjustment is done with the Exposure slider."
I'm pretty sure this is incorrect but don't currently have anything in front of me to reference as far as documentation is concerned. If I remember correctly, the Exposure slider actually pushes all the date in the histogram equally, which means it also pushes blacks and whites. There used to be a Brightness slider that, I think, only affected midtones.
These days the best way to do it with a single adjustment is to lift the tone curve from the middle. That leaves the blacks and whites mostly as-is and has a greater effect on just the midtones.
This isn't to say that the Exposure slider shouldn't be used, or even used in this case, but when discussing what it does, it's important to know the difference.
Indeed. Exposure will change the overal brightness of the imagen, it is not limited to the midtones. Curves adjustments is a good advise. to preserve shadows and highlights.
Unfortunately Lightroom will adjust brightness if you want to change midtones the way I explained. Just try to change the midtones by dragging the midtones area in the histogram.
Sorry guys, that's not quite right. The Exposure Slider adjusts the midtones in a similar, but not identical, way to using curves. It has the visual effect of altering overall brightness but it does not affect the full tonal range equally. It has worked like this since Lightroom V1.
You only have to make a basic change to the slider to see this happening in the histogram. The blacks and whites are protected, up to a point, and LR attempts to smoothly roll off the highlights.
Changing the Exposure Slider is not the same as changing a camera's exposure. I do think it's badly named and should be called Midtones.
Thank you for making this clear.
Something I will look into myself somewhere in the next days
Also I've found that the whole "Highlights all the way down, Shadows all the way up" move works ok for cameras with LESS dynamic range (as long as nothing was clipped to begin with), otherwise you wind up with something that looks like the end result here, which is a picture pushed too far. You can argue it's personal taste all you want but the evidence is in the trees, especially on the tallest ones on the right side of the frame. It's got the tell-tale "looks like it was sharpened too much but really the dynamic range was pushed too far" crunch to it.
The problem here is that you're pushing an area that truly is a shadow area up to a midtone. The reason you're doing this is to reveal detail. The problem is that you're doing it with too much contrast. Shadow areas can have detail and still be in the shadows, and look like they're in the shadows. You need to lower the overall contrast of the image to do that, though. But there's a difference between revealing detail within a distinct part of the histogram (shadows, midtones, highlights) and pushing the data in those areas into another zone (i.e. shadows into midtones, etc).
I know this works also for camers with less dynamic range. But you will see image degradation much sooner.
As I mentioned, the end result is perhaps not to everyones liking, but I used it to explain how you can work in Lightroom to use the DR.
"Shadows all the way up" can really make the shadow parts very, very noisy though.
I agree with you. You cannot change an uninteresting image into something nice by post-processing. That was not my goal.
I just used this image as an example.
"if you want something to look interesting, don't light all of it."
I think that is indeed the best answer.
:)
First one needs to know what the dynamic range of the camera is in the first place and stay in the range. Then calculate an exposure to create an image which is easy to work with using a spot meter in conjunction with the zone system which still works in the digital age. The only thing that has changed is instead of film there is a sensor.
I use a Sekonic Speedmaster L-858d-u lets face it todays camera meters are set for everyday exposures once the shooter gets into a tricky lighting scenario the meter is useless.
All camera metering systems change over time and need to be calibrated and the ICC profiles adjusted most serious photographers calibrate their monitors why not the camera.
Personally when a tricky lighting issue comes a calibration patch is the first frame and using X-rites calibration system via Lightroom easy sue tis a pain some times but worth the time
A color checker for landscape photography? I wouldn't dare to use such a thing when photographing a nice red sunset or the blue twilight.
I was thinking the same thing. A color checker (CC) would be ideal for subjects within arm's reach. But, that mountain several miles away, I don't know how you could take advantage of a CC unless there's some workflow I'm unaware of which is quite possible.
I tried this with a simple gray card to get rid of the colorcast from a Lee big stopper.
As a result I also got rid of the nice sunset colors, turning it in just another daylight looking landscape.
And yes, your flower or bug will have the exact correct color. But if that is your goal, shoot a flower or a bug under controlled studio light conditions.I think that is the place where a color checker will work best.
All your doing is creating a profile for the lighting under what your working under which makes it easier to recreate the the scene giving you a better starting point. It doesnt matter if it a portrait or landscape if your shooting in raw you need a starting point if you shoot in JPEG it not as critical
For instance I live in Fairbanks if I shoot a landscape were the color temp is totally differnt than Florida by setting a separate profiles it save me countless of hours behind the computer.
Even though most cameras set the white balance automatically it doesnt work all that well.
The color Temp changes from drastically from one part of the country to the next for instance the lighting here is leans towards the cool side Florida is one the warm side in both instances when shooting in raw will still picks up color bias. By creating separate lighting profiles it is easier to work with when working in raw.
My work flow for the most part involves using the color patch all the way to the printer.
Does it work for landscapes sure stop and think photography is recording the light reflected off a subject think inverse Square law
https://www.youtube.com/watch?v=K0EcS5NK6_4
It turned out well, if you want to import it to the Iphone, then you need a certain software, for this I advise you to use https://softorino.com/waltr/windows-guides/how-upload-music-your-iphone-..., you can find another one. But it will be free on the first day, so I advise you to choose it.
Nice try...
Enjoy the sound of silence... leave your iphone at home when shooting landscapes.
I'm wondering why cameras do not yet have an "EttR" metering mode.
hahaha - that would be something :)
deleted ;)
Eh, now I want to know what you wrote before you deleted it! :D
Good summary of the basics. If I'd known this much when starting out years ago, I'd have done a lot better.
I think one reason the whole concept of DR might be confusing is that we don't have even a rough sense of how much "range" there is in a real world scene, how much of that we can capture, and what happens to it after that. I wrote a blog post in which I tried to boil this down to an oversimplified 'elevator pitch' on DR in photography today:
https://jimhphoto.com/index.php/2020/05/14/dynamic-range-for-dummies/
People will argue the fine points of DR endlessly, and it's worth remembering that it can become another endless search for technical perfection vs. getting something interesting in front of the camera. The great film photographers of the past weren't afraid of having a lot of black in a photo.
Not only black, but white also.
I have been told to dim the brightness of the sun in a photo because it was white. The person told me that is not realistic because it was too bright...
lol
Yes. Those endless critiques about how you're "losing" highlights and shadows.
"Raising the darkest parts of an image will increase noise levels, and banding might become visible. This is the biggest downside when using the dynamic range of the camera. This has limitations, which often become noticeable when the dynamic range of the scenery is very large," That is the purpose of "exposing to the Right" when you are capturing the image. You will maximize the dynamic range of the camera and you can view that through the histogram at capture and get a good view of the shadow areas. If the shadows are touching the left side of the histogram, it alerts you that there may be problems. You can choose to change lighting or return to the scene at a more opportune time. If you are shooting raw, the histogram is showing dynamic range for a jpeg. A good practice is to test your camera in high contrast scenes to get an idea of the dynamic range performance before shooting something critical. My tests have shown that I can go about a stop more than what the histogram is showing because raw shooting provides the maximum dynamic range of the camera but not shown on the histogram. I think opening shadow and bringing down the highlight technique is a good starting point for beginners. Once you understand dynamic range there are better methods. Because I maximize dynamic range, my unprocessed raw files appear overexposed. What I do is lower the exposure slider to where the highlights look "right". Then I use the white slider to bring up the low light areas. As necessary, I open the shadows and do local adjustments based upon my emotional and compositional ideas as opposed to a mechanical workflow.
Thanks.... you are too kind!
lol
Isn't funny how our wives are often the last to know how great we are. They trash and denigrate us worse than others.
Good point. Thanks for writing this down, Ed Sanford.
But be careful when going beyond the right histogram boundry, based on the 8 bit histogram of your camera. I have noticed how the picture style settings of your camera can fool you. Setting a neutral picture style will show a different histogram compared to a landscape picture style.
When testing how far you can go beyond the boundry, keep the picture style that you used and never change it. Especially when you push it to the limits.
OK.... what I didn't write is that I use an application called Fast Raw Viewer. It creates a histogram of the raw file that can be read on the card. So, when I am shooting, I bracket starting with the histogram and then go up to two stops over. I find that in most cases, I end up processing the 1-over brackets a good bit of the time. Nevertheless, I don't bet the farm while in the field. I bracket....
Fast Raw Viewer?
I will check that out.
Having multiple shots exceeding the 8bit histogram boundry is a workable method indeed.
By the way, you really killed it on that image "Forest Light"... I have struggled to get foggy forest scenes like that. I'll bet the print really "sings"......
Thanks Ed. Appreciate it
I prefer HDR stack :)
UNfortunately that is not always possible. Especially with moving subjects.
Im so grateful to have read this. I am just exploring my path as a beginner photographer. I hope I can apply all of these great tips.
https://www.svgmotors.com/