
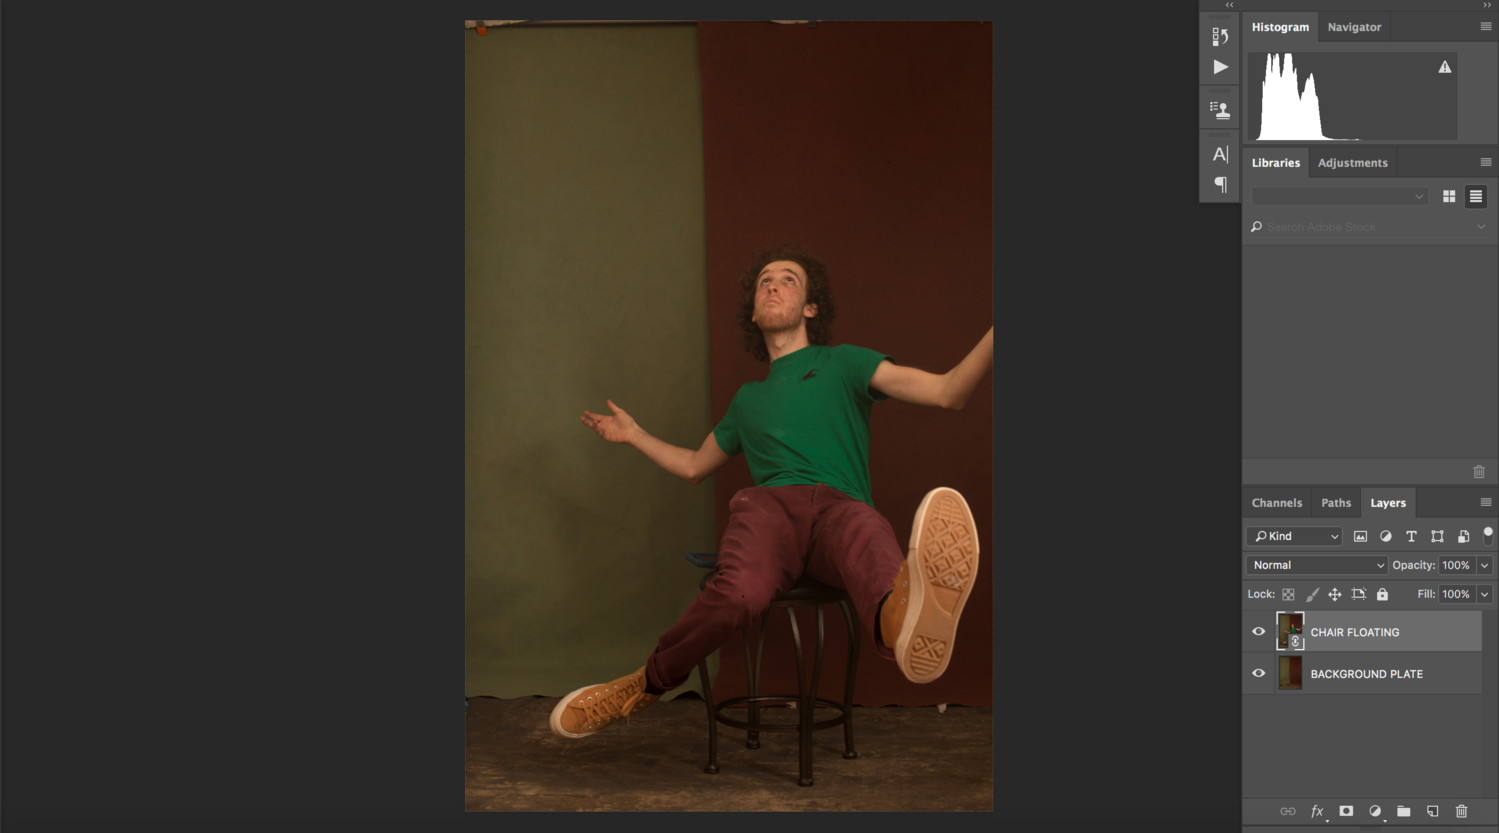
Ever wondered how people created those "impossible" photos of them sitting off the ground? Here I teach how to make a levitation photo in just under 10 minutes using some simple tricks in camera and finishing it off with Photoshop.
It all started with an idea. This past week I was getting bored with my backdrop that I've been using for months now and wanted to spice up my images. So I called up Gravity Backdrops and ordered two massive hand-painted backdrops; one green and one red. As I was driving home from school, I realized I was wearing red pants and a green shirt (the same as my new backdrops) and thought it would be cool to play around with complementary colors and try something new. So that's where I learned to levitate.
The Setup
For this shot, I know I wanted something fun and interesting, and something that tells a story. I took my Gravity Backdrops, folded them in half, and then hung them side by side. I wanted it to be split into two different worlds and wanted to match what I was wearing.

A behind-the-scenes look to the setup in my studio (my 8x8 living room).
Technical Settings
Since I was ultimately taking a self-portrait, I needed some way to trigger it and wanted to see my liveview screen as I was shooting. My camera of choice for self-portraits is the Canon 6D because you can pair it with your iPhone using CameraConnect to review images, and trigger the shot from the palm of your hands. I set my camera up with a Rokinon 50mm f/1.4 and a ProLine tripod and started firing away. Below you can see the camera settings.
Camera Settings
- Shutter Speed: 1/160 s
- ISO: 400
- Aperture: f/8
- White Balance: K7800
Lighting
Since I wanted to show a fun environment and vibrant color palette, this meant no shadows on the background and an even distribution of light across the entire scene. As my key light I placed a 6-foot Elinchrom Deep octa directly behind the camera 7 or 8 feet back so I get an even spill of light on me and on the background. For my fill I placed an Impact 22-inch beauty dish faced towards a white wall for my face.
The Shoot
The most important thing to keep in mind when creating a levitation photo is that you want your camera not to move and for the light to stay the same. So your first shot should be a blank shot of the background scene, also known as the background plate. After the background plate is shot, next bring in a chair or item you will be balancing on. Keep in mind when you're posing that you will be removing the chair later in Photoshop, so make a face and pose that reflects that. Once the main components are shot, simply go around your house and gather any props that are relevant to the scene and throw them in the air. The process can be seen below.

The four images it took to make the final image. First image is the background plate. Second image is the actual levitation shot. Third image is for the hat. Fourth image is for the lamp.
The Editing
For these kind of shots, even if you've never dared open Photoshop before, don't worry. There's nothing to sweat about. The only tool you'll be using is the masking tool and that's it. Simple as that.
The masking tool is a very powerful tool in Photoshop. A few things to keep in mind before we dive in is that when your mask is filled with black that means the image is invisible and you must paint white back to reveal what's on that layer. When the mask is white, it means your layer is visible and to remove things you don't want simply paint black over the image.
Step 1: Open Your Background Plate and First Image With the Chair
To open your file in Photoshop, press CMD+O on a Mac or CTRL+O if you're on PC. Place the levitation photo over the background plate and put a mask on the top layer. With a brush that is 100% opacity and 100% flow, paint black over the chair, and magic: the chair will disappear. A helpful note is If you ever want to toggle between painting with black or white, simply toggle between them using “X” on your keyboard.

Adding a mask to the chair layer.
Step 2: Masking In Other Objects
Make a mask on each layer and press CMD+i to invert the layer and make it invisible and paint back with white to make the objects visible where you want them. Repeat this process for any other prop you shot separately. The final image is a combination of four separate images.

Add a black mask on the hat layer and paint white to reveal.

Add a black mask to the lamp and paint white to reveal the lamp.
The Final Image
After about 10 to 15 minutes of masking and placing your objects in the scene, the last step is bringing the image to life through color correction, dodge and burn, or any other stylistic choices you chose to add. That's all there is too it. In just 10 minutes you could learn to fly!


Final image after Photoshop adjustments.
Closing Thoughts
When something is on your mind, go and create it. Don't think, just create. The most important part about the art of photography is to have fun and learn a few things along the way. Go out and create your own levitation photo today and leave it in the comments.


This is such an incredible article, you nailed It! I can't wait to see other people's or levitation pics, such a fun thing to try out.
Wow Gabrielle! First comment ever on my first ever fstoppers article!! Thanks for the amazing support! Lots more to come soon!
Great explanation
Appreciate the kind words Lee! Looking forward to being apart of this team!
It's always fun when you can do locked off shoots like this. You coulda had a bit more fun with it, by extending the background onto the floor I think, perhaps something like this...
Really good thought! Thanks for the feedback! I did wish I could get up higher off the ground
Ah I haven't done one of these for a while! They are good fun! https://fstoppers.com/photo/130793
Wow that's awesome! How'd you do it?
Pretty much the same as the article above. But obviously outdoors. A tripod is not optional, it is needed! I found a clearing in some woods (as you can see!) I found that a levitation shot like this really works best when the camera is low down to the ground. You need to be able to see right underneath the subject to really sell whats going on and believe they are floating. I once did a shot like this and after all the effort of removing what the model was standing on if the camera is too high it still kind of looks like they are standing up! Putting the camera low gives me that lovely foreground bokeh right at the bottom of the shot too.
I carried a foldup DIY mini walkway used for decorating, and Beth sat on that in a variety of poses. She chose the tea pot, there was nothing actually coming out of it at the time, the tea and steam were done in post.
Just take a load of shots until you think you have a pose that you love. Then (and this is the important bit as mentioned above) do not move the camera or the tripod, carefully move the model and what they were sitting/lying on out of shot completely, and take another shot of the background (this is often called the background plate.) (I also very gently clicked my autofocus off so that the focus stayed the same as it had been when there was a subject in shot.
Then when you get your images onto the computer, find the BEST shot of your subject, and the background plate shot, open them as layers, and use layer masks to remove what they are sitting on.
I also sometimes take a 3rd shot where I get someone to hold something in mid air so that I can get some natural shadows on the floor below where they are, but you are do with in post with dodging and burning.
Then process as you desire and add to your portfolio!
Great explanation! Thanks!