
Lightroom is undoubtedly a great tool for Digital Asset Management (DAM). Some people use it for Digital Asset Management and Editing while others use it just for Digital Asset Management and do all of their editing in Photoshop or some other external application.
I use Lightroom for both, doing most of my editing in Lightroom and a small portion in Photoshop and/or plugins. I particularly like using it for organizing, keywording, commenting, and rating images.
Lightroom has many features that often go unnoticed by casual users. Over time I've learned some of these features and how to combine them together for specific tasks. Here's how I use Lightroom for various import and export tasks, maybe they'll be useful for you as well.
Import Tips
People are often in a hurry to get their photos into Lightroom so they can start looking at them. Unfortunately many people just use the default import settings. One of the things I immediately found a use for in the Import dialog was the File Renaming feature. An image file name like "IMG_3456.CR2" isn't very useful, and will only start creating duplicate issues after you have 9,999 images. The problem with a file name like this straight from the camera is that it does not tell me anything about the photo.
I use the File Renaming setting to rename my RAW files during import to a format that includes the date and the sequence number. For example: IMG_3456.CR2 becomes 20190821_0001.CR2, IMG_3457.CR2 becomes 20190821_0002.CR2, and so on. I use a Year\YYYY-MM-DD\ folder structure for my photos, so at any time when I have a RAW or JPG image file name in this format, I know exactly what folder the original image is in. This does require me to manually type the shoot name in the format of the date. You could automate the date format, but then it would be the date of import and not the date of the actual shoot.
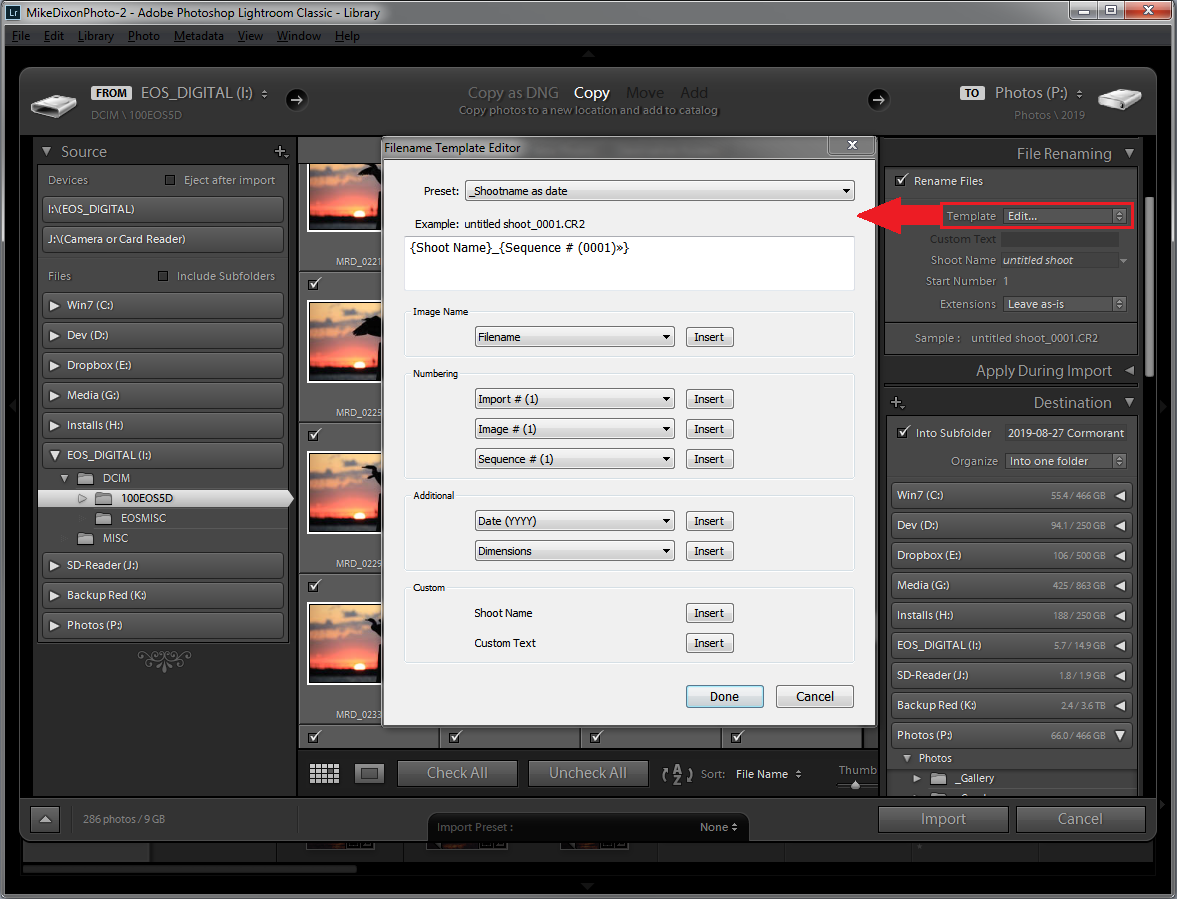
Lightroom Import Dialog, editing a filename template
When importing your photos, make sure to put each shoot in its own folder. Dumping all of your images into a single folder not only slows down the access with your computer but will slow down Lightroom when you're displaying all of the thumbnails. I've had several instances of people coming to me for help with their Lightroom and I found they were just importing everything to one folder, or the folders were in no particular organized structure.
When importing from a memory card, simply select the year (parent) folder in the Destination section, then check the Into Subfolder option and then type the folder name you wish to use. I use a format of "yyyy-mm-dd {description}" for example: "2017-08-21 Eclipse". Lightroom will show you the new folder to be created in italics under the parent folder as well as a "+" sign on the folder icon. This is a good visual indicator as to exactly what folder will be created and where your photos will be copied. The date format for the folder not only helps with sorting by date, but the folder itself can be copied to another location and be completely descriptive and unique on its own. My folder structure for this would be "{drive}\Photos\2017\2017-08-21 Eclipse\".
Export Tips
Perhaps one of the first things you learn in Lightroom after learning how to edit a photo is how to export images. Creating presets for various export configurations like full-size printing and social media images is one of the more appreciated features in Lightroom.
My first rule for exporting is that I NEVER export to the original image folder unless I'm making a copy for another use (more on that later). That folder is only for the original source image files or files created by merging panoramics, HDRs, or edits in Photoshop as I still consider these as "source" images.
When I export, I always export to a subfolder of the original image or to a specific folder other than the original when creating images for things such as these articles. For example, my exports for Facebook always go to a "Facebook" subfolder. This accomplishes a few things:
- I can tell that the image has been posted to Facebook because it's in the folder.
- It's easier to locate as there are fewer images in that folder.
- If I need space I can always delete the entire "Facebook" folder and know that my original images are safe in the parent folder.
- I won't accidentally send a lower quality image off to a printer.
- I won't accidentally delete an original source file when deleting the JPG's.

Here's a trick for you. In the Export dialog under the Export Location section there's a checkbox called Add to This Catalog. When this setting is checked, once the Export is complete the exported file will be re-imported into your catalog. This is useful when used in conjunction with exporting to a subfolder such as "Facebook". Once you do this you can not only see that you've exported the image for Facebook, but you can now manage these exported files directly from Lightroom (delete, rename, e-mail, publish, etc.) without going to Explorer (Windows) or Finder (macOS). If you do this, I suggest using a subfolder name that is quite unique from any keywords, titles, or other text in your catalog, such as "Facebook_Export", that way you can view all of these images simply by filtering a view on all of your photos and selecting Text, then "Any Searchable Field", "Contains All", and "Facebook_Export".
My second rule for exporting is that I always rename the file using the renaming feature in the export settings. Most of my renaming presets simply add a suffix to the original filename that indicates their use or size. For example, when exporting 20190821_0001.CR2 for Facebook it becomes 20190821_0001_fb.jpg. This can be done in the Export Dialog, File Naming settings by checking the Rename To checkbox and then selecting Edit... in the combobox. In the Filename Template Editor there are many different fields that you can use to construct a filename format. One of the more useful ones is the Dimensions field, so you could have an output filename like "20190821_0001_fb_2048x1024.jpg".
Here are a few of my rename uses:
- 20190821_0001_Full.jpg - Full size, Full Quality jpeg for printing.
- 20190821_0001_fb.jpg - Limited size and quality, "fb" for Facebook, "ig" for Instagram, etc.
- 20190821_0001_1024.jpg - 1024px on the long side, mostly used for forum or blog posts.
- 20190821_0001_5x7.jpg - The copy name field in Lightroom is output to the filename so that I know the print size that I'm targeting so that the print service does not have to do any cropping. I create a virtual copy for each crop ratio.

The Copy Name is displayed in the thumbnail cell and is also placed in the file name when exporting for printing.
Rare but Useful Import/Export Tips
Occasionally I want to create a copy of a photo in my Lightroom catalog that is either a copy of the original RAW file or a copy in a different format, while still having both in my catalog either for further editing or comparison using the Loupe view.
I created export presets for this. The trick is to simply specify the file format you desire under the File Settings section and then under the Export Location section check the Add to This Catalog option. For the Export Location I choose Same folder as original (no subfolder) for the Export To setting. In this instance, I do not have it renamed in the File Naming section because I already did that on the original import. Once executed the new file will be re-imported right alongside the original but in a different format, except for RAW files which I have it append a suffix of "_copy" to the filename.

Make a copy and reimport export presets
This process could also be used to simply copy the file to another location, it doesn't have to involve resizing or changing the file format. Simply choose a specific folder in the Export Location setting and then choose Original in the File Settings, Image Format setting and you can copy a file by using an export preset (make sure you uncheck Add to This Catalog).
Conclusion
You can do a lot in Lightroom. For many things there are several different ways to accomplish the same task. Combining various settings and options can not only make your life in Lightroom easier, but also a bit safer. Having a consistent and organized import and export process is simply a great practice to ensure file integrity.
Do you have any Lightroom import or export tips that you would like to share? Let me know in the comments!


Good advice. LR is so much more than a raw processor. This article clearly shows how LR can be, and really should be, the hub of all your photo management activities, I don't think there is another single app that can do the same broad range of workflow tasks and at the same time offer a pretty decent raw engine.
Just a follow up... I don't understand the (very common) advice to use some form of date-based folder structure. One folder per shoot, as you say, is a good idea, but given that filtering by date is a trivial exercise, why put shoot folders in date folders too? I never do this, ever, but I know plenty of LR teachers who advocate for this and in fact it's the default in LR. No-one has ever managed to satisfactory explain why it's a good idea.
I always put the date in my folder names
I have already shot several times at the same area, and around the same time
Just putting "Sunset at Place XXX" in the folder name would force me to go and look at the created column name since the would be several occurences. I don't have that extra step to make since i can already see the dates while as I sort my folders alphabetically
Besides, if you happen to change your hard drive, and replicate your data by copying the folders instead of replicating the drive or using a data cloning tool, the "date of creation" of your folder wil not be the original shooting date, but the date of the copy
I don't rename my raw files though. The only advantage would be not having duplicate file names on my drive. I don't think of anything else
For me, it makes it easier to find the folder for an image outside of Lightroom, but I could see how some people would be OK with just a description. It also makes it easier if I have more than one shoot of the same location/description.
Lr is good for small and medium size images unless you know that the LR pipe can't supply the print job to the printer without timing out and that the image size vs resolution will cause you image to print short and Filter Fail.
Its usually not an issue printing from lightroom if you want to print a postage stamp size image where things get messed up is printing large files with out having the right resolution. Yes drivers, firmware updates, phone calls with Epson support (PRO) they don't have a checklist.......here is the biggest issue though what is the native size Epson print drive is STUPID it can't do any calculations, its limited as to size vs resolution.
Adobe knows this but you don't pay enough or they need more subscribers to handle the issues. Adobe's software that I use has many issues that are either fixed in ten years or never fixed.
Book has issues that are so elementary they basically try to force you to only use their canned templates.
LR must have a list a mile long.
PS is pretty good but third party software is a must to make PS kick butt.
Why doesn't Adobe buy a RIP and add value to the software, a RIP would be better that buying boats or basketball courts.
Many thanks for share this article; I have learned a lot.
I need to ensure Lightroom does NOT rename my imported files. But, for the life of me, I cannot find any File Renaming section in Lightroom Classic Import. Why isn't that section showing??
Well, I found it. Had to right-click between sections and "turn on" that section. Oyi! LoL