
There's this nifty piece of software called Adobe Photoshop Lightroom, and in my time as an educator in the craft of photography I have seen its use frequently abused and mishandled. The issues affect beginners and pros alike, and stem from multiple issues, everything from technical oversight, all the way to a fundamental misunderstanding of what Lightroom is meant for. Read on for an overview of common misconceptions and mistakes with regards to this immensely powerful photo editing system.
I'm not here to teach you how to use Lightroom. I'm here to tell you what to consider before learning how to use it. If you're already using it, I'm telling you what to fix. A lot of these tips and suggestions will apply to any non-destructive catalog image editing program such as Capture One, DarkRoom, DxO Optics, or the defunct Aperture.
It's a UNIX system! I know this!
No, Lex, it's not UNIX (it's actually based on SQL Lite), but notice I said system. And herein begins one of the biggest issues I encounter on a near-daily basis. If you're one of those people who asks a group or forum, "Which do you use or prefer? Lightroom or Photoshop?" you are part of the problem. And if you answer Photoshop, chances are you don't fully grasp what Lightroom is for, either. Lightroom is a fully non-destructive import-to-export database-driven ecosystem that covers ingestion, culling, keywording, folder organization, presets, plugins, batch editing, and export. What happens in Lightroom, (mostly) stays in Lightroom. There's none of this "I use Lightroom sometimes," weirdness I always hear. It is designed to either be used or not be used. There is no sometimes, only Zuul.

You can look at Photoshop as a glorified Lightroom plugin and Lightroom as a glorified combination of Bridge and Adobe Camera Raw (ACR) in a much easier-to-use and polished package. A true understanding of the ecosystem shows that Lightroom and Photoshop are mutually inclusive. Neither truly replaces the other which is exactly why Adobe packages them together for $9.99/mo. You could technically utilize Lightroom entirely without ever editing a photo in it, even if this is a big waste of its power. Part of that power is batch editing. Photoshop really shines at "heavy lifting" editing one image at a time, while Lightroom can edit 800 photos in a single click. Adobe designed them to work together and it's as easy as right clicking on a photo and choosing "edit in Photoshop." When you're done in Photoshop, you just click "Save" and it automatically gets put right back into Lightroom stacked with the original file. Lightroom even has some basic "actions" included, such as the ability to select multiple files and have them open in Photoshop as layers, in a Smart Object, in the HDR dialog, or in the Panorama dialog.
I'm personally able to do about 95% of my editing in Lightroom, and if you primarily just use ACR and "preset toning actions," it'll probably be the same for you. Have no fear, when you need layers, liquify, or some other specialty tool, Photoshop is just one integrated click away.
Respect the catalog.
Lightroom has three major components that all must work together to function, a lot like the human body. The first is the application which acts like the fleshy bag of bones itself. The second is your (hopefully raw) images that are the food needed to function. The third is the catalog file. The catalog is the brain. Virtually everything you do within Lightroom gets stored in the catalog file. If you lose the catalog file, it's no different than losing your brain. You're dead and you have to start over.

There are a number of important things to understand about the catalog file.
- The catalog is what allows us to have a full "non-destructive" workflow. Any and all edits you do entirely within the Lightroom interface, including lens corrections and warping, don't ever actually save to your original file. They're all stored and saved in the catalog file with an infinite history. Made 300 brush strokes on a photo? No worries, you can revert to each and every one even years from now. Photoshop only saves 20 steps by default, and unless you save a very large PSD, you're going to lose them all when you save.
- Unless you've changed the default settings, every time you close Lightroom it asks you to back up the catalog. This is great, but it is of utmost importance that you understand that this doesn't back up the images. Most of you will say "duh," but this will be a revelation to some of you. Trust me. This is a far more common misconception than you think. You must back up your images on your own. Lightroom has no way of doing that automatically.
- The catalog file and images don't have to be in the same place on your computer. In fact, I believe the best way to future-proof storage for visual artists is a modular system where your media is stored on (Thunderbolt, USB 3.0, or eSATA) external drives. For maximum system performance you still want your catalog file to be on your internal drive, especially if it's a solid-state disk (SSD). Lightroom is constantly reading and writing data to and from the catalog, so it should have the fastest path to Lightroom possible. When you import files, you'll want to make sure you choose the correct location, though. Make sure the drive you store your images is selected in the Destination dialog every time. I actually store photos in one of four different drives depending on the shoot, but it's all still with a single catalog file.

- Adobe has publicly acknowledged that Lightroom is designed to use a single catalog file. While it is designed to manage multiple catalog situations, these should be only considered advanced or specialty situations. In the early days of Lightroom having a lot of photos in your catalog could impact performance, but several years ago they upgraded how the database is handled so that the number of images effectively has no negative speed impact. External catalogs can be useful as temporary working catalogs that eventually get merged back into a master catalog, but if you're starting out I recommend not doing that until you are intimately comfortable with the ecosystem. There's nothing less fun than accidentally overwriting all the edits from wedding right before delivery. Trust me on that one.
It's smart, but it cannot read your mind.
This is technically another catalog-related issue but it is far and away the most misunderstood and abused issue with Lightroom so we're giving it some special attention. This is also the number one reason why I believe most long-time Photoshop users talk bad about Lightroom. DO NOT EVER move an image without telling Lightroom, ever. Yes, I'm yelling, and no, I cannot stress this enough. From day one, until you no longer use Lightroom, you don't touch an image without informing the application. If you want to create, rename, move, delete, modify, or alter a folder you do it in the Library module in the left pane. As far as your photos are concerned, this is Explorer for you Windows users. This is the Finder for you Mac users. If you make folder and image structure adjustments within the app, it knows. There are very few situations where you ever need to actually go into the image folders via the traditional Explore/Finder route ever again. Do it all in Lightroom.
If for some reason a folder gets moved outside of Lightroom, there will be a little question mark next to the folder in the Library module. You can right click it and try to find it, but if you haphazardly move or delete files and folders outside of Lightroom, you may be in for a world of hurt when you can only find individual files randomly scattered about.
Make plans and organize early and often.
Keywords, collections, flagging, and folder structure are the two most basic and critical components for maintaining both efficiency and sanity. If you don't do it when you start out you'll probably never get around to it. Trust me. I'm more organized than any of my other Lightroom-using friends, and I'm certainly not perfect.
- Keywords: You can get pretty picky with keywords, and the more specific you are the better. I personally do pretty broad keywording, but admire anyone who does more. In the import dialog, always fill out basic keywords that can help you find the shoot if you forget where you put it. Locations, topics, people, and even gear involved can all be helpful. But whatever you do, make sure you put in even just a few keywords with every single import with no exceptions. Just a few days ago I had to pull up an image in my library that a tour management company needed for a major advertising campaign for an upcoming band's North American tour. We're talking in the the thousands of dollars for this single image, and they were up against a 30 minute deadline. Of course it wasn't where it should have been in the folder hierarchy. But I was able to quickly find it via a metadata search of the band's name and now I can pay rent and utilities for the next two months thanks to my very basic keywording habits.
- Collections: You've got me here. This is something that is really powerful but I've never taken the time to get into. Basically collections are imaginary folders that can hold any images in your catalog without actually moving them from their permanent location. There's a ton of great uses for them, but I think they're exceptionally useful for organizing your portfolio. If you were with a prospective client and they asked you right this second to show them your top 10 best images, how quickly could you provide your portfolio? If you had a smart collection that automatically collected all your 5-star rated images, the answer would be "immediately." Yeah, I really need to do this.
- Flagging: The most critical culling/picking action you can do. It should be the very first thing you do after every import. Flag picks (keyboard shortcut P) and rejects (X). Anything you never plan on ever needing again should be rejected. Anything you plan on potentially giving to a client at some point should be picked. If you have photos you may need to reference later or want to save for a rainy day, just leave them unflagged and unrejected. After I have delivered photos to a client, then I can delete all the rejects in a single click. Get in this habit for every shoot and it will keep your library nicely trimmed of useless photos.
- Stars: Decide on a system early and stick with it. There's no wrong way as long as it works for you, but Thom Hogan has a great article on dealing with lots of digital images in which he references the great Galen Rowell's "ABC system," which would translate to 'A' being 5 stars, 'B' being 3 stars, and 'C', being 1 star. This gives you 2 and 4 star ratings for images that are on-the-fence and maybe you want someone else's opinion before making a final determination. Five stars would be for real winners. Don't even touch this unless you think the image could be in a coffee table book. We're talking cream of the crop. We're talking a level where even the best photographers in the world might only have a handful of these a year. These are your instant portfolio images and should be ready to go on the cover of a magazine at any moment. Three stars would be for images worthy of selling that you are proud to have your name attached to with a lot of good stuff for broader portfolio use. One star images are for pictures that someone out there would find publishable, but you'd be indifferent to having your name associated with it or not. Maybe these are important images that don't necessarily have a profound style to them. Don't think of 5 to 1 meaning bad to good. Bad photos get deleted. Neutral photos don't get a star rating at all. A good idea of something I'd keep but wouldn't assign stars to would be family formals for a wedding client. They're important to a client, but I'm never going to do anything with them.
- Color labels: These are convenient when you want to mark a selection of photos temporarily, such as picks for a blog post or album. Don't use color labels for anything important because they are Lightroom-only metadata. Stars and flags can actually be read by other programs and systems. Colors, usually not.
- With regards to flags, stars, and labels, do not mix them. Each does its own thing. Just keep it simple and start out with what's important to you. If you don't have a real use for stars, don't use them. In a few years you may wish you did, though.
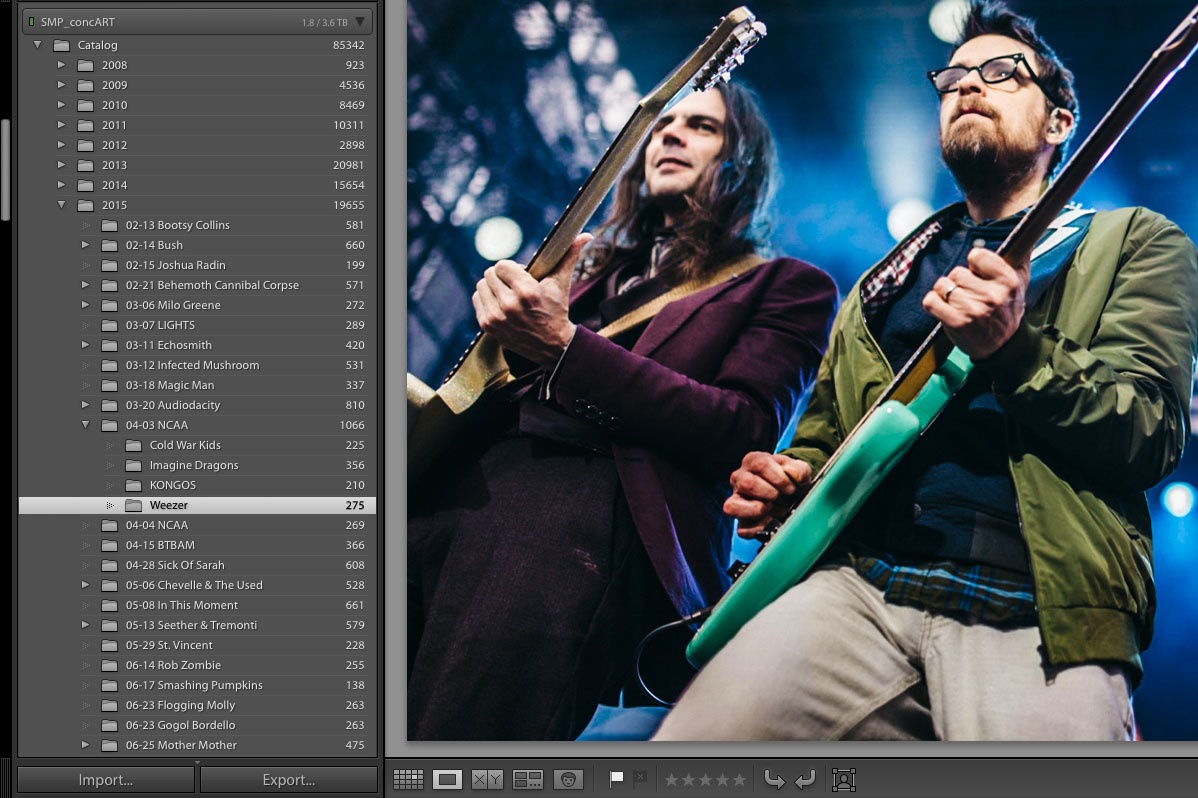
- Folder structure: This is my first line of organization and how I typically access and find most of my photos. As with most forms of organization, there are a number of ways to do this but in any case start broad and get specific. Here's an example of I handle my live music:Since I have a drive dedicated to holding my concert photography, I know exactly where to go for them. I pick the drive, then the year. In each year I have every show listed with the date in front so they are chronological. By having folders by year I have no need to put the year here, so MM-DD will do just fine. If I have an event with multiple artists, I can have it drill another level down. Do not be afraid to create new folder levels if it keeps you more organized. I also do not advise sorting all of your work chronologically. Only sort styles of photography this way. We don't usually think of our work by date, we think of it by the type of shoot. I also have a drive for lifestyle and general photography that is organized like this:
 Use styles and drill down from broad to specific. In this example I've got my travel folder expanded to show that I separate it by domestic/international before going into the region and then dates. And it's okay to be flexible. As you can see in the domestic folder I have mostly states listed, but a few are cities. If I travel and shoot more in Illinois, I will create an "Illinois folder," and move Chicago into it. Same goes with Nevada and Las Vegas. They just don't need to be that specific yet. Nothing is permanent, except deleting photos without a backup. Don't do that.


Take advantage of presets and plugins.
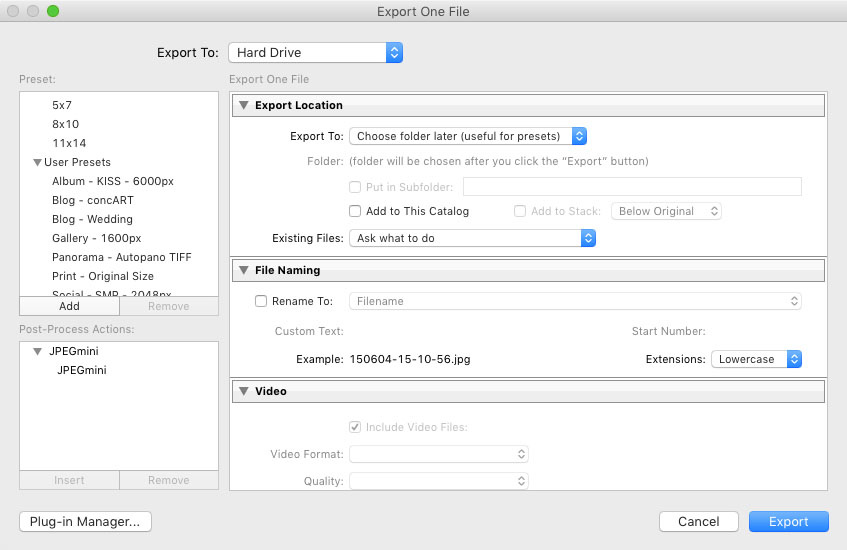
Develop presets (like those you get from VSCO, Replichrome, Mastin, and the like) get all the glory in Lightroom, but export presets are one of the great features of Lightroom. First thing's first, you need to understand that Lightroom is designed around the export concept. Since it's non-destructive, you don't save over the original file, ever. Instead, you create on-demand files. If you need to send a file to a client for web-use with a watermark, you create a file specifically for that. If you need to export files for uploading to your album designer, you export a file for that, too. If a magazine wants to use a photo in an article, you send them a file that is specifically exported for that purpose. Exported files are, essentially, disposable after their intended use. If you need it again, you re-export it. Let Lightroom do as much work for you as possible. If you're constantly exporting the same type of file over and over again, make an export preset. It's as simple as entering the settings you want and then click "add" on the left panel. Same goes for regular develop presets. If you are always doing the same thing to every image, make a preset. You can even have presets apply automatically from the import dialog.
There are entire multi-day courses devoted to Lightroom education. I'm very passionate about the program as it's wonderful utility, so I hope to write more Lightroom articles, but this is one that's been on my mind for quite some time. If you have any other Lightroom topics that you'd like to see, let me know in the comments!


I thought to learn something new but I didn't :D Anyway the article is great and describes what LR is made for!
apparently I'm using lightroom correctly
"Photoshop is a glorified Lightroom plugin."
Well that's one way to quickly discredit yourself as a photographer/retoucher...
Why don't you post a link to your portfolio and let's see who's the better photographer/retoucher, you or Sean?
Totally uncalled for dude. especially for someone representing fstoppers. I'm not defending what the guy said but who cares who is better. use a bit more tact next time dude.
My bad. People piss me off too much sometimes.
Yeah, when did photography become a pissing contest?...bad Fstoppers...very bad
In my mind Will Ryan was off base with his tacky comment. Just because someone says "Photoshop is a glorified Lightroom plugin." does not in the least discredit themselves as a photographer/retoucher, nor their skill set. It is only their opinion of those two programs and how they work for themselves. To me the onus for apologizing is on Will Ryan.
Why thank you :)
I've been using Photoshop since 4.0. I'm around 100% aware of how Photoshop works and is positioned in any given workflow.
I obviously do not actually think Photoshop was designed as a plugin for Lightroom, I'm merely suggesting that in a full Lightroom workflow, Photoshop is used exactly like a plugin. You only use it when you need it and it's integrated with some level of automation.
Agreed on the Plug-In thing.
"IF" the user is taking advantage of a total solution (PS+LR) then PS can be thought of as a plugin since 90% of edits can be done right within LR. Retouchers have slightly more specific needs that are more easily accomplished in PS AFTER global edits are made within LR.
I think Sean was just a bit too casual in making that relationship...assuming others would get his joke.
Nicely done otherwise.
Okay THAT makes much more sense, and I agree with you there. Maybe I misunderstood, but I took the original comment as "there's hardly a use for Photoshop now that Lightroom exists."
No, no, no, definitely not. :-) Photoshop is still king for doing "heavy lifting" on individual images.
Agreed. LR develop module is all I need for 90% of my images and PS is very much treated 'like a plugin for LR' in that I launch it from LR (Ctrl+E), do my work, and drop the result back into LR (automatically) and continue on my way... but if I had to pick only one program... it'd have to be PS. The stuff I need PS for simply can't be done in LR... the reverse is not true.
Some points are well... just wrong. You can always point LR in the direction of a moved folder. Who in their right mind wants the slow refresh of LR when culling when you can use Photo Mechanic? And "Photoshop is a glorified Lightroom plugin" WHAT?! On my side of this, LR is an image processor, great at what it does and faster than ACR. Catalogue? Never. KISS is the only way.
If you do minimal previews it's usually pretty quickly. But I've done the Photo Mechanic route before and yes, it's lightning quick for culling.
I personally just so large imports before bed and when I wake up in the morning they are ready to go, though.
I probably should have touched on that, but importing is a large topic with a lot of variables. Photo Mechanic is outside of the scope of what o was getting at right now. Thanks for bringing it up, though!
The problem with culling in LR is that it's both slow at import time (solvable by having a shooting schedule that allows you to simply import and render before bed) AND when you are flipping from shot to shot. The latter is especially true when using high res screen. On a 4k monitor and a lighting fast computer and disk sub system, D800 files take 2-3 seconds each to show up during culling. Over the course of a year, I might cull a few hundred thousand images... that's an extra 125 HOURS per year if I cull in LR vs elsewhere.
Ditto about file moves and file management -- it's just not a good solution for that. The fact you emphatically tell your readers "DO NOT EVER move an image without telling Lightroom, ever. Yes, I'm yelling, and no, I cannot stress this enough." speaks to a PROBLEM, not a feature. I want to edit on a different system -- that involves moving a ton of files and the catalog and I need to do that with a real file manager, not LR. Want to clean up old files that may be intermixed with other files -- LR makes this a disaster. etc, etc. LR is terrible at file-handling.
I could go on and on... but the crux is that LR is very capable and CAN do a ton of things BUT... in almost every instance, other than batch applying the exact same develop settings to a billion images, a different program does a better, faster, job. (and even with that, Bridge+ACR would do it faster... too bad the ACR interface is poor)
About the catalog: Always make sure your lightroom is set to save the sidecar XMP automatically, which is not default for some weird reason. This makes the catalog optional. You can delete stuff from lightroom and keep the edits. You can lose the catalog and keep the edits. You can easily backup raw+edits. You can even copy the raw+xmp to other computer and keep the edits.
Forgot about this one: You can import the raw in photoshop/acr and keep the edits.
XMP don't save Flags and edit history though.
Thanks for providing the extra info!
Or convert to DNG and have the changes saved to the file.
I agree with everything you said and would include the fact that many photographers don't include the way they shoot into their LR workflow. Changing lighting and metering, and WB constantly during a job is death to batch processing which is essential to corporate event jobs etc.
The fact that you should be shooting in RAW in Camera Neutral with contrast turned down also helps tons. This helps you to can see a correct Histogram to better adjust your images afterwards and makes a huge difference to the speed and accuracy with which you work.
I love LR, but frustrated that their export function doesn't support a CMYK color spacing. I have to export from LR to PS to achieve this (required by many end-users of my work). Owned by the same company.......but cannot include standard export formats for the industry. Adds time to my workflow, that I really don't want/need.....
Hi Steve. You can absolutely export as tiff from Lightroom. In the export dialogue, go to File Settings / Image Format. There you will find a drop-down list of formats, including tiff.
He didn't say tiff, he said CMYK color space.
I would think it would be up to the client to convert them. I'd think they would be used to it, but it would depend on the contract I guess. If they want print ready files, I guess that might include color space and file format, but it might also just mean print resolution and good quality.
Or show display in different color profiles, output with different rendering intents, or show out of gamut colors. It's color management is truly atrocious.
I'm a Lightroom/non-destructive workflow since version 1. I teach lightroom to other photogs as a side gig to my photography. Great article overall - I hear and understand you're angst.
I do take issue with two areas in your writing. I am a big advocate of ALWAYS putting the images and Lrcat file in the same folder. Most of the 'teaching' jobs start out as tech calls for guys with huge problems trying to synch or reconnect catalogs to images that were stored elsewhere. I mean synching and 'update folder location' works if you know what you are doing, but if you don't you can easily dump dozens of hours of editing by mistakingly reimporting the images as new, instead of simply relocating the original folder. It's a big problem - I get calls to clean and reorganize/relink collections all the time...enough to make a side business of just that. For the inexperienced - pulling Lightroom out of it's auto/default behaviors is the first step to taking control of a workflow - the second is to put the edits (Lcat file) with the images so you never have to worry about relinking them.
The second issue is...you 'haven't really gotten into collections' are you kidding? It's probably the most powerful tool in the Lightroom arsenal for culling, grouping, multi-picking, and especially doing that thing you are so rightly adamant about...actually moving images around. You could do a whole article the length of the one you wrote - just on collections. Matter of fact I think I will get right on that - thanks for the article.
It's much easier to plan and execute upgrades and system changes with a modular workflow where images get put on external drives. Assuming proper folder structure and and a general understanding of organization it shouldn't cause any issues, but working in corporate IT for a while, I totally understand the frustration you're getting at by adding an extra link in the chain for many users. I should have specified this is for higher volume, more tech-savvy users who plan on upgrading more often.
As far as collections go, I was just being honest. It's one of those things that I totally understand are powerful but haven't taken full advantage of myself. BUT, I understand their usefulness enough to recommend people use them even though I really haven't yet!
I would argue Kevin's workflow suggestion is better. Keep the LRCAT with the given job - one folder for the job; inside that folder you find the LRCAT, a folder for the source files (RAWs, TIFFs, etc) and a folder for the delivered images. (and as the job grows, a folder for the prints, albums, contracts, etc). Everything about job X in one nice self-contained folder that can be easily moved, managed, and backed up without relying on LR.
Sorry, one more thing. You neglected to mention the biggest reason to use Lightroom - tethered shooting.
Yeah this is one of the biggie features for me. Love It!!
I wasn't touching so much on reasons as to why someone should use Lightroom, this was more about common mistakes in thought and handing.
Besides, while I do use Lightroom for tethering, Capture One totally owns LR in this regard.
If tethered shooting is your biggest reason to use lightroom, move to capture one immediately. Nikon tethering was broken for months in lightroom after osx el capitan was released. Adobe clearly does not think it's an important feature...
Out of all that, not one mention of XMP file? Everything else is just....common sense? Try sending your edited file to someone to without that. Your catalog is nulled then and useless.
I've never sent my files to someone else for editing, although I do have LR set to embed the XMP automatically. As someone else mentioned, that's a good idea to tell newbies to do. I would say this was something I just didn't touch on because I don't deal with it myself and never have, but it's a very good point. Thanks for bringing it up!
I'd rather use DNG - which stores the XMP data within the raw-file.
Single vs. multiple catalogues... I've yet to see a definitive answer of whether or not the LR can technically handle libraries with tens or hundreds of thousands of photos and to what practical extent. From personal experience, the performance (including simple startup time) is vastly different and dependent on one's computer.
Last year I've started separating actual catalogues for my Personal vs. Commissioned work, as opposed to just relying on folders and collections. One has nearly 60K files the other one under 10K, and the difference in navigation and speed between them is apparent. Also, I see numerous other reasons to keep separate catalogues vs. one big one... keeping 1:1 previews, for instance, for some catalogues vs. others.
I can testify that there is no problem whatsoever with large catalogs. I have 721,000+ images so far, neatly organized by "Year>Agency>client>reverse-date-order - shoot name" folders. The only thing that takes a bit of time is backing up the catalog. But i found that by deleting history states for the older years' photos, it saved a bunch (like 9GB) of space on the catalog.
Also, I've read that having a lot of presets drastically slows down LR opening time. I don't have many, so i can't comment on that from experience.
I will say though, that operations that scan the entire library for a particular photo, like obscure cases, like shutterSync, a plugin made to help match metadata from the iOS app ShutterSnitch takes more time, the more total images you have, but i haven't used that plugin in years. (longest sentence ever)
Oh, yes, that's something I should have mentioned. Presets and camera profiles slow down loading. Anything you absolutely don't need, you should delete.
I have zero reason to keep my kids birthday photos in with my professional work.... so I don't. On that point, I actually have zero reason to keep client X's photos in the same catalog as client Y ... so I don't.
A new catalog for every client/need.
(and if you could access LR's develop module without having to add to the catalog, that'd be nice for one-offs)
whoa... this post is quite old... anyway - the issue (and a major one, for me) I see with multiple catalogues is having to search for images across, presumably, hundreds if not thousands of libraries. It's one layer in the organization tree that is incredibly slow to switch back and forward from. Having nicely organized folders, along with all other tools (colors, ratings, collections, etc.) is there for a reason. I see no benefit to having multiple libraries, especially when they go so granular as separating individual clients - it completely defeats the purpose of a "library" from the organizational point of view for 99% of uses there. I'm well aware of the archiving workflows where separate libraries make sense for storage/backup/distribution scenarios, especially if one is working with a team and has to share a project with others. But for the average one-man band multiple libraries cause more headache. Just my view, YMMV, of course ;)
One of the most amazing time savers is the photoshelter publish export extension plugin. If your website is photoshelter you can export directly to a folder from your computer instead of having to upload the files after you have waited for export. Combined with the photoshelter app now I can leave my house for shoots once I click export, and manage the photo delivery from my phone. It's an incredible time saver.
I would recommend another folder organitzation and folder/collections workflow.
I usually store all my images in that way: "photos > library > 2015 > 20151124 - Florence > raw". While using this method I can backup easily by picking the last folders I added. Doing Sean's workflow, you may have to remember where the hell you added the last pictures. You still can use Sean's workflow BUT through Collections instead.
Hope this tip to be useful.
There's most certainly different ways to handle organization. I was just hoping to give a good example to those who don't have any idea where to start. Thanks for your input!
Great article. Lightroom has completely simplified my workflow as a professional but it is very hard to get other people to understand how it works. This is a good place to send the uncertain. :-)
"Lightroom can and does replace Photoshop for many serious and even professional photographers. "
Absolutely, for many users Lightroom is all they need. But that still does not mean they actually replace each other as applications. Even for me as a full-time professional, Lightroom is all I need for 95% of my work. But if I need to composite, or I need to liquify, or I need to do any number of advanced photo manipulations, Lightroom just flat-out does not any way provide those functions without going to an external editor.
Lightroom is all you need.
Until you need more.
Just my two cents here:
As stated by some fellows here XMP and JPEG Metadata don't save all your stuff but I have to correct some things you wrote:
* Color labels are actually saved in the Metadata (in the description). I realized that when I was testing PhotoMechanic and it's interoperability with LR.
* Flags are not saved. So ALWAYS give out star ratings to flagged images, too. If your catalog is ever lost, you will be thankful to have that covered.
Some other stuff that is good to know:
Virtual copies are not saved via XMP or metadata. But thankfully there is a workaround for that. Just save the current state of the image as a snapshot. Those will be written to XMP.
I hope this was useful info.
Cheers and keep up the good work,
Helmut
Thanks for the clarifications!
The first thing that set the mood for the article was the headline of the article "Lightroom: You're Doing It All Wrong" Not only is it pretentious its also a click bait and basically it starts off by not teaching and instead preaching. Quite off putting I must say. After reading this pretentious headline, I try to objectively read the rest of it, but with a healthy dose of scepticism precisely because of first impression.
After reading the sentence "I'm not here to teach you how to use Lightroom. I'm here to tell you what to consider before learning how to use it." I don't know what to think. Is the author, trying to write a disclaimer and in a sense say I am only pointing out the things to consider or is this the same guy who wrote the headline. Either way, there are some good info for people who are new to lightroom, but the tone of the article and the narrow scope is quite disappointing. Not everyone uses lightroom as the author and obviously he did not consider this, but he surly considered a provoking click bait crappy headline like "Lightroom: You're Doing It All Wrong" . Not impressed.