You can make your photos pop by boosting their color in Photoshop. But as with everything in Photoshop, there are many ways to accomplish similar results. I compare my go-to method to PiXimperfects method. Read on to see the compared results.
First, let me say that I love the videos Unmesh Dinda of PiXimperfect produces. For me, Dinda has a way of clearly communicating how to achieve the desired result in his training videos. That’s why when I saw this video by Dinda, I wanted to try the technique myself.
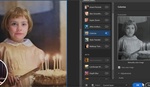
Dinda uses a color correction layer approach to boost colors in a photo that would normally be considered to be flat and boring. Using the color correction layer approach the retoucher can zero in on the particular colors they feel need to be boosted. Then by applying a layer mask to each of the color correction layers, the corrections can be applied to the specific areas of the photo that the retoucher believes need to be boosted. The last part of the technique is to use a blend mode, typically either a soft light or a screen blend mode is used.
I tried the technique on a photo from the Monster Energy Supercross race in San Diego that I shot for GateDrop earlier this year. While the lighting was great for the event, it still produced some flat looking photos. As my photos are editorial for GateDrop, my editing is normally very minimal since it is important to get the photos up online as soon as possible.
For quick edits to adjust color, exposure, and to sharpen, I typically import my photos to Adobe Camera Raw. Once there I’ll do a quick white balance adjustment if needed, and then a global exposure adjustment, again if needed. Occasionally I’ll do a couple of local adjustments using the adjustment brush which may include boosting the colors by adjusting vibrancy or saturation.
While the below photo to me is OK, it does not have the same pop of colors that I remember from the event nor that I want the photo to have. Supercross is full of colors and I want my images to convey those colors.

In the following photos, I use the PiXimperfect approach and my usual Camera Raw approach. The before photo is the PiXimperfect approach, which I used five color correction layers. The after photo is my usual technique of using Camera Raw.


Do you have a preference? To me the results are similar but the approaches are not the same.
After trying the PiXimperfect method I will definitely be using it in the future when I want to have more control over the areas and colors I want to boost. However, when I need a quick adjustment I think I’ll stick with my Camera Raw approach.


Easier/faster way to do this using Lab color. Here's a quick example.