As with any craft, there are fundamental techniques which should always be considered regardless of the job, model, or location. Even working professionals overlook general rules from time to time and occasionally need to be reminded.
A few months back I came across the YouTube channel of Ed Gregory. Gregory's channel is chock full of amazing tutorials for beginners and pros with topics ranging from Adobe software to cinematic color grading. This video in particular inspired me the day of a shoot when I was finding trouble getting motivated. It reminded me of some key concepts to successfully capturing a beautiful portrait and inspired me to try something different for my own shoot that afternoon. In this comprehensive tutorial shot on location in the Bahamas, Gregory provides 11 useful tips for making the most of your next portrait session. Here is a brief synopsis.
Location
When choosing a location for your portrait, be sure the model is not in direct sunlight, and ideally, in an open shade or closed shaded environment. Furthermore, when shooting a headshot avoid shooting into a complex background. Instead, choose one that is simple with fewer distractions so your focus is on the subject.

Lighting
Think about the quality of light falling on your model. Does it look ideal to shoot in harsh, midday light? Probably not. Instead, place them near a door or a window where the light can softly enter the room providing even illumination and fewer edgy shadows. If necessary, use a reflector to fill in areas where shadows have a tendency to appear.
Angles
For general headshots, try and have your lens at eye level with your subject. Shooting from a higher elevation conveys a sense of innocence versus a lower elevation which is more heroic. If shooting for a more commercial look, these effects may be desirable so consider the final outcome and proceed accordingly.

Camera Setup
Shoot with a wide aperture but avoid anything wider than f/2.8, particularly for headshots. In his example, Gregory uses an 85mm lens at f/3.2 to ensure the eyes remain sharp, which brings me to his next point.
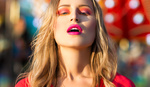
Focus on the Eyes
Without a doubt, be sure your focal point is the subject’s eyes. If the eyes are out of focus, the shot is ruined. Period. If the model is posed at an angle to the camera, focus on the eye closest to the camera as it will be the first point of interest to viewers.

Cropping Is OK
This point may go against the beliefs of some but in real-world application, this tip can save you a lot of hassle in post. Avoid shooting the exact frame around your subject that you are ultimately looking for. While cropping might seem less than ideal due to a slight loss of resolution, most digital cameras in today’s world pack more than enough pixels for a bit of cropping. Leaving space around your frame ensures nothing is accidentally cut out of the shot like a shoulder or the top of a head.
Communication Is Key
Awkward silence is bad for photos. Develop a rapport with your subject, ask them questions about their day, make them laugh, anything to keep them engaged and interested. And smile. It is proven that a smile is contagious and emanating happiness on set will make you model feel the same.

Posing and Expression
Don’t simply fire away continuously with the same pose. Ask your model to turn to one side and look back at camera. Reposition them directly. Typically, after enough tries they will begin to feel comfortable and manage this process on their own. Be sure and pay attention to their posture and have them open their shoulders for a more a natural look.
Wardrobe and Styling
This is one of the most common aspects of portraiture left to chance. The model simply shows up the day of with whatever they felt like wearing. Wrong. Determine what the model is wanting photos for and how they will be used. Plan out a variety of clothing options and if at all possible, have a makeup artist on set. This is one tip that will surely set your images part from others and conveys professionalism to your clients.

Fix Any Issues
Again, don’t blow through a hundred shots in five minutes just because you can. Take your time. Look for wrinkled clothing or hair that is out of place. Make sure your model isn’t sweating or overtly shiny. Anything that you find yourself justifying as a fix in post, stop and fix it now. It will save you an enormous amount of time and headache later on.
Always Get the Shot
Above all else, be sure and come prepared to get every shot you need. Plan out a shot list, visit the location beforehand to scout the area and become familiar with the terrain, check your gear the night before, and arrive early. Being prepared is crucial and not only will it put you at ease but it will be obvious to your subject with the same effect.


All images used with permission.
[via Photos in Color]


Short and sweet. Thanks, Mark. However, I would dare to disagree (in part) with your point about lighting...I've often shot midday, in harsh light and I've even placed the model directly in it. Thankfully, the model was comfortable and the temperature was mild. I've utilized cool and warm gels, along with ND filters to produce a desired effect and I was able to find a happy medium in the highlights/shadow details. Thoughts? I understand it's probably not the best idea to shoot during those times, but it was a fun and challenging experiment nonetheless. Cheers~
WORD! So, I would never "advise" shooting in harsh light unless that is the look you are going for. Sharp shadows, hard transitions from dark to light-an edgy dramatic sort of look. You can position your model in such a way that the light falls across her face in a pleasing way, for example in a rembrandt pattern; but in general most people are going to probably avoid harsh light because it is simply too much contrast for any given situation. Gels are only going to change the color of the light from a flash to 1.) match the color of another light source such as tungsten or fluorescent or 2.) be used creatively to provide color contrast where it doesn't exist naturally. I don't see a use for them in harsh light unless you are trying to change day to night which again, is a special and likely creative circumstance. ND filters will help you cut down on the amount of light entering your lens so you can use a larger aperature and maintain a shallow depth of field even in bright light. So yes, you can definitely shoot in harsh light if you have no other options but for a routine job, in particular headshots, I would go for soft, even light which can only be found in the AM or later afternoon.
Word! After all (& as you know), I don't work with people much these days. I love landscapes...for now. In time, however, that'll change, as I could use some brushing-up on my portraiture skills. Cheers-
I'll be passing through your neck of the woods May 14th-20. Keep that in mind... We are planning on camping out for free and rafting the royal gorge id ur interested ?
Absolutely! I'm looking forward to shooting together again.🤙#likeoldtimes
Mark, a question not answered by your great video; in some of these photos (and many, many of mine) one of the model's eyes is squinted a bit or at lest appears to be smaller than the other (her right eye in these photos). Do you know what causes this? Is it the model? Angle of her face? And do you feel like you should fix it or leave it natural? Thanks again for the video.
Hey Anthony, sorry it took me so long to respond but thank you for commenting! First of all, just to be clear I didn't shoot the images. They were provided to me by the creator of Photos in Color so I really can't say for sure why her eye came out that way. That being said, when I look at the images it looks to me that she is either hiking up her brow for a "sexy" sort of squint or perhaps she just has one eye disproportionate to the other which is not uncommon. Humans in general, while fairly symmetrical, will often exude small differences such as this when viewed up close. It is what makes each of us unique and in virtually no instance, except at the request of the client, would I remove or adjust the eye-at least in this particular situation. If she had an abnormal looking eye due to un-natural circumstances such as allergies, I would consider adjusting otherwise, I consider these types of nuances to be what makes us special in photos.