Forest photography can seem overwhelming, chaotic, and hard, but if you follow these seven steps, you ought to improve a significant amount.
I absolutely love forest photography (also known as woodland photography), and I have spent a significant amount of time in Danish forests the past one and a half years. In my latest video, I finally got fog in one of the most mystical forests I have found in Denmark, and I decided to share seven tips to master forest photography. “Mastering” is always a problematic term to use in an artistic field, but if you follow the seven steps below, you should see a significant improvement in your woodland photography.
Step One: What
First and foremost you need to find yourself something interesting to photograph. I usually try to find something that stands out in the forest. It can be a lone small tree among larger trees, it can be a tree of a different color relative to the surrounding trees, or, as in the examples of this article, trees that look like something out of a fairytale. It is important to emphasize that you do not necessarily need to find something uncommon but look for something that piques your interest. I also have an interest to photograph my local beech forests exactly because they are rather common in Denmark.

Be prepared to do the legwork and explore different forests. It was by chance I found this specific part of this forest, but if I had not explored, I would not have found it.
Step Two: Settings
My forest photos tend to fall within the focal range of 35mm to 105mm. Occasionally, I shoot wider or longer (mostly longer). By avoiding the wide angle focal lengths, I can zoom into the scene and create some perspective compression where it looks like the trees are standing closer together. Having zoomed in, you also need to use a small aperture to get the entire scene in focus. On my full frame Sony a7R III, I usually shoot at f/16. I also tend to keep the ISO as low as possible (to get as noise-free a photo as possible) and let the shutter speed be whatever is required to get a proper exposure. If it is windy, you may need to compromise the ISO or aperture to avoid blurred branches and leaves.
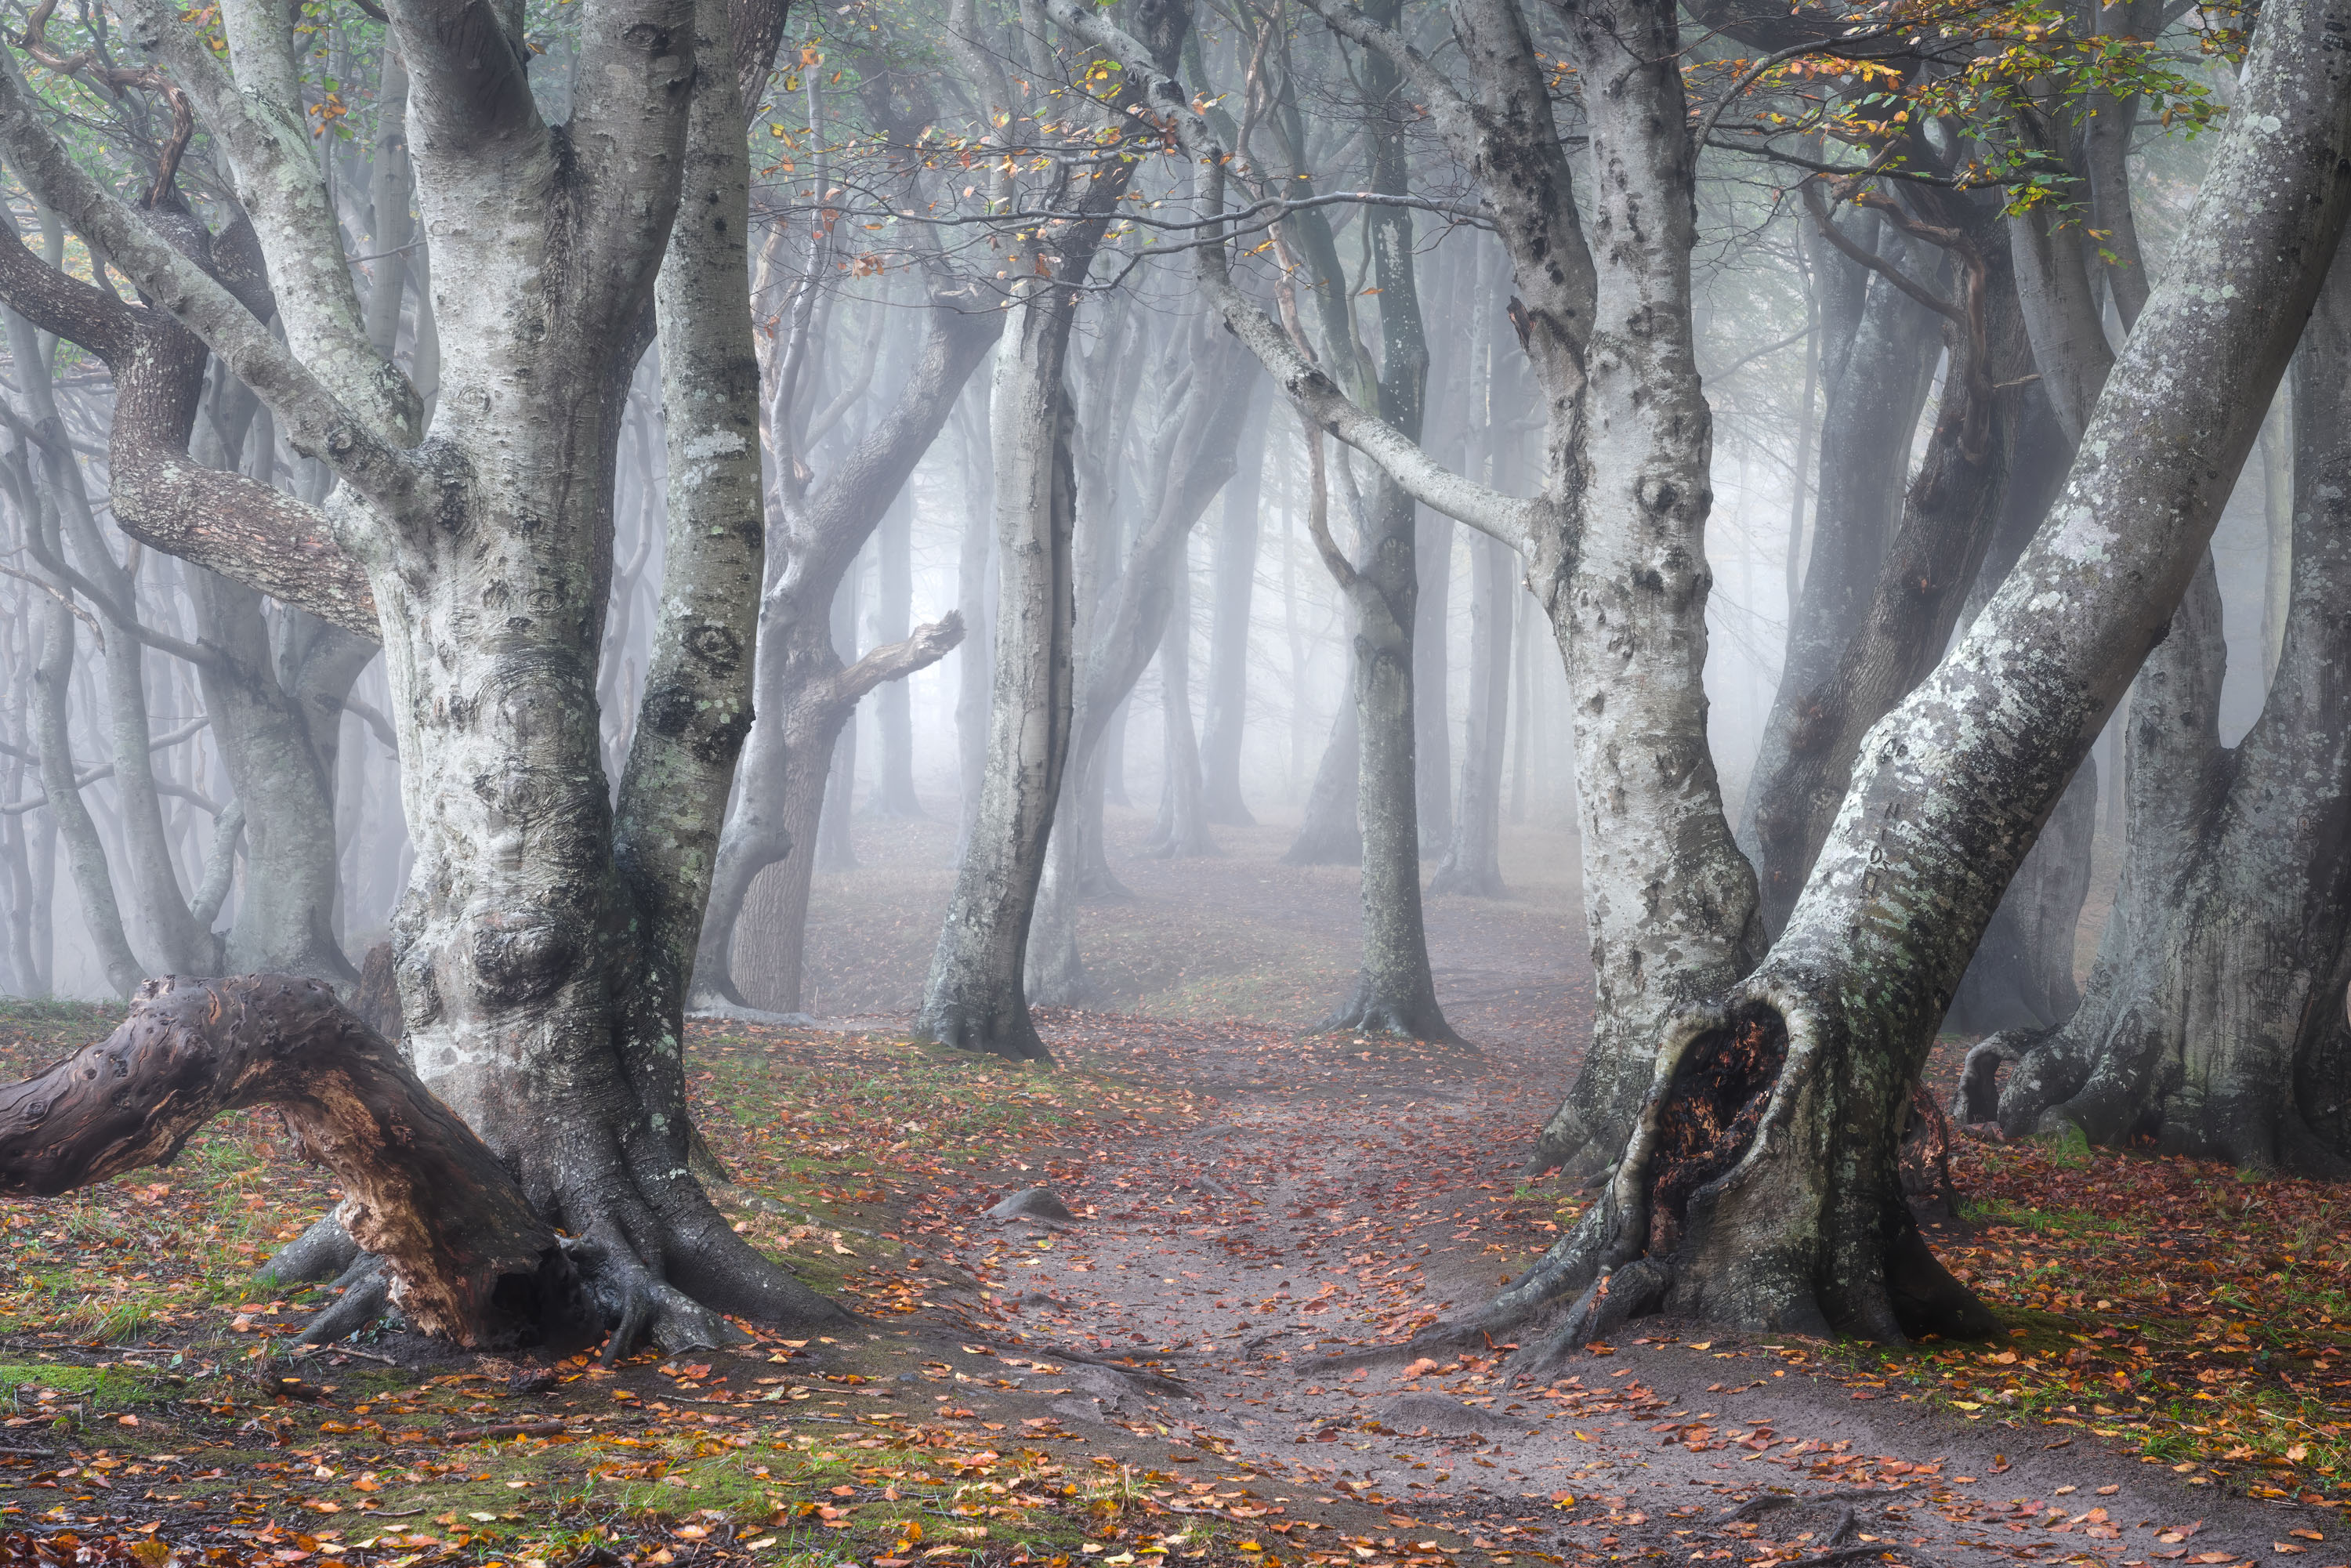
74mm, f/16, 8 s, and ISO50. Luckily, there was no wind that morning.
Step Three: The Sky
The eye tends to be drawn to the brighter parts and high-contrast areas of a photo. Step three is trying to avoid including the sky in your photo. The canopy of the forest is full of small holes where you can see the sky, and these small holes can be highly distracting. This step goes along with step one, as it is easier to avoid the sky when you use longer focal lengths. Furthermore, by avoiding the sky, you “close off” your scene from the outside world, which makes for a much more intimate and mystical photo.

If you are shooting with a wide focal length, you can always tilt the camera down to exclude the sky.
Step Four: Composition
The composition of the photo is extremely important. Creating a proper balance is essential, but within a forest, it is also important to create an aesthetic separation between the trees. Try to have the dominant trees of the scene separated an equal amount to create a proper rhythm and balance. I also like to use forest trails as leading lines, leading the eye through the photo from the foreground and into the forest, which also helps emphasize the depth. Getting a good composition is all about trying to improve the aesthetic quality of your photos to make them pleasing to look at.

The trail works as a perfect bending leading line through the photo. Where will it lead?
Step Five: Fog
Step five is to use fog to your advantage. If you can go during foggy conditions, the fog helps to separate the trees, emphasize depth, and create a mystical atmosphere. I cannot overrate how important fog and mist is for forest photography. With more experience, you also get better at predicting fog. For this specific location, I waited for half a year before I got a chance to photograph it with fog. It was very much worth the wait!

I use the apps Windy, Yr, and ClearOutside to predict fog.
Step Six: Light
If possible, try to position yourself as to photograph towards the light. It does not have to be towards the sun itself. It can be towards an opening in the forest where the light beams down through the canopy. Having the brightest part of your scene well inside the frame makes sure the eye is fixed within the photo. Furthermore, having the trees silhouetted against the light emphasizes their shape and simplifies the photo.

If the fog is too thick, it can be hard for the sun to break through.
Step Seven: Do Not Get Stuck
When you have followed all the above steps, make sure not to be stuck in one composition. Move the camera a little forward, backward, or to either side and zoom in and out. Only a few centimeters can make a substantial difference to the depth, the separation of the trees, and the balance. It is notoriously hard to review your photos in the field and avoid unwanted mistakes. Having many slightly different photos of the same scene makes sure you can choose the best in the post-processing phase.

Getting just the right amount of separation between the trees is important!
Bonus Tip
Learn to edit. A proper edit of your photos can make a great photo into a sublime photo. It does not have to be heavy editing, but adding vignetting, removal of specular highlights, cleaning the photo, desaturating colors, increasing the highlights, and dodging a forest trail can really go a long way.

Be sure to check out the corresponding video above for even more photos and more thoughts on woodland photography. Let me know down in the comments if you have more tips for woodland photography.


Great article 👍
Thanks, Daniel! :)
Insightful as always Mads!
Thank you, Max 🤓
Thanks for sharing
You're very welcome, Michael :)
An incredible collection! Superb article!
Thank you, Hans, I hope you learned a trick or two ;)
Superb vision! Fog and mist just add so much perspective to photos. Well done, Mads!
Thank you, Willy! It was such a great morning 😁
Great images 👍🏼
Thank you, Kai! :)
Marvellous work and well written Mads!
Thank you, Mikkel! That is very kind of you! :)
Always a pleasure and a great learning experience watching your videos, and reading your articles. Thank you, Mads!
Thank you, Richard. I'm very happy to hear to that!
Great and Great!!! Can you tell me what focusing mode you used on the trees and what metering mode? Your excitement and passion comes through in your videos, Any watching Photographers can definitely connect with your excitement of the moment and find!
Thank you, John. I usually use the flexible spot, enlarge the photo and autofocus on what I want in focus. Metering is the just average.
Great article!
It's articles like these that keep me coming here...to learn and improve!
I am very happy to hear that - too bad people mostly respond to the gear articles :P
Jeg setter veldig pris på videoene dine på youtube Mads! Jeg har vel sett alle omtrent, og elsker stilen din. Du sier du redigerer bildene dine tungt, men det kan man ikke se. De ser faktisk ikke særlig redigert ut bare naturlig nydelige. Noe som betyr stor dyktighet! Hilsen Nordmann!
I really appreciate your videos on youtube Mads! I have seen about everyone and love your style. You say you heavily edit your images, but that`s impossible to see. Actually they don`t seem that edited, just naturally wonderful. Which means great skill! Regards Norwegian!
Tusind tak, Jan! Means a lot. I sometimes do heavy editing. In this example, it is not too bad. It also comes down to how you define "heavy editing". Is it 50 adjustment layers in Photoshop, one layer with a sky-replacement, or the clarity slider cranked to 100 ;)
How do you predict when fog will be present?
I use the apps Windy, ClearOutside and YR + experience :)
Great article and gorgeous series of images!
Incredible pictures! Superb article!
I love the photos! Great article and super tips!
I thoroughly enjoyed this video, Mads. You came away with stunning images that day and your tips are on point for working the scene. You were blessed to have fog conditions align with your outing, but you should also feel blessed to have access to such dynamic old growth forests. Living in the Canadian prairies, we just don't have forests such as these, much to my disappointment. I am very envious of your locale!
Thank you very much, James! A lot of people are saying that, so I will for sure be grateful :)