With all the incredible new 4K cameras — BlackMagic’s new pocket cinema, Sony’s mirrorless line — anyone remember last year’s excitement when Magic Lantern shipped 4K raw for the 5D Mark III on April Fool’s Day? Only it wasn’t a prank.
Sadly, continuous recording was iffy at best. But earlier this year, Magic Lantern enabled new 10-bit and 14-bit lossless modes to shoot 3.5K raw.
That’s right, 3.5K. raw. On a six-year old camera. Historically, the most difficult part about Magic Lantern raw has been the workflow: when shooting, the monitor barely works, and in post production, you have a tedious coloring and editing workflow. But the results are impressive for a camera that wasn’t designed to shoot raw footage!
So if you still have a 5D Mark III and wouldn’t mind shooting some great footage, it might be time to freshen up those Magic Lantern raw skills. If you’re new to shooting raw, here’s a separate tutorial on getting started with 3K raw on a 5D Mark III.
It goes without saying that using Magic Lantern is at your own risk. At worst, it could brick your camera and you’ll have an expensive decor piece for your studio. Anecdotally, I’ve been using Magic Lantern for over four years now with some crashes here and there, but no bricking.
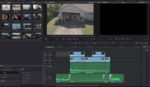
This tutorial walks through a round-tripping workflow for quickly wrangling hours of Magic Lantern footage. DaVinci Resolve has amazing color controls, but I’m more comfortable editing in Premiere. Since both support Final Cut Pro XML, you can use them together! The tutorial shows an older version of DaVinci Resolve and Premiere, but the controls are still in roughly the same places in the latest versions.
I tried the workflow out on a trip to Yosemite National Park a few years ago to ship this travel montage. Forgive the wobbling — noob Glidecam operator at work.
Have you shot any footage with Magic Lantern raw lately and tried the 3K or 4K modes yet? How did the experience go?


Any idea if this would work on the 6D?
The 6D ist supported but in way lower resolutions:
The 6d is restricted to about 40MB/s writing speed, some options:
1728 x 724 resolution (1:2.39 aspect ratio) x 25 frames per second in 10 bit should give continuous recording
1728 x 972 resolution (16:9 aspect ration) x 25 frames per second in 10 bit gives about 20 seconds recording time
The 5D MKIII is at the moment the best to use for ML RAW Video because it has the biggest bandwidth to record to your card. The MK IV etc. has not been hacked yet.
Echoing David, 6D support has been growing for a while. But pretty much the only reason any of this worked out on the 5D Mark III is that the CF card slot is baaaaaaarely fast enough. The new lossless modes made a breakthrough by using a little more CPU and spitting out less data to the card.
For FCPX-Users and users that want to use an easier workflow I can recommend MLVAPP: https://ilia3101.github.io/MLV-App/
It has an easy to use interface and exports to ProRes4444 etc.
I always use MLRAW at 1080p on the MKIII, which gives you pretty much unlimited recording times and liveview. At 1080p the quality is better than on my Sony 4K Cameras, because it is RAW. Especially when you have a lot of Detail in your frame the MLRAW shines. It looks like the Sony F35 footage if you are familiar with that.
In 1080p and 14bit losless compression you can also record wit 48 fps!!!!
Thanks for sharing, David! Is there a good round-tripping workflow for FCP + DaVinci?
Wait, 48fps? Really? I haven't tried this yet, that's amazing.
If you set your MKIII to 50/60 fps in the Canon menue you can select the 48 fps option under crop modes in the ML menue. It is not a crop but it is listed there.
With 1080p and a 2.35:1 ratio I can record more than 10 seconds of 48 fps RAW video.
What exactly do you mean by round-tripping? Many people just export ProRes from DaVinci. There is an option where you put all your clips in the timeline and DaVinci will export each CDNG Sequence in the timeline into an individual ProRes clip that you can than import into FCPX.
Nice, I'll have to try out some slo-mo!
Round-tripping lets you edit in say, Premiere or FCP, but color only the clips you end up using with DaVinci Resolve. Check out the tut (first video) if you get a chance.
It helps you deal with lots of footage; realistically you wouldn't color every single clip the first time round — you'd throw a quick base grade on all your footage, edit the timeline in Premiere, then touch up colors on just the clips that you ended up using in the final timeline.
You've renewed my interest in trying 3.5k. I even bought the EOS-HD guide on ML 3.5k a year ago and never tried it.
I am definitely not a pixel peeper but I keep coming back and reviewing the few Magic Lantern projects I've done at 1080p/14 Bits over the last few years and really liking the look. There is a noticeable depth and brilliance to them. I moved away from using ML on client work because of the work flow but it truly makes a difference.
Same, 14-bit does such an exceptional job for landscapes, especially when the lighting is tricky. I just discovered Rec 709 to sLog2 looks better with some of the LUTs I show in the tutorial, hoping to try it next time! I may try shooting some footage in Oregon.
So he shot 3.5k RAW and uploaded the demo reel in 720p?
Sadly, Vimeo scales down to 720p unless you have a paid account — the source was in 1080p (I shot it before 3.5K landed).
For Windows users I would recommend Fast CinemaDNG Processor software which is working on NVIDIA GPU, so it's very fast:
http://www.fastcinemadng.com
The latest version is working with Magic Lantern raw video natively.