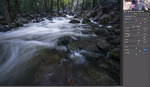
There are somewhere in the neighborhood of 20,000 ways to convert an image to black and white, each with its own advantages and disadvantages. This method shows why just pulling the saturation out of a photo probably won't give you a satisfactory result and how you can take more control of the final product.
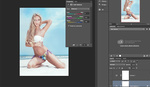
Coming to you from Blake Rudis of f64 Academy, this helpful video will show you why many photographers use gradient maps for their black and white conversions, as well as a few tricks for adding a bit more mood to your images. As Rudis walks you through the method, keep a few things in mind:
- Always feather when using the Blend-if sliders; otherwise, you'll end up with blocky transitions.
- When you're painting light and dark areas (especially at the third step), pay attention to the sources of light and their direction. Work with the light, not against it.
- The third step will look very strong when you apply it, so change the opacity of that layer to taste. You can also play with the blending modes of both the second and third steps as you please.
Other than that, let your inner artist out and get to work!


This is where I fall short, when I want a photo in black and white I do some basic procedures such as desaturating my image and adjust the contrast. It works but not as well as with black and white film.
Wow.....Improvisation on an black and white theme. I have to say just desaturating an image does get a little too boring and predictable after a while. Thank you. Great stuff.
Wouldn't it be easier to just watch something by Jim? ;-)