
Autumn and winter are upon us, and in the north the polar light has appeared in the night skies. Time to go out and photograph the elusive Northern Lights. Here are a few tips on how to capture it.
The polar light is one of the most beautiful things nature has to offer us. You cannot image what it is like, unless you have seen it. Or better said, if you experienced it. And the most fun part; it is easy to photograph if you take a few things into account. As a matter of fact, you can practice all year long, at any location you like. If you can photograph the stars in the sky, or the Milky Way, you can photograph the polar light.

Photographing polar light is similar to photographing the Milky Way. If you can do the latter, you will succeed in succesfully shooting the polar light. (EOS 5D4 16mm | ISO12800 | f/2,8 | 30sec foreground and 10 sec for the sky)
The polar light happens very high in Earth's atmosphere. It is the result of protons from the sun that collide with air. Different atoms and molecules produce different colors. Oxygen atoms produces red light; nitrogen atoms green and blue light, and nitrogen molecules produce purple-like colors. Green and red colors are the most common. The activity of the sun is responsible for the polar light activity, and there are a lot of apps that give a prediction of the intensity. The amount of activity will be given as a KP value.

A lot of Apps are available that predict the activity of the polar light. It gives a good idea of what to expect. But remember, these are just predictions. It may turn out to be much better than expected... or less.

Some Apps have nice visuals, but the only thing you really need is the activity for the latitute you're at.
The camera can capture an intensity of KP 1 or 2 from a real dark location, although we cannot see it with our bare eyes. From KP 3 the polar light becomes visible and from KP 4 or 5 it becomes really intense. The higher the activity, the further South it will appear in the sky. For the Northern Lights you must be somewhere above the polar circle. Somewhere above 62° latitude should be good. The best place is around 68° latitude.
To see the polar light, you need two things; enough solar activity to reach at least KP 3 intensity, and a clear sky. You must find a dark location, although a high intensity can also be visible from the center of a larger city. Photographers need a few extra things, of course. First, a camera that is able to shoot at high ISO, a wide-angle lens with an aperture of at least f/4, and a sturdy tripod. Concerning the lens; I mentioned an aperture of f/4. Of course, f/5.6 is also possible, but in that case you may need to crank up the ISO value. I would recommend a lens with f/2.8 or even a wider aperture.
The polar light can appear low at the horizon, depending how far North you are, and depending on the activity. At 68° latitude I found KP 3 to be reasonably low at the horizon, being able to shoot with a focal length of 50mm or even 70mm. But when the activity increases, the curtains of light reach high up in the sky. In that case you need at least 24mm of focal length. I think a 16-35mm lens should be perfect in most cases, giving the most flexibility.

Shooting polar light is not limited to wide-angle lenses. This photo is made with 70mm focal length. What is possible depends on the location and the activity. (EOS 5D4 70mm | ISO3200 | f/2,8 | 2 sec)
I already mentioned; if you know how to shoot the milky way, you know how to shoot the polar light. Use a large aperture, a high ISO value (between ISO1600 and ISO6400), and play with the shutter time to reach a correct exposure. You may want to keep an eye on the old 600 rule to prevent star trails. Better still, use the 500 or 400 rule to be sure, due to the large pixel count on modern sensors. With this in mind you can shoot the polar light without any problem.

One of my first photos of the northern lights. I used a longer exposure time to make sure I captured it. But I learned you will lose details in the curtains of the lights, by using long exposure times. (EOS 1Dx 17mm | ISO3200 | f/4 | 30 sec)
If you have seen the polar light, you know it is constantly moving. Sometimes it moves slowly, but when the activity increases it can go crazy. By using a long shutter time the details in the green curtains will fade, leaving only a green glow in the sky without any details. If you use a fast shutter speed, amazing details may become visible. Using a shutter speed between 1 and 5 seconds is perfect. You may need to turn up the ISO value to keep a good exposure, and keep an eye on the histogram to prevent the risk of under exposure.

Using a short shutter time will reveal amazing details in the green curtains of the polar lights. But you might need to use high ISO values to make sure your photo has the correct exposure. (EOS 5D4 17mm | ISO6400 | f/2,8 | 3,2sec)
Another thing to keep in mind is the brightness of the polar light. When the activity is high, some parts may become very bright. It will give an overexposure if you are not careful. That is why you will need to play around with the ISO value to maintain the best exposure.
To sum up the basic settings:
- Use a focal length like 24mm or wider
- Use a large lens opening, preferably f/4 or larger
- Try to keep the shutter time between 1 and 5 seconds
- Variate ISO value to have the correct exposure
- Don’t hesitate to use a high ISO value like ISO6400
- And of course shoot from a sturdy tripod with a remote or a 2 second self timer
Another tip I can give is about the composition. Try to find a recognizable foreground that is interesting. This will make the photo even more impressive. Don’t forget to make a few exposures for the foreground, which you can use in post processing, if necessary. If you are shooting polar light with a nearly full moon, the light of the moon will illuminate the landscape beautifully. You don’t need to worry; moonlight will not effect the visibility of the polar light from KP 3 onward.
Shooting high into the sky, without a foreground in the frame, can be boring. But on the other hand, the polar light can form beautiful patterns, like angels or dragons in the sky. A local told me once: "Lady Aurora is dancing in the sky," which sums it up perfectly.
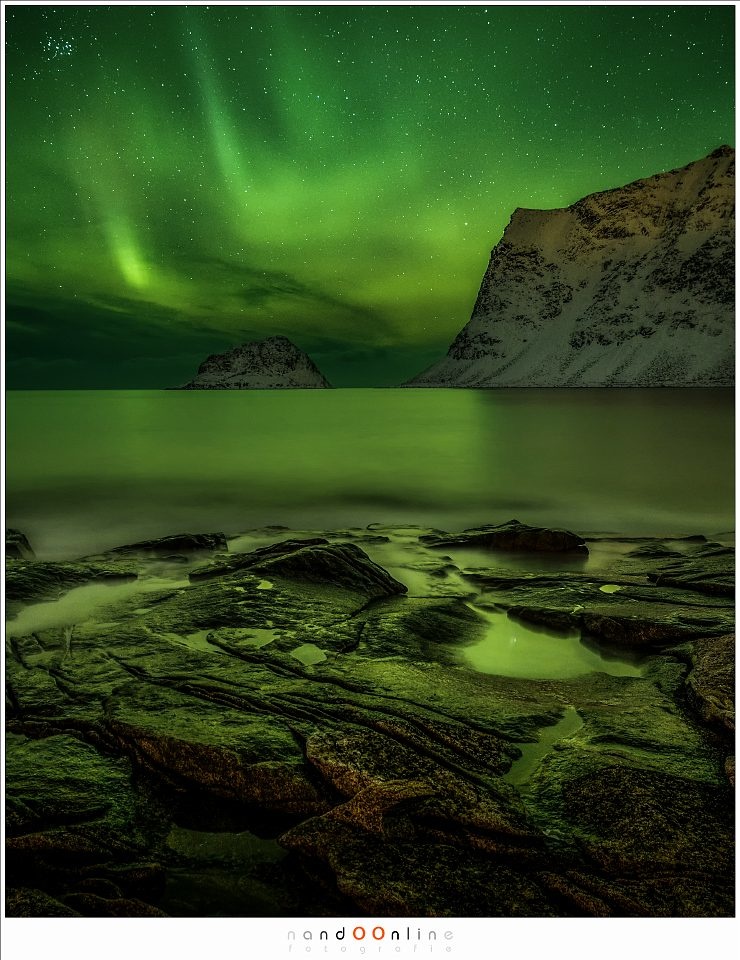
Using an interesting foreground can make the photo so much nicer. I tried this by using the rocks and tide pools at the extremely dark bay of Haukland at Lofoten. (EOS 1Dx 33mm | ISO6400 | f/2,8 | 10sec)

Shooting the polar lights without any foreground is also possible. In that case you need to play with the lines in the sky. If no nice patterns form, the photo may turn out to be boring. (EOS 1Dx 24mm | IS3200 | f/5,6 | 8sec)
It may be good practice to stay mobile. Do not stay in just one place or else you end up with a lot of the same compositions. If the night is still young, you can visit a few different locations. You will end up with a nice variety of photos. And above all, don’t forget to enjoy the show, because it is truly magical.

The rorbuer of Mortsund under a green sky. After shooting this photo, there was enough time to enjoy the show. (EOS 5D4 16mm | ISO3200 | f/2,8 | 6 sec)

Northern lights over the city of Leknes. I had this composition in mind, but I had to wait for half an hour before I had enough light trails from passing cars. (EOS 5D4 16mm | ISO3200 | f/2,8 | 6sec for the sky, and ISO800 | f/5,6 | 30sec for the cars)

Shooting polar light with a moon in the sky is no problem. The moon light may even light up the landscape. (EOS 5D4 55mm | ISO3200 | f/2,8 | 2 sec)

Clouds may obscure the polar lights, but they also light up by the artificial city lights, giving the landscape a terrible yellow color cast. On the other hand, it also provides a nice contrast with the green curtains in the sky (EOS 1Dx 45mm | ISO6400 | f/2,8 | 4sec)
I have planned my next trip to Lofoten, Norway already, and I am looking forward to it. I hope to see and photograph the Northern Lights again. Have you ever seen the polar light? Or are you planning to do so? Tell me your story in the comments below.


Great! 👌
Great article! I would note, however, that while the article suggests that you need to be above the polar circle, you can without a doubt photograph them much farther south depending on the kp strength and where you're shooting from.
I've captured northern lights several times at 45 degrees North, though it will certainly not compare to a more northern showing. Looking over Kp maps you will see that a kp5 or 6 is commonly visible much farther south than the polar circle, especially in East-central North America. Food for thought!
Indeed, I did not mention how high KP strengths can be visible up to 45 degrees north. These are often far from spectacular when seen from these latitudes, although even the slightest visibility is always great.
In my experience the further North the latitude the lower you should have your shutter speed for start trails. I usually will not shoot more then 4/s to 8/s exposures due to the starts trailing. At the 10/s at 62 degree latitude, I find it make the stars just a a touch trails seeming out of focus. I also find in Canada 62 degrees seems to be the best latitude for viewing in Yellowknife a) it has the most consistent Aurora in Canada and b) its weather also seems to be more favourable to clear skies.