
As photographers, it is easy to get caught up on what is in the middle of the frame and ignore what may fall on the edges. But, the edges can actually have a surprising impact on how successful your compositions are, and being more purposeful about that part of the image can really improve your photographs!
]When many of us initially learned how to compose a photograph beyond blindly pointing and shooting, the focus was on what happens in the middle of an image or in the thirds of the composition if you are following the rule of thirds. You may have been taught to put your subject on the intersection points of a grid dividing your image into thirds or perhaps in the middle, and that was that. However, the edges of the frame, though they don't get as much attention in lessons, also have a big impact. Taking the time to look around your viewfinder (or live view) screen fully to check what is falling on or near the edges can help take your compositions to the next level.
There are two main things to think about with the edges of the frame: cutting your subject off just slightly or having your subject too close to the edge of the frame. Both are extremely easy to do, especially when dealing with moving subjects, and both usually result in a less than ideal composition.
Cutting Subjects Off

The image on the left was taken first when I wasn't paying close attention to the edges. I awkwardly cropped two places on her body, resulting in a far from strong composition. I noticed, however, and adjusted, resulting in the image on the right.
Cutting subjects off purposefully is a totally acceptable thing to do, of course. The three-quarters headshot is a great example of this. One fourth of the body is cropped out of the image, and it looks just fine. But, when you just barely crop out a piece of the subject, whether it be toes or the tip of a head, it has the tendency to look accidental. And when things look accidental, when it comes to photography compositions at least, it can also look unprofessional. So, if you are going to crop your subject out, try to do so on the substantial end of things. Go big or go home, as the saying goes, right? Otherwise, getting into the habit of leaving a little extra room around your subject will help prevent this. That extra room will also come in handy if you decide that you want to crop things later, which may be a necessity if you are posting to Instagram (because of the dreaded 4:5 ratio) or printing to an aspect ratio different from what your camera took the image at.
If you get to the post-processing part of the process and you notice an image that barely cuts off toes or something of the sort, don't feel like it's a failed image and toss it in the trash. Cropping images in even more can usually improve the composition, making it possible to save those almost-there images! Sometimes, cropping to a different aspect ratio can make a big difference as well, so don't forget to play around with that. Cropping to save a composition won't always work, especially if it's the tip of the head or the edge of a shoulder that you cut off, but it is absolutely worth a shot.

I wasn't a fan of how I barely cut off my dog's feet in the image on the left. In this case, the image was destined for Instagram, and the dreaded Instagram crop actually improved the composition.
Putting Subjects Too Close to the Edge

Although it's a small part of the image, the elbow being so incredibly close to the edge of the frame creates tension and takes away from the composition.
The other common issue I see in compositions is putting a piece of a subject or the entire subject too close to the edge of the frame. Leaving nothing but a sliver in between your subject and the edge of the frame creates tension in images, which isn’t usually a good thing. Instead, leave some room in between the edge of the composition and your subject. This gives the eye room to roam around the image more freely. It also provides some visual breaks, which is helpful for a successful composition. Some images will be really unbalanced if you put your subject too close to the edge of the frame as well, which is another reason to watch out for this.

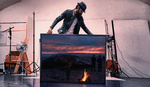
The image on the left is very unbalanced and feels awkward with the painter that close to the edge. With more room around her, as in the image on the right, the composition becomes much more successful.
Images with the subject too close to the edge could potentially be fixed in one of two ways, depending on the situation. At times, just as above, cropping in so that you are purposefully cropping the subject can improve the composition and save the image. Or, if the setting of the photograph lends itself to this, and depending on your editing skills, you could extend the background to add more room around the subject. Studio shots with solid backgrounds lend themselves well to this method, as do images with out-of-focus foliage.
Slow Down
The easiest way to avoid both of these problems is to simply slow down while shooting and take the time to look all the way around the edge of your viewfinder. I had a professor in one of my undergraduate classes that told us on a regular basis to do that just that, and I am so grateful for that advice. I am still guilty of making these two mistakes from time to time, but it happens much less frequently when I slow myself down. Of course, it's much more difficult when you are photographing a moving subject or a situation where you don't have time to slow down, but getting into the habit of paying attention to the edges of the frame when you do have that option of slowing down will help lessen the frequency of bad edges when you have to react to a scene quickly. As with most things in life, building a habit when conditions are ideal makes it more likely to stick around when they are not.


While this may seem obvious to most like myself, I like how you broke this down into a clear, concise article. I'm sure a lot of beginners are going to find this incredibly helpful. Thanks for putting this together! Articles like these are what make Fstoppers a great resource.
I really appreciate that! Thank you!