Metering and exposure are uneasy companions. Although they seem to work well together on the surface, the metering can trick you into exposing badly. Here are some experiments showing you how to take control of exposure and use it creatively, especially in aperture priority mode.
There’s an enormous amount of nonsense written about cameras’ exposure modes. I roll my eyes when I hear people must use manual mode. That’s utter poppycock. Understanding how manual mode works is one thing. However, being told you must use it is another.
I am a fan of aperture priority. It does a lot of the heavy lifting for photographers. Its big advantage is that the camera will expose the image according to the metering. The equally big disadvantage is also that the camera will automatically expose according to the metering. Let me explain.
If you are unaware, this mode lets the photographer set the aperture, and the camera automatically adjusts the shutter speed. Turning the mode dial around to A (Av on a Canon) gives the photographer fast control over the camera’s settings.

All other brands label their mode dials A for aperture priority and S for Shutter priority. Canon are different, calling them Av and Tv respectively.
When shooting events such as weddings, I invariably use aperture priority. Why? Because of the constantly changing lighting conditions and the camera’s speediness at compensating for that. It can switch from 1/60th second to 1/2,000th far faster than I can turn a dial when in manual mode.
Furthermore, the camera places restrictions on the exposure settings that are not there in shutter priority or manual mode, making it far less likely that I will accidentally shoot an incorrect exposure. “What,” I hear you gasp, “an experienced professional photographer can make a mistake?” You had better believe it, and it can happen to anyone. Admittedly, the risk of doing so has reduced since switching to mirrorless; I can see both the histogram and a close representation of the final image through the viewfinder before pressing the shutter. That assistance notwithstanding, the exposure is limited by both the widest and smallest apertures. I can set the aperture to either extreme and still get the correct exposure.
Moreover, aperture priority is a great way to learn the counterintuitive way metering and exposure work together. That is why I am using it for the following experiments.
Experiment One
With your camera set to ISO 100 (200 if you use Micro Four Thirds), in aperture priority, take test shots at the widest and narrowest apertures in a dimly lit room. On a standard kit lens, this may be something like f/3.5 and f/22, respectively. The exposure will be the same at each extreme, although you might struggle to handhold the camera at the narrowest apertures because the shutter is open for too long.
Experiment Two
Now, do the same in shutter priority. At one extreme, the image will be pure white and at the other, very dark. The correct exposure will cover an area somewhere in between the two extremes.
In shutter priority, the camera is restricted by the longest and shortest shutter speeds. That range is from 60 seconds to 1/32,000 second on my camera, though yours may differ from that. Thus, it makes it possible to accidentally and catastrophically over- or underexpose your photos.
Experiment Three
Next, while indoors, set your camera to take a shot correctly exposed in manual mode. Then, step outside into bright daylight. How long does it take you to adjust the settings to get the correct exposure? Try that again in aperture priority. Now, the correct exposure should be acquired instantaneously.

Even on a dull day, outdoors is usually much brighter than indoors.
Experiment Four
There is a problem to overcome with that approach, though. The metering might trick the camera to expose incorrectly.
Your camera expects the world — on average — to be a particular brightness. The sky is bright, the ground is darker, and there is a mix of tones between. This is a simplified explanation, but on average, it thinks the world is mid-toned, often referred to as mid-gray or 18% gray.

Shooting "contre jour" towards the sun may result in your camera underexposing. Unless this is the effect you are looking for, then adding positive exposure compensation is necessary.
Make sure that your camera is set to its whole-frame metering mode. This is variously called matrix, multi, multiple, multi-segment, multi-pattern, evaluative, or ESP, depending upon your camera brand.
In aperture priority mode, take a photograph of a common outdoor scene, such as a park or a tree-lined street. The picture should expose correctly. Now, fill the frame with something white, like a sheet of paper. You might have to draw an X on it first so the camera can focus. Look at the photo on your back screen. It will appear gray. Your camera was misled by all that whiteness. It expected the frame to be mid-toned and not pure white, so it reduced the exposure accordingly.
To override the metering, you must add positive exposure compensation to brighten the image. This may require pressing a button marked +/- and turning the main dial, called the command dial on some cameras. Alternatively, if your camera is equipped with a second dial, turn that clockwise. You should see an indicator in the viewfinder that shows the exposure is increasing. Turn it to about +1.7 and photograph the piece of paper again. It should not appear white. The precise amount of exposure compensation may change from camera to camera.
What does this mean in the real world? If you are shooting a very bright scene, such as snow, the sunlit sea, or bright sand, you need to add positive exposure compensation to brighten the image, or the camera will make it too dark. It may seem counterintuitive to brighten a photo of a bright scene, but it is what you must do. I apply exposure compensation to almost every photo I shoot, which is why I only buy cameras with two dials.
Experiment Five
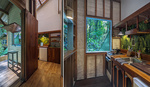
The exact opposite is true of shooting something black. Put the exposure compensation back to zero and fill the frame with something entirely black, such as the back of a camera bag. Look at the picture. Again, it looks grey and not black. This time, you must dial in negative exposure compensation. Try -1.7. So, if you are photographing in a dark room and you want to show that darkness in a photo, you must therefore dial in negative exposure compensation to make all those shadows look dark.

Dialing in underexposure made the barely lit black curtains on the left appear dark. Without exposure compensation, they would have appeared mid gray, the man would not have been a silhouette, and the lit areas would have been blown out.
Experiment Six
You can use under- and overexposure creatively. In a dimly lit room, use a bright light to illuminate a subject. Or, if you are outside, look for shafts of sunlight shining through the shadows of trees or buildings. Dial in even more underexposure until the shadows become black and the brightly lit highlights are mid-toned.

Early morning sunlight illuminated this tree trunk. Reducing the exposure further darkened the low-lit background.
Experiment Seven
Now, look for a very bright scene with a dark element. Dial overexposure in until the scene becomes nearly white and the dark element moves into the midtones.

By overexposing, the shadows are moved up into the midtones and the midtones into the highlights, giving a graphic quality to the image.
Experiment Eight
The sensors on cameras allow varying amounts of leeway for correcting exposure mistakes. If your camera has got it a bit wrong and especially if you shoot raw, then you can usually correct it in post-processing, although it is always better to try to get it right in camera. However, if you push it too far, you will lose details and may introduce noise when brightening a shot. Consequently, it’s good to know how far you can push exposure in either direction and still get good results.Try repeatedly shooting a scene. Increase and decrease the exposure. How far can you push it in either direction while still getting acceptable outcomes in processing?

Although aperture priority is great in most circumstances, it isn't the only mode on the camera. Others are better depending upon the circumstances, such as the OM System's Live Composite mode that I used to capture these fireworks.
This article is just brushing the surface of exposure, and there is a lot more to it than what I have included in this short article. Feel free to post your experiment results in the comments. Please ask any questions there too. Additionally, Fstoppers has a fabulous course available that will help you get to grips with other aspects of exposure and the essential camera techniques. Many of the writers here also run hands-on workshops, and it's worth checking to find out if there is one in your vicinity.