Sending off old negatives can be time-consuming and even a little costly. Here is how you can develop film using just your camera, tripod, and a light source.
With the passing of my grandfather last year, I have been helping clear his house. The volume of memories he has kept is staggering and while many are letters and documents, there are also a wealth of photographs and negatives. As if photographer and YouTuber Mark Hotlze's intention, a video tutorial on how to digitize and develop negatives and slides using your digital camera was uploaded by him.
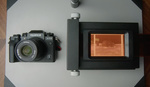
The technique is more straightforward than I had expected, with the bulk of the workload being in the post-processing which I have no issues with. All you do is use a macro lens at 1:1 and put the film on a light source. I have many LED continuous lights I use so I can just place a piece of film on one and away I go. The results are impressive and I will be spending some of my time in isolation doing just this!


His approach is crude, to say the least. If you're not shooting RAW make sure you white balance your light source prior to shooting your images. Even with the most minimal setups he's shown you should cut out a window from a piece of thin cardboard from, say, a cereal box, and use as an aperture mask it to keep all the excess light from flaring the lens and, ultimately, your image. Depending on your setup, lay the cutout on top or below of your chrome or neg. This will increase contrast and sharpness.
Film plane curvature will always be a problem scanning film, especially chromes left mounted in their paper or plastic mounts, and especially in crude setups like these. Notice how all the edges of his images are out of focus.
Try to align your sensor's plane with the film plane as parallel as possible on all four corners. It's tricky in setups like these, but do your best. If your camera body allows for focus bracketing, shoot a few frames to ensure all the live areas are in focus and stack in an app like Photoshop, GIMP, Affinity Photo, or any of the open source or commercial stacking apps available. If your camera doesn't have focus bracketing, you will have to do it by hand. This will ensure your image is focused edge-to-edge. Don't count on being stopped down for extra depth of field when in macro mode. ;-)
If your light surface is strong enough, you can scotch tape your neg strips to help flatten them out, just fold over a small tab on the tape so you can gently and safely remove the tape without ripping your negs. Cardboard/plastic aperture window cutouts to reduce flare can also help flatten the film strip, depending on what material you make them out of.
Some images may need multiple exposures to extract all the highlight and shadow detail in the image, so once you have a good setup, shoot anywhere between 3-5 frames 1-stop apart and stack 'em into an HDR image in any of the previous apps mentioned or any app that allows you HDR stacking, and adjust accordingly. Obviously you won't need to do this for most images, but you'll probably run across a few that could use it.
I guess that was more than 2 cents worth, but you may want to keep these points in mind when copying your chromes and negs with your digital camera.
Fantastic additional tips mate, thank you! Honestly I was impressed with the results I was able to get just following the puck. Honestly I don't have a lot of dedicated stuff, but through a little trial and error, especially the slide film stuff I was happy with the results. More importantly, the impact showing my parents these after so many years has been huge. Film negatives are a different story, but I kind of like the blurred image around the subject in SOME instances.
I'm definitely not a master at it, but the exercise was rewarding and the impact it had made it worth the effort to share.
Thanks so much for your added expertise on the subject, this was about as figuring it out as you go as I could get lol.
Hopefully everyone is staying safe and sane during these very strange times.
Yes I understand these are good setups for most people laying around with a lot of time on their hands and no gear. Staying parallel even in the simplest setups goes a long way tho. :-) Many old images are already blurred on the edges so it's not always so important to have everything in focus. But even in the simplest of setups if you do need the edges stacking is pretty much the only game in town.
Have fun everyone, and I wish everyone great health always.
Sincerely appreciate it, wouldn't have pulled these out if it wasn't for the need to fill the time. Glad I did though, seeing some stuff in there that I've never seen before...and honestly viewing images through a projector is mind bending. For OLD TECH, it sure knows how to make an impact.
Do not use scotch tape or any other adhesive tape. I would use matte black card stock from an artist supply store, plus a hobby knife to cut the edges clean. tape a straight edge to act as a guide on top of this card stock on one side.
Then use a ruler as a weight to hold the other edge of the negative down, Cover the ruler with the black card stock to reduce reflections from that too. If the negative strip is not sitting flat, get a similar second ruler/straight edge to hold down the other side.
If you have many negatives create a hinge at the ends of the rulers and use more card stock to have the two rulers at a fixed distance apart suitable for the negative.strip.
Refine as necessary.
I used scotch tape for years when I did professional darkroom work back in the 80s, never a problem with it, always a handy way to stretch negs to flatten them. Black opaque vinyl tape allows you to cover the sprocket holes while you're at it.
Another option for flattening negs is to get some old metal enlarger film strip holders. They'll clamp the negs down and they already have and aperture window.
All these tips are useful ! As I decided to scan my negatives/slides, 135 and 6x6, I started to use the ES-2 Nikon. And it works pretty well ! Even with and old lens like the 60mm AFD and an old D700 (I don't need bigger files).
But for the 6x6, I used a black paper, in which I nicely cut a 6x6 square, after precise measurement. I taped one side of the paper on a thin led lightbox usually used for drawing. I slide the negative under, with a manual anti-dust blow plastic thing to avoid most of the dust (not sure what is the word for this, usually used for dust on the sensor). And on top I put a small glass (a bit smaller than the A4 lightbox) to flatten the whole thing. I don't have any newton circles due to the small thickness of the paper.
I tethered my D700 mounted on tripod on Capture One. I use the Liveview autofocus, which gives good results ! I pay attention to the speed, not to get blur. Aperture around 8, speed between 1/20 and 1/160, depending on exposure. Et voila !
You can see the result here :
https://www.stefan-gonzalevski.com/analog-work
Nice work, and nice shots.
Thank you !
Actually, it's better to use a plugin like negative lab pro. It does some amazing profile conversions and saves a lot of this manual hassle. You can do batch conversions too.
https://www.negativelabpro.com/guide/
Definitely, I actually downloaded the demo, but decided against using it because wanted to keep it "just the stuff I have". The bare min at this time seeing as people might be strapped for spending money and have excess time. Of course, that doesn't mean it's not a great option!
I still haven't used it, i should give it a try.
So that's how you "develop film."
thanks for the article. I tried "scanning" some old negatives with that method using my phone as a lightbox - unfortunately the pixels of the phone are showing in the "scanned" photo. So - please strike out the option to use a phone as a lightbox.
Now I need to find a way to get a proper lightbox to scan my old negatives :-)
If you can suspend the film somehow high enough away from the screen it will go out of focus. Perhaps a foam or plastic cutout about an inch high should do it.
I was walking around today and saw just the thing you need to shoot off your cellphone. :-)
Thanks - I built something from Lego - phone box and film holder. See in my FB post (the text in Hebrew, but the photos speak for themselves)
https://www.facebook.com/dror.avinun/posts/10158549974131929?comment_id=...
THAT is brilliant! wow! Nice Dror!
That's awesome dude! Add an aperture mask for the live frame and it'll be perfect!
I guess it depends on the soft box, I managed fine with mine as the threads are too tight to see even with a macro lens. You could also lay down something between the soft box and the slide. A piece of white acrylic could work for example. There's definitely some experimental aspects involved with doing this, I find it you plant some seeds, depending on what people have they can trouble shoot their own best solutions.
Thanks Mark,
In my first try I put the negative directly on the phone - that's when I saw the pixels. Then after some trials and errors and too much spare time, I built a box for the phone and a negative holder from lego parts - it's working pretty well and I got reasonable results.
I still need to see how to wrap the construction so I will not get light from the outside and improve the results.
"I still need to see how to wrap the construction so I will not get light from the outside and improve the results."
Just think of it as a darkroom. Set up your shot, shut your room lights off and pull down your blinds. ;-)
Thanks for the tips - I continued building the construction and now it also holds the DSLR so I do not need a tripod.
See the full FB post (in both Hebrew and English this time)
https://www.facebook.com/dror.avinun/posts/10158573492061929
That's awesome!