From time-lapse photography to video, many photographers need more battery power than their camera system can adequately hold on board. Whether it’s due to weight of the system creating three-axis time-lapse, the size of the camera with a grip, or the need for uninterrupted shooting, there is an answer for those looking to create images and video: the Case Relay from Tether Tools.
Case Relay is basically an answer to the limits of an onboard battery system for nearly any camera. Tether Tools has created a very quick and easy system that allows photographers to have uninterrupted shooting out of their equipment even when swapping a used battery and therefore never missing a moment. Though DIY creators have been hacking their cameras for a number of years, the Case Relay answers that approach with a quick and easy way to extend your battery power indefinitely.

The Tether Tools Case Relay
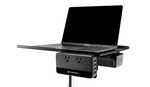
The base component of the three-piece kit is the Case Relay itself, an intermediary battery pack that is the central piece of kit between the DC Camera Coupler (a dummy battery specific to your camera model) and the Rock Solid External Battery Pack. Starting off with the Case Relay, this is the main part of your new power system, which also encloses a 1,200mAh 7.4V battery that allows you to hot-swap from another power source or battery pack on the go without losing power to your camera. Basically, your camera body is pulling power from the Case Relay itself while the relay continuously charges its internal battery from the external battery pack. When that external battery is completely discharged, you can supplement another external battery without losing power to your camera, because it’s running on the Case Relay's internal battery. This ability to hot-swap your power source is great, especially when you’re shooting continuously for a long duration of time or in colder temperatures where batteries don’t last as long.

The Tether Tools Rock Solid External Battery Pack front view
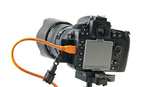
The Tether Tools DC Camera Coupler is where your camera connects to the Case Relay. For many camera systems, this is simply a dummy battery that is inserted into your camera’s battery compartment, and the power cord passes through a rubber gasket located next to your camera's battery compartment. If you haven’t ever noticed this gasket, take your camera out and check around the battery compartment, and you’ll notice a rubber flap that seals the compartment when not in use. For some other camera systems, the DC Camera Coupler can plug directly into the power port on the side of your camera.
The final part of the system is the Tether Tools Rock Solid External Battery, which is a 10,000 mAh battery pack with two USB type-A 5V outputs with one offering a 2.1A output and the other offering a 1A output. When shooting, you’ll primarily connect the 2.1A output to the relay, and you could potentially charge another piece of kit at the same time. The battery pack is solid and is in a slick form factor that takes up very little space and has no buttons to accidentally press and leave on while in your bag.

The Tether Tools Rock Solid External Battery Pack power ports side view
The entire system links together seamlessly and when connected together in the sequence dictated in the instructions, worked flawlessly. The Case Relay and external battery pack powered through continuously for over 1,000 15-second images in 40-degree weather without any issues and still having power in the external Tether Tools Rock Solid External Battery Pack. The battery pack light was orange, which meant that there was still at least 35 percent of the battery left. Normally, I would have ran out of power with a gripped 5D Mark III after about 600 images in similar conditions. Since most of my time-lapses are at most about 500 images, I have at least two days' worth of shooting on one battery pack rather than looking to recharge batteries between shoots or carrying extra batteries. For understanding, I’m usually shooting with three gripped cameras at the same time for time-lapse and static imagery and carrying about 12 batteries in my kit so I have backups.
You aren’t limited to using the Tether Tools Rock Solid External Battery Pack, as you can potentially use any other 5V 2.1A output external battery to connect to the system or use the AC Wall Adapter for unlimited power. I do like that I can’t accidentally turn on the Tether Tools Rock Solid External Battery Pack, which I have done with other battery packs when traveling, and they’ve been drained when I arrived at my destination. What this also means is that if you already have an external battery pack to charge your mobile devices, you already have power for the kit, and with a Case Relay and DC Camera Coupler, you have a whole system that can power your kit longer than most camera system’s battery options.

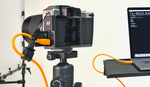
Tether Tools Case Relay connected to the Rock Solid External Battery Pack
When using the kit I also had the Tether Tools StrapMoore to hold the battery pack in place. The strap is fairly easy to attach to any tripod leg or similar circumference piece of kit, and the neoprene holds the kit very well without any issue of the battery slipping through. There are available extender straps that can be added to the StrapMoore to add additional battery options or hold onto larger circumference objects.
When working with the Case Relay, I noticed that the cable is only long enough for a two-foot slider; otherwise, I would need a Case Relay Extension Cable added to the kit for the four to five foot slider length I normally shoot with. You could attach the kit to the dolly portion of a slider, but you are adding weight to a portion of your equipment you don’t want to accidentally move during imaging. I would simply advise getting the extension cable and have more options on where to place the relay and battery away from the moving portion of your kit.

Tether Tools Case Relay System connected to three-axis time-lapse rig
Originally, when I worked with the Case Relay system, I did not follow the outlined steps to connect the external battery and Case Relay to the camera and noticed that the Case Relay light eventually turned yellow and then red. This meant that the relay was not being charged even with the system connected. The correct way to connect the Case Relay system is to connect the Case Relay to the DC Camera Coupler, then connect to the external battery or power, and lastly, insert the DC Camera Coupler into the camera and turn the camera power switch on. This way, the battery is charging the relay before it begins providing power to the camera system.
Likes:
- Removes weight from a three-axis time-lapse rig and allows the weight to be centered off the moving part of the kit.
- Easy to hot-swap batteries or power during operation and not need to stop shooting.
- Rock Solid External Battery cannot be accidentally turned on.
- Compared to additional batteries and grips, not much additional kit with more positives for shooting.
- DC Wall Adapter allows for unlimited power.
Dislikes:
- If you don’t connect everything per the instructions, you may run out of battery before the end of the shoot, because the system never connected to the external battery pack.
- No way to confirm exactly how much battery power left in the Rock Solid External Battery and the Case Relay, only a rough estimate of 100-70 percent, 70-35 percent, or 35-0 percent.
Overall, if you’re shooting time-lapse or video where removing weight from the camera or gaining more battery life is needed, the Case Relay works very well and allows you to dictate the power and shoot duration you want and not by how long one or two batteries may last. You can purchase the Case Relay system here.