
When I travel, I stay in each location I visit for several days to increase my chances of encountering great light. But even a week is sometimes not enough to get a single colorful sunrise or sunset. Either the sky remains free of clouds or it's completely overcast, preventing any interesting light from breaking through. Night photography is one way of dealing with a clear sky. But what can you do during gray weather?
When clouds cover the sky, you still have something to work with if those show structure. You can experiment with black and white photography and work out the details in those clouds. Or you wait until blue hour to breathe some color into the sky. If it's just flat gray, you can try to photograph woodland, waterfalls, or subjects that allow you to exclude the sky from the photo.
But as the gray weather drags on, you'll likely be longing to photograph some dramatic light at some point. The good news is that a gray sky can give you just that if you head to the right place at the right time.

The city of Ica in Peru illuminates the deep clouds over the desert town Huacachina.
Light Pollution
The absence of complete darkness can negatively impact plants, animals, and humans. Because of that, light pollution is usually viewed as something negative. Landscape photographers often try to avoid it to keep the illusion of untouched nature and not show any signs of human civilization in their photos. For astrophotographers, it's even more important to know where to find dark places. Apps like Plan.it Pro or the Lightpollutionmap help with that.
But if you want to turn a gray sky into a burning sky, you can use light pollution or sky glow to your advantage. In that case, you'll be looking for a place with a lot of light pollution. Those places are in or close to larger cities, which create so-called light domes at night. They can give a gray sky with low and medium clouds an intense orange glow.
This happened while I was photographing Playa de la Arnia one morning. The city Santander behind the cliffs in the distance lit up the medium clouds to create a spectacular scene that looks like a dramatic sunrise.

The photo of Playa de la Arnia was exposed for close to 10 minutes to get a good balance between foreground and sky.
Sky glow is best experienced at the beginning of blue hour in the morning or at its end in the evening. Because it's pretty dark outside, you'll often have to expose for a minute or longer to show details in the landscape. An alternative is to increase the ISO in your camera, which will allow you to expose for a shorter time at the cost of image quality.
I usually use high-ISO photos to fine-tune my composition in the dark and to get an idea of how the glow will look in the final image. To the naked eye, it will often appear much less spectacular than what the camera reveals during a long exposure. A shorter exposure at high ISO can also help to calculate the correct exposure time for the final photo at low ISO. If you have to expose for 10 seconds at ISO 1,600 to get good tonal distribution in the image, you must keep the shutter open for 160 seconds at ISO 100 for a similar result.
To capture the whole dynamic range of the scene, you should also include some shorter exposures to keep the bright orange colors from clipping. Another technique you can apply is time blending, about which I talked in a previous article. If your foreground is too dark when you capture the sky glow, take additional photos during blue hour and use those to reveal more details via exposure blending.
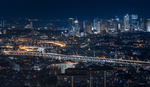
In the morning, I usually keep my camera in place after capturing the glow and take additional photos for the foreground once it gets brighter. In the evening, I start my photo shoot around sunset to photograph the complete transition from day to night. The photo of the Kuala Lumpur skyline shows how a gray sky around sunset first turns blue and then begins to pick up the reflected light of the city.

Balance
It doesn't always require as much glow as in the photo of Playa de la Arnia to achieve an interesting result. Sometimes, just a touch of orange or magenta color in the sky is enough, as shown in the Kuala Lumpur photo. Had I taken it later, the whole sky with most of the city would have turned orange. At that time, the image would have had a noticeable color cast, which is usually hard to correct. If the incandescent lights of a city are the sole light source of a photo, the natural colors will disappear behind an orange veil. For a well-balanced image, you'll want to avoid this monochromatic look. The goal is to show at least one additional dominant color.
If you time your exposure right, the blue hour will provide this balance. At some point, the orange glow and the ambient light in the sky are at an equilibrium. It is the moment you should try to capture. Keep your camera in place throughout the morning or evening, and take many photos. Later, pick the one showing the best colors for post-processing, or combine multiple images for the best result.

To achieve balance, you often don't need for the whole sky to glow. Sometimes, just a touch of orange or magenta will do the trick.
Photo Editing
You must be careful if you want to blend photos taken throughout a period of changing light. The colors of blue hour often don't mix well with those captured when the sky is glowing. If your goal is to use the blue hour photos to reveal more details while keeping the colors of the sky glow image, you can make use of the Luminosity blend mode:
-
Make the photo with the glowing sky the base layer.
-
Put the blue hour images on top and set their layer mode to Luminosity.
-
If there have been shifts between the different images, select all layers and use Edit - Auto-Align Layers....
-
Apply a black mask to all layers except your base layer.
-
Use a soft, white brush and start painting in the details.
In addition to those steps, it helps to adjust white balance, brightness, and contrast during raw processing to better match the photos before loading them into layers in Photoshop. This step is something you should do in preparation of any exposure blending. It will help you create much more seamless results. If you equalize the images properly, you don't even need special masking techniques during the blending.


Thanks for this. You have a lot of ideas that interest me, especially light pollution as a positive.
Saving this article. Thanks!
Very interesting and informative article. Thank You. I now have some serious homework to do 😆