
Seascape photography is a challenging yet rewarding genre of photography. The dynamic nature of the sea makes taking photos at the coast very exciting, but it also requires a unique set of skills and knowledge. And that's what I'll share in this article as seven tips that'll help you take your seascape photography to the next level.
Know the Tides and the Swell
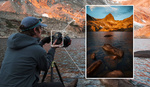
The importance of knowing the tides when you head out to the coast is no mystery. Sites like Tides4Fishing or the app Nautide provide you with the necessary information. And since the tides follow a natural rhythm caused by the gravitational pull of the moon and the sun, it's possible to plan a trip to the coast weeks or even months in advance.
But not so fast. There's more to understanding the movement of the water than checking a tide table. Swell plays an equally important part. To capture a dynamic seascape photo, you need a way to predict swell and surf. And while the weather at the location you want to photograph plays a role, the origin of a large swell can be much farther away.
The good thing is that there are apps that help with the prediction. The popular weather app Windy has a model for predicting wave height built in. You can also check sites like magicseaweed or Surf Forecast.


This photo was taken on the first evening at Dominicalito beach with a lower tide and less swell. It already got pretty wet during this shoot, so I knew that during the second evening, I had to find another spot.
Get the Timing Right
Seascape photography is a lot about timing. Since your main subject is in constant motion, the moment you take a photo can make a huge difference. You can press the shutter when a wave crashes onto the shore, when the water flows up the beach, when it flows back into the sea, or as it changes its course.
The photo of the sea stack at Praia da Adraga shows the instant the water stopped climbing up the beach. I captured a perfect line of fine bubbles leading to the sea stack. Timing this photo was essential to create foreground interest.

When I take such photos, I don't want my camera to shake when pressing the shutter, and I also cannot use a two-second timer. That's why I consider a cable release or remote one of the most important pieces of equipment for seascape photography. Use a cable release and activate the burst mode of your camera to capture multiple photos in quick succession. It increases your chance of capturing the perfect moment.
If the dynamic range of the scene is too high for a single exposure, photograph a bracketed sequence before or after you dedicate your focus to the water's movement. Graduated neutral density filters will also help in such situations.
Combine Exposures
When I've locked in on a composition, it's not uncommon for me to take 50 or more photos of the exact same scene. Each photo will show slightly different movement, waves, and patterns in the sea. If I'm lucky, I will have a single photo at the end showing all the elements that I need to tell the story about a location. But this doesn't always work.

If you use a tripod, all those photos will align when you load them as layers into software like Photoshop. Often, you'll have some images where the waves in the middle ground break beautifully, then a few that show splashes in the foreground, and another set that captures all the dynamic range in the background. You can use masks to combine those and create an even more captivating result, as I show in the video below.
Find Tidal Pools
You don't always need movement when you take photos at the coast. Especially on calmer days, tidal pools are a great compositional element that benefits from the lack of wind. During low tide, these puddles can create beautiful reflections.

You must be careful, though. While you are at a beach looking for tidal pools, avoid walking through potential compositions. Work yourself slowly forward with your camera in hand, so you can regularly check if there's a photo. If you already know a location, it can be a great help because larger pools usually form in the same areas.
In the video below, I show how you can use scouting to get the most out of a single photo shoot at a tidal beach.
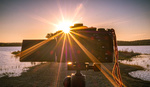
Get Into the Water
To create the most dynamic perspectives in your seascape photos, immerse yourself in the subject. Getting at least your feet wet is something you shouldn't try to avoid. If the water is too cold, use neoprene or boundary socks. If you photograph a tropical beach, you'll not have these problems. But still, protect your feet by wearing water shoes.

While you take photos with the water rushing around you, keep a close look at the waves and never turn your back on the ocean. Be prepared to retreat quickly if a rogue wave approaches. It also helps to protect your camera with a rain cover, just in case. What you will also need is a good lens cloth. I use large Muxel Bamboo cloths to clean my lenses and filters at the coast. A large microfiber towel is also helpful.
I learned another way of keeping filters free from spray in Indonesia. The local photographers were using a small electrical fan, which seemed to work great at keeping the lens clean. I did a quick search online and found the KiCA JetFan, which looks like it could do the job. I don't know how such a device fares in wet conditions, so it might help to wrap it.
In the seascape photography tutorial below, I share more tips on how to keep your gear operable at the coast.
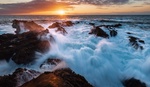
Use the Right Exposure Times
Most of the seascape photos online show water blurred by its motion. If you want to replicate this effect, use exposure times of 1/4 second or longer. If you extend your exposure times to several seconds, the sea will take on an ethereal look, and the water, especially if there are a lot of waves, will look like fog.

You can achieve such long exposure times by photographing before sunrise or after sunset, or you use neutral density filters. A 3-stop filter like the Kase Wolverine ND8 is usually sufficient to get long enough exposures at sunrise and sunset. As it gets brighter, you'll need at least an ND64 filter. Or you take many photos, load them as layers into Photoshop, combine them into a Smart Object, and go to "Layers - Smart Objects - Stack Mode - Mean."
But don't default to using long exposures at the coast. Especially on stormy days with a large swell, it can be much more effective to use short exposure times if you want to show the power of the sea. It will also maintain more texture in the water, which can work well with a detailed environment, as in the example photo of Alfanzina Lighthouse in Portugal.

Include the Surroundings
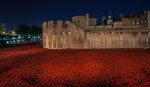
Seascapes are not just about the water. Try to incorporate the shore, rocks, cliffs, and other elements characteristic of the coast you are photographing into your compositions. Coastal flowers are also something you should look for. They can introduce additional colors and make your photos appear more vibrant.
When you compose such photos, think about balance. Photographing along the coast, you'll usually have the ocean on one side of the frame and the land on the other. The photo below is an example with a very prominent foreground that anchors the composition. It allowed me to have a slight imbalance in the background, with the cliff face on the left but only the open sea on the right side. Thanks to the foreground and color harmony in the photo, it still feels balanced.


Conclusion
The tips above covered topics including preparation over equipment, technique, composition, and photo editing. And although I tried to cover a lot of ground in this article, there's more you can do to take stunning seascape photos. One thing I didn't talk about, for example, is using a telephoto lens to capture details in the water or along the coast. Especially on stormy days with a large swell, this is a great way to capture truly unique photos.


Nice article. A Nitecore BlowerBaby trumps the fan IMO and is also just generally great for blowing dust off of sensors, from around lens mounts, etc.
For me..is it wrong to exclusively photograph seacapes(portrait photo with seacapes) and pretty girls? I am enamored with both in my photography
good article, well written.
some tips i didn't know and i've been doing this more than 50 years!
Great article Michael. I carry a rocket blower for the spray so that during longer exposures you can use it quite frequently without any interference in the shot, but I'm going to check out the fan, thank you.
Awesome tips! I personally go nuts with a 10-stop ND filter to turn the water to glass when the waves themselves aren't doing something interesting.