
My favorite light for shooting landscapes is definitely sidelight. Still, I won’t let the position of the sun stop me from photographing great locations. You shouldn’t, too. There are plenty of options to become creative.
There are many challenges which we face when shooting against the sun. The brightness of the sun in contrast to the shadow side of a landscape creates a dynamic range, which even our eyes can’t manage at times. Additionally, we have to deal with flat colors and sun flares. Shooting against the sun is anything but easy. It’s at least hard, if not impossible to shoot a “normal” looking landscape against the sun.
But who cares about normal? Shooting against the sun also prevents you from creating snapshots. You have to make creative decisions and think about what you're doing, after all. I guess nobody would care for the Mesa Arch if it wasn’t for a sunray photograph at exactly the right timing (Google it, it’s really a little boring without the right light).

Don't be scared of the direction of light. You can work around it.
But you don’t need a famous landmark to shoot against the sun. In fact, I found myself shooting against the sun quite often at average (still beautiful) places to create nice effects in my photographs.
You can do it, too! Here are five tips on how you can deal with the sun shining into your face.
Leave the Sun Out of the Frame
The first tip is quite simple, but not really creative. When your photographs lack color and seem flat, it might be enough to keep the sun outside of the frame. Additionally, you should screw your lens hood on and maybe even block the sun in front of your lens. Your photograph will become more saturated when you block the sun – even if it’s not in the frame.
The reason is the different elements inside of your lens. When sunlight enters the glass from a flat angle, it becomes diffused within the glass and flattens the whole photograph. There is hardly a case where we want to have that effect. On location, use your hand, a filter bag, or whatever you find to block the sun.

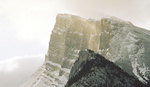
Sometimes, you can wait until the sun gets naturally blocked. Even though the area is blown out, the bright light adds to the image.
Work With Silhouettes
The high dynamic range of a photograph with a bright sky and a dark foreground is a big challenge, which you can work around with filters (graduated NDs) or HDR photography. In many cases, it isn’t necessary to work around it, when you can use the contrast for your purposes.
Silhouettes don’t show a lot of structure and detail, but our brain is smart enough to understand simple shapes. Usually, the simplicity of a silhouette is just beautiful. Plus, they are easy to create.
There are two easy ways to capture a silhouette. You can photograph against the sun and keep it outside of the frame, or you can place the sun directly behind your subject. In this case, you'll get a nice rim light on the edges of your silhouette.
In both cases, you need to expose for the sky. Your exposure should only slightly touch the right side of your histogram to keep as much detail as possible. Don’t worry about your subject being totally dark; that’s what you want. Especially when you find some clouds in the sky, this method will look great, because you might get a red burning sky and a dark, contrasty shape in the foreground.

Misty and diffuse light in front of you is great to create silhouettes, too.
Create Sunrays With Small Apertures
You don’t always need to keep the sun outside of the frame. Our (almost) infinite source of energy makes a great subject, too. But how can you make that white, blown-out area appear the way we learned to draw a sun as a child? Sunrays are the answer. And they are not that hard to capture as well.
At first, you need a small aperture. The blades inside of your lens give shape to your sunrays. The smaller your aperture, the more defined your sunrays. You’ve got to try a bit with your own lens to figure out what suits you best. For me, it’s all the way down to f/22. F/16 still works great, too.

The sun sends it's rays along the area, where it is blocked.
If we photograph right into the full sun with f/22, it will still appear quite messy rather than defined. Hence, we need to partly obscure the sun for the best results. That might be done by a tree, the edge of a rock, or simply the horizon. But be aware: Especially in the case of the horizon, you need to be quick. The sun rises and disappears faster than it seems at the horizon. You have around one minute to get your shot done. Preparation is key, here.

Use this effect to create a full sun by letting it peek through an object.
Make the Sun Visible in Other Objects
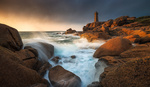
You can make the magic of the sun become visible without including it in your shot. When the sun is still – or already – above your subject and the horizon, but yet distributes its golden hour light, you can still catch its rays.
Early spring – and also late autumn – are great seasons to photograph fog and mist. Overnight, the humid air will cool down and let the water condensate into small droplets. If you find yourself at a lake, you might also find mist condensing from the water surface, when the sun warms it up. With the right point of view and a few trees to obscure parts of the sunlight, you’ll add a magical mood to your photographs.

Sunrays can even become visible when the sun is higher up in the sky
Wait for the Colors
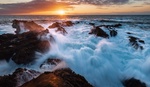
Sunsets are objectively beautiful and especially at the seaside where you will find a lot of sungazers hypnotized by the sinking sun. If there are no clouds in the sky, I still find it a waste of time to try to get a great picture of the sunset itself. Instead, I wait for the sun to disappear below the horizon. Especially in spring and autumn, you’ll have a lot of time shooting with the colorful residual light from the sky. Purple, red, blue, black. Everything is there to create a unique and moody photograph.
The lower contrast of your scene even gives you some detail on the shadow side of your landscape, because you can shoot a higher exposure without blowing out the sky — if you like. HDR will do a great job here and you can even pick your grad ND as well. Some of the results will make you start questioning the supremacy of the golden hour!

The atlantic sea at the blue hour. Even though there was room to expose the scene brighter, I love the lack of detail in the sand.
You Can’t Change the Conditions
As long as you are not an extraordinarily wealthy and powerful person, you can’t change the weather by blowing some silver iodide into the sky. And you will probably never manage to change the earth’s orbit. Hence, you have to deal with what nature gives you, and that’s quite a lot. There aren't a lot of reasons to not shoot a landscape. There are only challenges, which you can accept and try to push your skills a little further. What’s your own experience with shooting into the sun or when did it annoy you the most? I’m happy to read your stories in the comments.

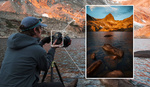


This reminds me of my frustration with going to Big Bend. There are beautiful places for sunsets but every time I go, the sky is almost completely cloudless and if windy there is a layer of dust in the air. Below is one of my solutions photographing at The Window on a cloudless and dusty evening and just using the gradient in the post-sunset sky.
I have hard times photographing when it's sunny and I generally avoid it and add some sun rays in Photoworks afterwards if needed. It may not be the best option for learning but at least I don't have these annoying shadows
Hey Jenny, that's a nice work around with a big "but". The light always needs to fit to the fake sun rays. And most of the time they fit best, if they are really there. You need the sun in front of you, at least. I guess it's better to take the challenge and shoot under hard conditions than avoiding them and rely on post processing. Editing should only enhance what's already there, in my point of view.
Photography in foggy weather is always a tricky. Your auto always looks for middle gray (18%). You need to understand the simple zone system to compensate. NYC skyline in the fog.