Photography is as much about what you show in your photos as it is about what you hide. Too many details can overwhelm the viewer. You can already be selective about what you include in an image when you capture it. There are also several techniques that help you simplify a photo in post-processing. One way to do so is by introducing a darker mood and by shrouding less important areas in darkness.
The photo-editing techniques I show below work best for images taken on cloudy and rainy days. The soft light you get then provides the foundation for applying a dark processing to your images. Photos taken on brighter days can also benefit from these techniques to a certain degree. But I would refrain from giving every image a dark look and try to show different atmospheres in your photos.
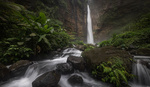
Now, let's look at the before and after comparison for a photo I took at 25 Fontes in Madeira. The starting material was already processed in Lightroom to provide an even distribution of details and light. Focus stacking and exposure blending were also applied. While the photo captures some of the atmosphere of the day, it still looks pretty flat. This often happens on overcast days when you don't have directional light to work with.
To add dimension and depth to a photo while hiding some of the less important details, several techniques can be applied.


Dark Mood
In the feature video, you can follow along as I apply dark processing to the photo from 25 Fontes. My tool of choice for that is the Camera Raw Filter. It allows me to tweak many different settings in one step instead of having to rely on several adjustment layers in Photoshop:
- Create a Smart Object from your current edit. Select all layers in your layer stack, right-click on one of them, and press Convert to Smart Object.
- With the Smart Object active, go to Filter - Camera Raw Filter... or press Ctrl/Cmd + Shift + A. It will open the Camera Raw window.
- Here, you can work with as many of the adjustments from Camera Raw as you need to create a moodier version of the photo. I usually bring down the Exposure and reduce the Dehaze. Those two sliders combined make the image already much moodier. You can prevent your darks from clipping with the shadows and blacks sliders. Since the photo gets softer overall, there's some room to add texture, contrast, and a touch of clarity. Be creative. If the image gets too saturated, reduce the vibrance.

- Those settings are applied to the whole image after you press OK. Since you created a Smart Object, you already have a mask linked to the filter. Invert it by clicking on it and pressing Ctrl/Cmd + I. Then, reveal the effect in the areas you want to subdue by painting in the mask with a soft, white brush.

In the example photo, I applied this technique primarily to the outer areas to direct the viewer towards the flow of water in the foreground and then to the waterfall in the background.
Atmosphere
Aside from darkening a photo, you can also add atmosphere. Especially with waterfall photos, it can help to introduce more depth. Typically, there will already be spray close to a waterfall. If that's the case, you can enhance it with the techniques I show in the video below. If there is no spray to work with, you can completely make it up. Just don't go overboard with the edit. Try to keep it realistic.
My preferred way of creating an atmosphere is to use the Clouds filter. To get started, some preparation is required:
-
Create a new, empty layer in Photoshop.
-
Use the rectangular marquee tool and make a small selection in the center of the layer.
-
Apply the Clouds filter under Filter - Render to the selection.
-
Press Ctrl/Cmd + T to activate the free transformation tool and expand the selection across the complete frame. You can increase the size of the rectangle beyond the image area if necessary. Stop once you feel the structures begin to look like spray.
-
Go to Image - Adjustments - Levels... or press Ctrl/Cmd + L and bring up the blacks in the Levels slider. It reduces the contrast in the cloud pattern.
-
Apply a slight Gaussian Blur to the clouds to reduce the details.
-
In the Channels panel Ctrl/Cmd + Left Mouse Click on the RGB channel. It loads the cloud pattern as a selection.
-
Delete the current cloud layer and create a new, empty layer.
-
Apply a mask to this new layer with the active selection.
You can add atmosphere by drawing in the layer with a soft brush in different shades of gray. Use a low opacity between 10 and 20% and gradually build up the effect. The cloud mask will instantly apply structure to it and make it look more realistic.

Soft Light Bleed
After making the image darker and adding atmosphere, it helps to introduce some light. You can achieve this by applying the light bleed technique I show in the following video.
Here, it's important to practice restraint and not add too much glow. Ask yourself: if this light had been present in reality, would it have introduced hard shadows? If the answer is yes, reduce the opacity of the effect. The goal is to create a soft light source.
Again, work with a Smart Object and use the Camera Raw Filter. Increases to temperature and vibrance together with a reduction of dehaze usually do the trick. As with the dark mood, selectively apply the effect to the areas where you want the light to bleed into the frame. In my 25 Fontes photo, you can see how I applied it to the top of the frame. A viewer's gaze can drift through the photo, starting in the darker areas at the bottom, then following the stream to the waterfall and light in the background.
Conclusion
There are many adjustments you can use to give your photos a dark look. And as usual with Photoshop, there are different ways to get to the final result. But the underlying principles are the same: darkening less important areas of the photo while keeping the blacks from clipping, adding atmosphere to introduce depth, and applying a soft glow to draw the viewer and add dimension. The degree to which you apply such processing depends solely on your preferences.


Nice tutorials. I made Action from the second one, so it works quickly. Excellent lightening and darkening action