As you progress in landscape photography, you might find yourself wondering how others get everything in focus within their images. In this article series and video, I'll go over how to focus stack while in the field and what to do once you sit down to process your images.
Focus stacking could be considered a more advanced technique within photography, but many times, it's not all that difficult to accomplish. Within this article, we'll go over what I consider to be a more complicated edit than your standard focus stack, but I will include resources at the end for other types you might encounter. Focus stacking is relatively the same in execution, but you might find different challenges depending on the image you're trying to create. Here are a few I've personally dealt with:

- Gradual focus shift: This is what you'll encounter the majority of the time in landscape photography. Imagine you're shooting with a wide angle lens in portrait orientation. You're placed relatively close to your foreground subject, but you'd also like to have the background in focus. The focal plane from the bottom of the composition to the top moves gradually as the distance of subjects moves farther away from the lens. This is typically the easiest type of focus stack to edit together.
- Large focus shift: The composition includes foreground elements with a large distance between the background. This large distance causes a big shift in focus between your foreground and background that is difficult to blend together. This is the type of focus stack we'll be editing within this two-part series. The biggest challenge is getting a cohesive edge between your elements that looks natural.
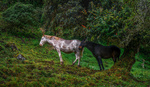
- Object separation: This is typically a mix of the above two scenarios. Imagine you're taking the same shot as the gradual focal plane example, but it's of a tree with many branches sticking out in the composition. This causes large separations of focus between branches and background and can be extremely challenging to edit, but there are options to make our lives easier.
Understanding that you'll encounter different types of focus stacks is important, and I highly recommend starting out by trying to find a composition similar to the one described in the gradual focus shift to get your feet wet. Speaking of, let's get our feet wet and jump into what you'll need to do in the field.
In the Field

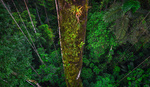
This soil was so fragile that even with a tripod, I had trouble getting stable images.
As with many techniques in landscape photography, you'll definitely need a tripod and access to either a cable release or a self-timer on your camera. Unlike exposure bracketing, you can't really get away with a quick handheld focus stack, as you'll be shifting the focus between each image yourself. As for your in-camera settings, it will vary depending on your model and camera. That said, you'll want to shoot at the lowest ISO your camera will go, an aperture between f/8 and f/16, and your shutter speed shouldn't matter as long as you're on a tripod and there isn't anything moving in your composition. You might need to adjust your ISO accordingly if you need a faster shutter speed to capture something moving, like flowers.
You might be wondering why I don't strictly recommend f/16 as your aperture to get as much in focus as possible in a single shot. Every lens has a sweet spot at where it is the sharpest and that typically falls within the range I recommended. If this isn't something you know, just stick with f/11 and you'll probably never notice the difference.
How Many Shots Do You need?
Once you have your composition set up and you're ready to start taking photos, the biggest question you'll encounter is just how many shots you need to take. Data is inexpensive, so you can never take too many focal points, but sometimes, you might end up taking so many that you overwhelm yourself in editing. The best way to decide roughly how many points you need is to focus on your foreground subject, whatever the closest object you want in focus is. While using live view on the back of your camera, you should have a magnification tool to zoom into the image. Once you have zoomed in, navigate through your image to where the focus starts to visibly fall off and refocus to that point and take a shot. Continue to do this through your image, mentally noting where you shifted focus while taking shots through the process.

The amount of shots I should have taken to achieve perfect focus
The shots you just took likely won't be the images you use to do a final edit because there may be too much time in between causing shifts in light, but it's good to take them to refer back to. What is important is knowing a rough estimate of where you shifted focus and how many points you'll need. Once you know this, you can go back through your image quickly with very little time in between shots to help prevent any changes in your environment.
The example we're using throughout this tutorial could have used an extra focal point. Actually, it could have used three more if I wanted to get every single element in focus. I wanted to take as few images as possible to get the edit as simple as I could, but in the end, I should have taken at least one more image, which you'll see in greater detail in part two of this tutorial once we get into edit the image.
Shifting Focus
All that's left to do is take your photos. I'm assuming most readers here have a camera that has autofocus and live view, but it's entirely possible you might be using a manual focus lens. If you're using an autofocus setup, all you'll need to do is navigate through your image by either touching to focus on live view or moving the focal point with your camera's controls if you don't have a touch screen. Do this as quickly as possible through your image, as sudden light shifts can make blending much more difficult.

Using touch to focus on a Canon R5.
If you're shooting with manual focus, you'll just need to use the magnification tool in live view and move through the image just like you did when you were finding all your focal points in the step above while manually focusing on each point. Keep in mind because you'll be touching the lens, you might have more movement between images, which can be even more exaggerated at longer focal lengths. Do your best to shift focus without moving the framing of the shot.
Conclusion
That wraps up what you'll need to do in the field to capture a focus stack. Thankfully, no matter what type of image you're trying to focus stack, the methods in the field remain the same. Post-processing is where you'll encounter different obstacles, as you'll see in part two of this tutorial.
I'd love to know if you have any other tips when you're in the field, taking images you plan on stacking later on. Or, simply share the images you've already captured. As always, thanks for reading, and be on the lookout for part two of this tutorial next week!


What happened to Part Two?