It's that time of the year when landscape photographers get most excited. But after you've captured that stunning forest of textures and colors, are you getting the most out of your image in Lightroom or Adobe Camera Raw?
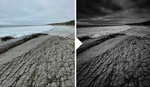
Fall is my favorite season. The air is crisp and Halloween is just around the corner. But what's on my mind is photography. Getting out there is the easy part, taking the right shot is the hard part, but editing the best shot can be more complicated than you think. Those colors are already vibrant, so if you don't know what you're doing, it's so easy to clip them, which results in a loss of detail.
Gone are the days of dragging the saturation and clarity sliders all the way to the right. The bar is much higher now, and a good editor knows how to finesse an image and tease out those colors. In this video from f64 Academy, we're shown exactly that. For me, the most important part to pay attention to is the oft-overlooked Calibration section, tucked away at the bottom of the adjustments panel. After discovering how to use it properly a couple of years ago, my workflow evolved and my images have become more refined, because it helps me to think about color more critically. f64 Academy gives a great overview of the panel and the other panels here, so I highly recommend giving it a watch.


Step 1, don't live in Central Texas.
Step 2. Click this next video where I tell you how to actually do it in photoshop but not after wasting your time with tips on how you can sorta do in Lightroom but then suggest that you shouldn't.