I've been flying drones for about five years, treating them like another lens in my landscape kit. My current drone is a DJI Air 2S, which has a one-inch sensor to give me an excellent 20 MP image. I like the drone as a tool because it can get me views I otherwise would never see, so on most trips, I get an equal amount of images from my DSLR and my drone.
My processing has evolved over the years as new tools have been developed that can greatly assist my editing. I used to be a Lightroom/Photoshop editor only, but now, that's changed.
To begin, and I probably don't need to say it, but just in case, I always shoot raw. I need all the data that I can get, and happily, DJI and most other drones offer raw files right out of the camera from the onboard microSD card.
For this tutorial, I've pulled an image from a recent trip to the Alabama Hills near Lone Pine, California. It's a marvelous place for landscape photography, and the Alabama Hills have been a filming location for many major movies, including How the West Was Won, Tremors, Iron Man, and hundreds of westerns and sci-fi movies. It's drone friendly, and usually, you can have the place pretty much to yourself.
In capsule form, my workflow looks like this. Raw image into DxO PureRaw -> Adobe Camera Raw -> Photoshop -> Topaz Sharpen AI as a PS plugin -> Luminar Neo as a PS plugin -> then back to PS for a final save and rendering to 16-bit TIFF and 8-bit JPEG for the web.
Let me go over the steps I take in some depth.
My first stop is always DxO PureRAW 2. It's a great, must-have utility for starting any image-editing session. The folks at DxO have data on just about any lens/sensor combination and can fix any anomalies in your optical path, including light fall-off in the corners, fringing, optical distortions, and more.
 Happily, recently, DxO added the DJI family of drones, so it automatically recognizes my optics and sensor and corrects for them. The process is automatic. It gets the camera/lens info from your metadata in the image and applies the corrections. The result is always good geometry corrections, vignette removal, and some sharpening. The results are so striking and so positive I would not process any drone image without a first stop with DxO PureRAW. My screenshots really don't represent the quality change as well as if you could see the original file, but in split screen, you can see the improvement. I'm zoomed in to 2x on this shot, so you can't see how DxO PureRAW deals with vignettes in the corners, but they are gone.

The DxO software keeps the image as a DNG, so the image is set to automatically open in Photoshop, which obligingly opens Camera Raw at launch. My first workflow item there is to select the Adobe Landscape profile, which on most of my images, improves on the default camera profile.
 I may also use a slight bump with the dehaze tool, as the Sierra Nevada Mountains are pretty distant. From Adobe Camera Raw, I open the file in Photoshop.
Without touching the image at this point, I almost always add Topaz Sharpen AI. You might ask why another round of sharpening after DxO PureRAW is needed? The answer is it's a different kind of sharpening. DxO does some optical sharpening, but Topaz automatically senses some motion blur. It's almost impossible to avoid if there is any wind, and of course, the drone propellers are providing some motion blur. Topaz corrects for the blur, and I almost always get a tack sharp image.
 Then, it's time for the Luminar Neo contribution. I use it mainly as a Photoshop plugin. Neo is a pretty new offering from Skylum, and just recently, they added AI Masking, linear and radial gradients, and a few other enhancements. I use the AI enhancement tools sparingly, but they make a big difference. Where Neo outclasses Adobe is with sky replacement. I often encounter what I call "severe clear" skies, which don't offer much to a landscape photo. Sometimes, I adjust my composition to avoid the sky, but here, in this wide drone view, I replaced the sky. I always use my own skies and match the weather and time of day, so I think the change helped.
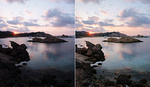
 I also used Neo color controls to get the color of the rocks closer to what I saw when I was there. It was a sligh but helpful adjustment. Here's a before and after.
 If you look at the two images, you can see that little changes add up. PureRAW gave me a very clean DNG file. With Camera Raw in Photoshop, I could dehaze effectively, and Topaz Sharpen AI fixed any motion blur caused by winds and the drone. Luminar Neo gave me some nice color and contrast enhancements and corrections and let me add one of my previously shot skies that I think made for a better image.
Drone cameras have come a long way, and some newer offerings to editors like DxO PureRAW and Topaz AI Sharpen along with Luminar Neo can have visible impact. And I still use Photoshop and Lightroom in my edits as well. This is a great time to be a landscape photographer, and drone photographers have better tools than ever. All the software and tools I use are available for both the Mac and Windows computers.