Creating an even, flattering light in the studio doesn't have to be difficult. In this tutorial, I will show you three simple parallel lighting hacks to make portraits that everyone from the boardroom to Broadway will love.
What Is Parallel Lighting?
Parallel lighting is a two-light setup in which one light is placed on each side of your subject, parallel to each other and perpendicular to the ground. Although I use the Westcott Peter Hurley Flex Kit, the same results can be achieved using strobes and 1' x 3' strip boxes. There are many reasons to love parallel lighting, but the biggest benefit is that it creates an even, flattering light, without heavy shadows. It works well for all ages, genders, and also for corporate, acting, modeling, and other kinds of clients. And, because it is fairly simple to do, it is perfect for beginners who are just getting to know their way around the studio.
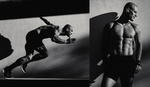
Tarik lit with parallel lighting. Each light is pointed towards his opposite shoulder in order to create an even and pleasing light.
Setup One: Pleasing, Even Results
In our first setup, we are going for an even, flattering light, that has no harsh shadows on the face. The first thing we want to do is place each light about twelve inches in front of our subject, and as close to each other as possible without the lights obscuring the subject's shoulders. The most important thing is to make sure to feather the lights. Feathering is achieved by not pointing the light directly at the subject, but instead angling it so that only the edge of the light hits their face. This is crucial because feathering will create a soft, pleasing light, whereas pointing the light directly at your subject will result in harsher highlights and shadows. Feathering in the parallel setup is fairly easy to do. Point the center of the left light towards the camera-right shoulder, and the right light towards the camera-left shoulder, instead of at the face.
Next, take a moment to make sure your subject is in the sweet spot of the light, because if they are ahead or behind the light convergence, they will have strange shadows on their face. You want your subject in the space where both lights meet, since the softest light will be in this area. It will probably be somewhere around twelve inches from the lights, but remember that finding the sweet spot is a game of millimeters, so keep an eye on how the light is falling across the face and adjust accordingly.
That's it! It really is that simple to do and people will love how they look using this light. I also opt for parallel lighting when I have a client with highly reflective glasses. Typically, I use a three light setup with a bottom fill, but removing the bottom light makes dealing with glare much easier, and the parallel setup provides similar results to the three light setup with a lower fill.
Dana lit with parallel lighting. Angling the subject is easy since the light does not drastically change from one side to the other as with a key/fill combination.
A Great Setup for Beginners
Besides being fairly easy to do, there is another reason to love parallel lighting, which benefits beginners. Since the light is even across all of the face, you can easily turn your subject's nose to the right or left without greatly changing the results, as with a key/fill setup. The benefit here is that you can focus on posing your client and finding their best angle without worrying about a dramatic change in the light if you turn their face from side to side. And although I avoid a “set it and forget it” approach to studio lighting, the basic setup can be tweaked fairly quickly if the subject is photographed with their nose either left or right.
Setup Two: Lots of Falloff and Drama
Now that we’ve learned the basics of parallel lighting, it’s time to create a different look using the same basic setup. Instead of opting for a flat, even light, we can create more drama by intentionally shadowing both sides of the subject's face. This variation of parallel lighting is excellent for actors, artists, or anyone who wants a unique portrait (I've used this for corporate work as well). In order to further heighten the drama, I opt for a very wide aperture and intentionally blur out the subject's ears and body. This results in most of the attention being drawn towards the eyes.
Tarik lit with parallel light, heavily feathered, and color graded.
In order to achieve this look, point the lights directly at each other, so the subject's face is lit only with the extreme edge of the lights. The sides of your subject’s face will be obscured in shadow, as well as being slightly out of focus, if you opt for a wide aperture. I further suggest using a black V-flat on each side of your subject for more intense shadows. As before, we want the lights to be as close as possible without interfering in the composition, but if you shoot vertically and crop out the shoulders, you can place them even closer together.
When I use this setup, I also like to color grade or create black and white versions for even more variety. I prefer my Canon 50mm f/1.4 lens for this work and often get in close to the subject. Just keep in mind that even a 50mm lens will distort a person’s face when very close, so this might not be the best method depending on your client’s unique features. A fast 85mm or 100mm will yield excellent results, of course, so make sure to experiment with lenses and apertures to find a look that you love.
Jesse lit with parallel light, extremely feathered so that only the extreme edges of the light hit the center of his face. This creates a more dramatic look, especially when combined with a shallow depth of field.
Setup 3: Add a Kicker Light
In our last setup, we add a third light to our parallel setup to use as a kicker, which creates a vertical strip of light down the side of the subject’s face. One thing to watch out for is the power level of your kicker, because if it’s too bright, all detail will be lost, resulting in a blown out highlight with zero detial. I prefer subtle kick that does not draw attention away from the subject's expression, and ensures the skin texture is retained.
The kick can be placed on either side of the subject in parallel lighting. Make sure that it is behind the subject, and not facing them directly. Generally I point my kick towards the opposite side of the subject, so if it's placed behind them camera right, it is pointed towards the left wall. My kicker is generally between 10% and 20%, but this varies depending on the subject’s skin tone. As before, once your lights are set, you can have your subject move their head to the left or right to see how the results change. Standard practice is to point the nose away from the kicker light, but as always I think that experimenting is the best way to learn, so don't be afraid to try different angles of the face and shoulders.
Tarik lit with parallel light and a kicker light placed behind him, camera right. The kicker adds a subtle strip of light to the side of his face.
Loose Ends
Although I use and prefer continuous lights, all of this can be done with strobes. Make sure to use either 1' x 3' or 1' x 2' strip boxes placed as close as possible to the subject as possible to create any of the results in this tutorial. Using large soft boxes will not work since the light spreads too much. I also use V-flat World v-flats, but black poster board on a light stand will do the job too Finally, always be aware of the ambient light in your studio space as it will impact your final image. I learned all of these parallel lighting techniques from Peter Hurley and Ivan Weiss, so go check out their work as well for more inspiration.
I hope you have enjoyed this tutorial and try out some of these techniques that have worked well for me!
Pete Coco is a portrait photographer and musician based in New York. When not performing as a jazz bassist, Pete can be found in his studio working with a wide range of clients, although is passion is creating unique portraits of other musicians and artists.
Hi Pete, thanks for the informative video. When shooting portraits, do you typically cut/trim the top of people's heads or capture them in their entirety? In your article, you have both. Do you have a preference? Are there times when you find one works better than the other? Kind regards, Mark
Thanks Mark! I never cut the top of the heads off in camera because most people want (or need) a vertical headshot for corporate use. I give them both crops but prefer the horizontal close crop and encourage them to use that one since it's more engaging. The horizontal crop is more common in acting headshots.


Nice overview! I'll need to try that out on some of my next clients! Thanks Pete!
Thanks Daniel! Glad is was helpful!
Hi Pete, thanks for the informative video. When shooting portraits, do you typically cut/trim the top of people's heads or capture them in their entirety? In your article, you have both. Do you have a preference? Are there times when you find one works better than the other? Kind regards, Mark
Thanks Mark! I never cut the top of the heads off in camera because most people want (or need) a vertical headshot for corporate use. I give them both crops but prefer the horizontal close crop and encourage them to use that one since it's more engaging. The horizontal crop is more common in acting headshots.